I still remember the first time I made smothered chicken with rice — it was a Tuesday night, I was starving, and my roommate had dared me to make something "actually edible" for once. Challenge accepted. What happened next was pure kitchen magic: the smell of onions hitting hot butter, the sizzle of chicken skin crisping up, and that moment when the rice absorbed every last drop of that luscious gravy. By the time we sat down to eat, we were both speechless, alternating between moans of delight and aggressive fork-stabbing to get the last bits from the pan. That night, I discovered what comfort food truly means, and I've been perfecting this recipe ever since.
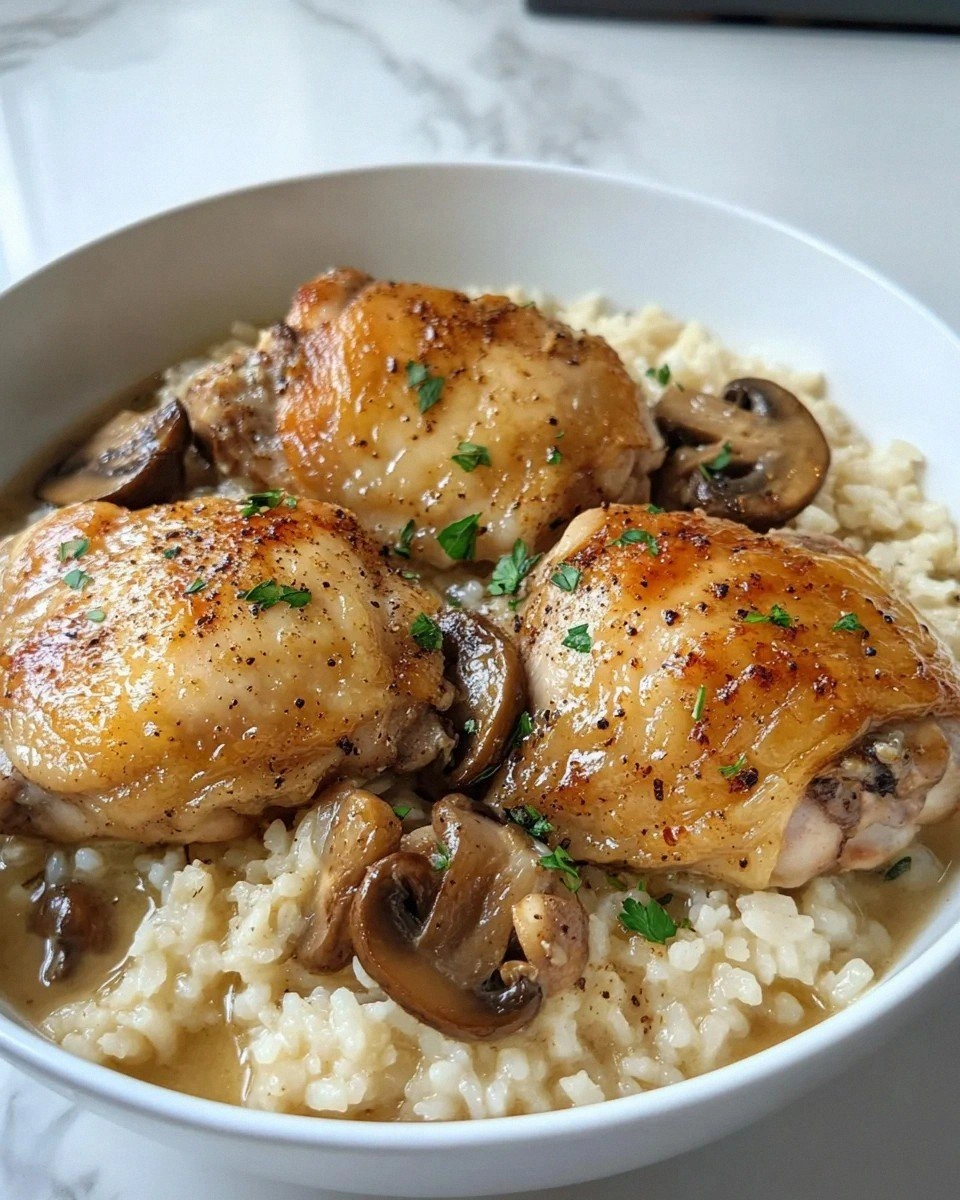
Picture this: tender chicken thighs, skin-on and bone-in for maximum flavor, nestled in a velvety gravy that's been slow-cooked with earthy mushrooms, sweet onions, and aromatic garlic. The rice isn't just a side dish — it's the unsung hero, soaking up all those incredible flavors like a sponge, transforming into something far greater than the sum of its parts. This isn't just dinner; it's a warm hug in a bowl, a dish that makes strangers ask for the recipe and family members request it for every gathering.
What sets this version apart? It's the technique I've developed after years of trial and error. Most recipes rush through the browning step or use boneless, skinless chicken (blasphemy!), resulting in a flat, one-dimensional dish. Not here. We take our time building layers of flavor, from the crispy chicken skin that gives way to juicy meat, to the fond (those brown bits on the pan) that becomes the backbone of our gravy. I've tested this recipe on picky eaters, food snobs, and my Southern grandmother — they all beg for seconds.
Let me walk you through every single step — by the end, you'll wonder how you ever made it any other way.
What Makes This Version Stand Out
- Skin-on, bone-in chicken: These aren't just pretty words — they're the secret to flavor that'll make your neighbors knock on your door. The skin renders its fat, basting the meat while creating crispy, golden perfection. The bones infuse the entire dish with depth that boneless cuts simply can't match.
- The two-stage cooking method: We sear first, then simmer — a technique that locks in juices while developing rich, complex flavors. Most recipes skip the sear or rush through it, leaving you with rubbery skin and bland meat. Here, patience pays off in spades.
- Homemade gravy built right in: Forget about opening a can of cream of whatever — we build our gravy from scratch using the fond from the chicken, fresh vegetables, and a handful of pantry staples. The result? A sauce so good you'll be tempted to drink it straight from the spoon.
- Rice that actually tastes like something: Instead of cooking rice separately, we let it simmer in the chicken gravy, absorbing every ounce of flavor. Each grain becomes a tiny vehicle for all that savory goodness — it's like risotto's more relaxed cousin.
- One-pot magic: Everything cooks in a single pan, meaning fewer dishes and more flavor. The chicken juices mingle with the rice, the vegetables release their essence into the gravy, and you get to kick back while the oven does the heavy lifting.
- Make-ahead friendly: This dish actually improves overnight as the flavors meld and deepen. Make it Sunday night, reheat Monday, and taste how the chicken becomes even more tender and the rice more flavorful. Your future self will thank you.
- Crowd-pleaser guaranteed: I've served this to toddlers who claim they hate mushrooms, teenagers who "don't eat anything green," and adults who swear they can't cook. They've all licked their plates clean and asked for the recipe before dessert.
Inside the Ingredient List
The Flavor Foundation
The chicken thighs are the star, but they're nothing without their supporting cast. Bone-in, skin-on thighs are non-negotiable here — the bones act as flavor conductors, releasing gelatin and minerals that transform our gravy from thin and watery to rich and silky. The skin provides two gifts: first, the rendered fat that becomes our cooking medium, and second, crispy cracklings that add textural contrast to every bite. When selecting your chicken, look for thighs that are plump with skin that's pale pink and slightly translucent, not dull or yellowing. I've tried this with boneless, skinless cuts — trust me, it's like watching a movie in black and white when you could have seen it in technicolor.
The onion is our aromatic workhorse, providing sweetness that balances the savory elements. I prefer yellow onions for their versatility, but if you want a slightly sharper edge, white onions work beautifully. The key is chopping them medium-small — too large and they won't cook down properly, too small and they'll disappear into the gravy. When they hit the hot fat, they'll release their water and natural sugars, creating the base of our flavor profile. Don't rush this step; properly caramelized onions are the difference between good and unforgettable.
The Umami Boosters
Mushrooms are the umami bombs that make this dish taste like it simmered for hours. I specify cremini because they've got more flavor than white button mushrooms but aren't as earthy as shiitakes, which can overwhelm the dish. When selecting mushrooms, look for ones that are firm and dry, not slimy or bruised. Slice them medium-thick so they maintain their texture during the long simmer. If you can't find cremini, baby bellas work just as well, and in a pinch, even regular button mushrooms will do. The key is not crowding the pan when you sauté them — give them space and they'll brown instead of steam.
Garlic adds that sharp, pungent note that cuts through the richness. I use three cloves because I want to taste it, not just know it's there. Mince it fine so it melts into the gravy, but don't add it until the onions have softened — garlic burns faster than a teenager's attention span, and burnt garlic will turn your entire dish bitter. If you're a true garlic lover (and honestly, who isn't?), you can smash one clove instead of mincing it for little pockets of intense garlic flavor.
The Spice Squad
Paprika brings more than just color — it adds a subtle sweetness and complexity that deepens as it cooks. I use regular sweet paprika, but if you want a smoky note, use half sweet and half smoked. The key is adding it at the right moment: after the vegetables have softened but before the liquid goes in. This blooms the spice in the hot fat, releasing its oils and intensifying its flavor. Don't substitute with generic "chili powder" — that's a blend that will throw off the balance of your dish.
Dried thyme is the herb that ties everything together with its earthy, slightly minty flavor. It's more concentrated than fresh, which is perfect for a dish that simmers for a while. If you only have fresh thyme, use three times as much and add it in the last ten minutes of cooking. Rub the dried thyme between your palms before adding it — this releases its essential oils and distributes it evenly. The combination of thyme with paprika creates that classic Southern flavor profile that makes people close their eyes and say "mmm" before they've even tasted it.
The Liquid Gold
Chicken broth is the vehicle that carries all our flavors. Homemade is best if you've got it — it's richer, more complex, and has that gelatinous quality that gives body to our gravy. If you're using store-bought, choose low-sodium so you can control the salt level. Warm it up before adding it to the pan — cold liquid shocks the ingredients and can make your chicken tough. The ratio of two cups broth to one cup rice creates the perfect texture: creamy but not soupy, with each grain distinct but cohesive.
The Final Flourish
Butter might seem redundant when we're using olive oil, but it's essential for that rich, restaurant-quality finish. It adds a silkiness that oil alone can't achieve, and its milk solids help thicken the gravy. Add it at the end, off the heat, so it melts gently without breaking. Use unsalted butter so you can control the salt level — you've already got salt in the broth and possibly in your spice blend. This final touch separates home cooking from restaurant quality.
Fresh parsley isn't just for color — it's the bright, clean note that cuts through all that richness. Chop it just before serving so it stays vibrant and doesn't wilt into the hot food. Flat-leaf parsley has more flavor than curly, but use what you have. If you want to get fancy, reserve some of the parsley stems — they're actually more flavorful than the leaves and add a nice texture when minced fine.
The Method — Step by Step
- Prep your chicken like a pro: Start by removing your chicken from the fridge 30 minutes before cooking — cold chicken seizes up when it hits hot fat, resulting in tough meat. Pat each thigh completely dry with paper towels, getting into all the nooks and crannies. Moisture is the enemy of crispy skin, and trust me, you want that skin crispy. Season generously with salt and pepper, getting under the skin where you can. This is the foundation of flavor, so don't be shy — most of the seasoning will end up in the final dish anyway.
- Get your pan screaming hot: Heat your olive oil in a heavy-bottomed skillet or Dutch oven over medium-high heat until it shimmers and just starts to smoke. This is crucial — if the pan isn't hot enough, the chicken will stick and the skin won't crisp. Test by flicking a drop of water into the oil — it should sizzle immediately but not violently. If you're using cast iron (which I highly recommend), give it an extra minute or two to heat through completely. That sizzle when the chicken hits the pan? That's the sound of flavor being created.
- Brown the chicken to golden perfection: Place the chicken skin-side down and don't touch it for at least 6-8 minutes. I know it's tempting to peek, but moving it around tears the skin and prevents proper browning. You want it deep golden brown, not just pale yellow — think the color of a perfectly toasted marshmallow. When it's ready, it will release easily from the pan. Flip and cook the other side for 4-5 minutes. Remove to a plate — they'll finish cooking later in the gravy. Those brown bits on the bottom? That's liquid gold, and we're about to use every speck.
- Build the flavor base: Lower the heat to medium and add the butter to the rendered chicken fat. When it foams, add your onions with a pinch of salt. The salt draws out moisture and helps them caramelize rather than steam. Cook for about 5 minutes, stirring occasionally, until they're translucent and starting to brown at the edges. If they're browning too quickly, lower the heat — burnt onions ruin everything.
- Add the aromatics: Stir in the mushrooms and cook until they release their liquid and start to brown, about 6-7 minutes. Don't crowd them — if your pan is small, work in batches. Once they're golden, add the garlic and cook for just 30 seconds until fragrant. Add the paprika and thyme, stirring constantly for another 30 seconds to bloom the spices. Your kitchen should smell incredible right now — like a warm, savory hug.
- Create the gravy: Pour in the chicken broth, scraping up all those beautiful brown bits with a wooden spoon. Bring to a boil, then reduce to a gentle simmer. The liquid should be about 1/2-inch deep in the pan — if it's too shallow, add a splash more broth. Taste and adjust seasoning with salt and pepper. Remember, the rice will absorb a lot of liquid, so make it slightly saltier than you think it should be.
- Bring it all together: Return the chicken and any accumulated juices to the pan, skin-side up. Nestle the pieces in so they're mostly submerged but the skin stays above the liquid — this keeps it crispy. Sprinkle the rice around and between the chicken pieces, making sure it's mostly covered by liquid. If needed, add a splash more broth so the rice has enough moisture to cook.
- Simmer to perfection: Cover tightly with a lid or foil and reduce heat to low. Simmer for 20-25 minutes, until the rice is tender and has absorbed most of the liquid. Check at 15 minutes — if it looks dry, add a splash more broth, but resist the urge to stir. When it's done, remove from heat and let it rest for 5 minutes. This allows the rice to finish cooking and the flavors to meld.
- Finish with flair: Remove the lid and marvel at what you've created — the chicken should be fork-tender, the rice fluffy and fragrant, and the gravy rich and aromatic. Sprinkle with fresh parsley and serve directly from the pan for maximum impact. I dare you to taste this and not go back for seconds.
That's it — you did it. But hold on, I've got a few more tricks that'll take this to another level...
Insider Tricks for Flawless Results
The Temperature Rule Nobody Follows
Here's the thing about cooking rice in a gravy — temperature control is everything. Too hot and the bottom burns before the top cooks; too low and you get mushy rice swimming in liquid. I use the "whisper test": when you lift the lid, you should hear a gentle whisper of steam, not violent bubbling or dead silence. If it's too vigorous, crack the lid slightly to release steam. Too quiet? Bump up the heat a notch. This one adjustment separates restaurant-quality results from home-cooking disasters. A friend tried skipping this step once — let's just say it didn't end well, and she had to order pizza for dinner.
Why Your Nose Knows Best
Don't underestimate the power of smell in cooking — it's your built-in timer. When the onions are perfectly caramelized, they'll smell sweet and slightly nutty, not sharp or raw. The mushrooms are done when they smell earthy and rich, not like wet earth. And here's the real secret: when the rice is perfectly cooked, you'll smell a toasty, nutty aroma that means the bottom is just starting to develop those coveted crispy bits. If you smell burning, you've gone too far — but catch it at that toasty moment and you've achieved rice nirvana. I always tell people to trust their nose over the clock — your kitchen timer might be off, but your olfactory system is perfectly calibrated.
The 5-Minute Rest That Changes Everything
I'm begging you — don't skip the resting period. I know the smell is driving you crazy and your family is circling like vultures, but those five minutes are transformative. During the rest, the rice finishes absorbing the last bits of liquid, the flavors redistribute throughout the dish, and the temperature equalizes so you don't burn your mouth on the first bite. More importantly, it allows the starches to set up properly so your rice isn't gummy or sticky. Cover it with a clean kitchen towel under the lid during the rest — the towel absorbs excess steam, keeping the rice fluffy instead of soggy. I'll be honest — I ate half the batch before anyone else got to try it because I couldn't wait, but the portions I saved for the next day were even better.
The Salt Timing Secret
When you add salt matters as much as how much you add. Season the chicken generously before browning — this seasons the meat itself and the rendered fat. But hold off on salting the final dish until after the rice has cooked. Rice absorbs liquid as it cooks, and if you season too early, the grains will absorb salty liquid and the whole dish can end up over-seasoned. Taste after cooking and adjust — you might be surprised how little additional salt it needs. The exception? A tiny pinch of salt on the onions helps them release moisture and caramelize better. This technique works for any rice dish, and once you master it, you'll never serve bland or over-salted food again.
The Crispy Skin Savior
If you want extra crispy skin (and who doesn't?), here's my secret weapon: after the dish finishes cooking, remove the chicken pieces to a separate pan and pop them under the broiler for 2-3 minutes. Watch them like a hawk — they go from perfect to burnt faster than you can say "dinner's ready." The direct heat re-crispens the skin that's gone soggy from steaming in the gravy. Meanwhile, let the rice rest in the covered pan. When you serve, place the chicken on top so everyone gets a piece with that satisfying crackle when you bite into it. This extra step is what separates good cooks from great ones — it's the difference between "this is delicious" and "holy cow, how did you get the skin so crispy?"
Creative Twists and Variations
This recipe is a playground. Here are some of my favorite ways to switch things up:
The Southern Comfort Version
Add a tablespoon of Worcestershire sauce to the gravy for extra umami, substitute smoked paprika for half the regular paprika, and throw in a bay leaf while it simmers. Finish with a splash of hot sauce at the table — not mixed in, so each person can control their heat level. This version tastes like Sunday dinner at your grandmother's house, assuming your grandmother was an incredible cook who knew her way around a spice cabinet.
The Mushroom Lover's Dream
Use a mix of mushrooms — cremini, shiitake, and oyster — for layers of earthy flavor. Add dried porcini mushrooms soaked in warm water, using the soaking liquid as part of your broth. The result is an intensely mushroomy dish that'll convert even mushroom skeptics. I once served this to a self-proclaimed mushroom hater who asked for seconds, then thirds, then the recipe.
The Spanish-Inspired Makeover
Swap the thyme for oregano, add a pinch of saffron to the broth, and include sliced Spanish chorizo with the onions. The saffron turns everything a beautiful golden color and adds that unmistakable Spanish flair. Use short-grain rice like bomba if you can find it — it creates a texture closer to paella than pilaf.
The Light and Bright Version
For a lighter take, use boneless, skinless thighs (I know, I know, but sometimes you need to be healthy) and replace half the rice with cauliflower rice. Add a handful of cherry tomatoes and some chopped fresh oregano. It's not the same dish, but it's delicious in its own right and won't leave you in a food coma.
The Comfort Food Extreme
Add heavy cream to the gravy in the last 5 minutes of cooking, stir in some frozen peas, and top with crispy fried onions. This is over-the-top comfort food — the kind of dish you make when someone needs a food hug. It's not elegant, but it's exactly what you want when you're having a terrible day or celebrating something wonderful.
The Asian Fusion Adventure
Replace the paprika with Chinese five-spice powder, swap the thyme for fresh ginger, and use jasmine rice instead of long-grain. Add a splash of soy sauce to the gravy and finish with sliced green onions and sesame seeds. It's a completely different dish that somehow still satisfies that comfort food craving, with an umami bomb that'll make your taste buds dance.
Storing and Bringing It Back to Life
Fridge Storage
This dish keeps beautifully in the fridge for up to 4 days, and honestly, day two might be even better than day one as the flavors continue to meld. Store in an airtight container — I prefer glass because it doesn't absorb odors or stains. Separate the chicken from the rice if you want to reheat them differently, but I usually just store everything together because the rice keeps absorbing flavor. Press plastic wrap directly onto the surface of the rice to prevent it from drying out. When reheating, add a splash of water or broth and cover loosely — it steams back to perfection. Whatever you do, don't microwave it on high power unless you enjoy rubbery chicken and exploding rice grains.
Freezer Friendly
You can freeze this dish for up to 3 months, but with one caveat: the texture of the rice will change slightly. It becomes a bit softer, but in a comfort food way that actually works. Freeze in individual portions for easy weeknight meals — nothing beats coming home to homemade comfort food that just needs reheating. Use freezer-safe containers or heavy-duty freezer bags, removing as much air as possible. Label with the date and contents because frozen rice dishes all look suspiciously similar after a month. Thaw overnight in the fridge, never on the counter, and add extra liquid when reheating since freezing draws out moisture.
Best Reheating Method
The oven is your friend here — cover with foil and reheat at 325°F for about 20 minutes, adding a splash of broth to keep everything moist. For smaller portions, the microwave works if you're careful: use 50% power, add liquid, and cover with a damp paper towel. The stovetop method is actually my favorite for individual portions — add everything to a small pan with a splash of water, cover, and heat gently over medium-low, stirring occasionally. Whatever method you choose, make sure the chicken reaches 165°F internally. And here's a pro tip: add a tiny splash of water before reheating — it steams back to perfection and prevents that dreaded dry, crunchy rice texture that happens when you reheat grains incorrectly.