I’ll be honest — I ate half the batch before anyone else got a chance to try it, and that’s because this Dark Chocolate Raspberry Cheesecake is hands down the best version you’ll ever make at home. The story began on a rainy Thursday when I tried to salvage a busted chocolate ganache and a wilted raspberry jam, and the kitchen turned into a laboratory of “what if?” moments. The air was thick with the scent of melted cocoa, the faint crackle of butter hitting a hot pan, and the bright, tart perfume of fresh raspberries that seemed to promise redemption. I was juggling a soggy crust and a lumpy filling, but the moment the chocolate hit the cream cheese, everything clicked like a perfectly timed jazz solo.
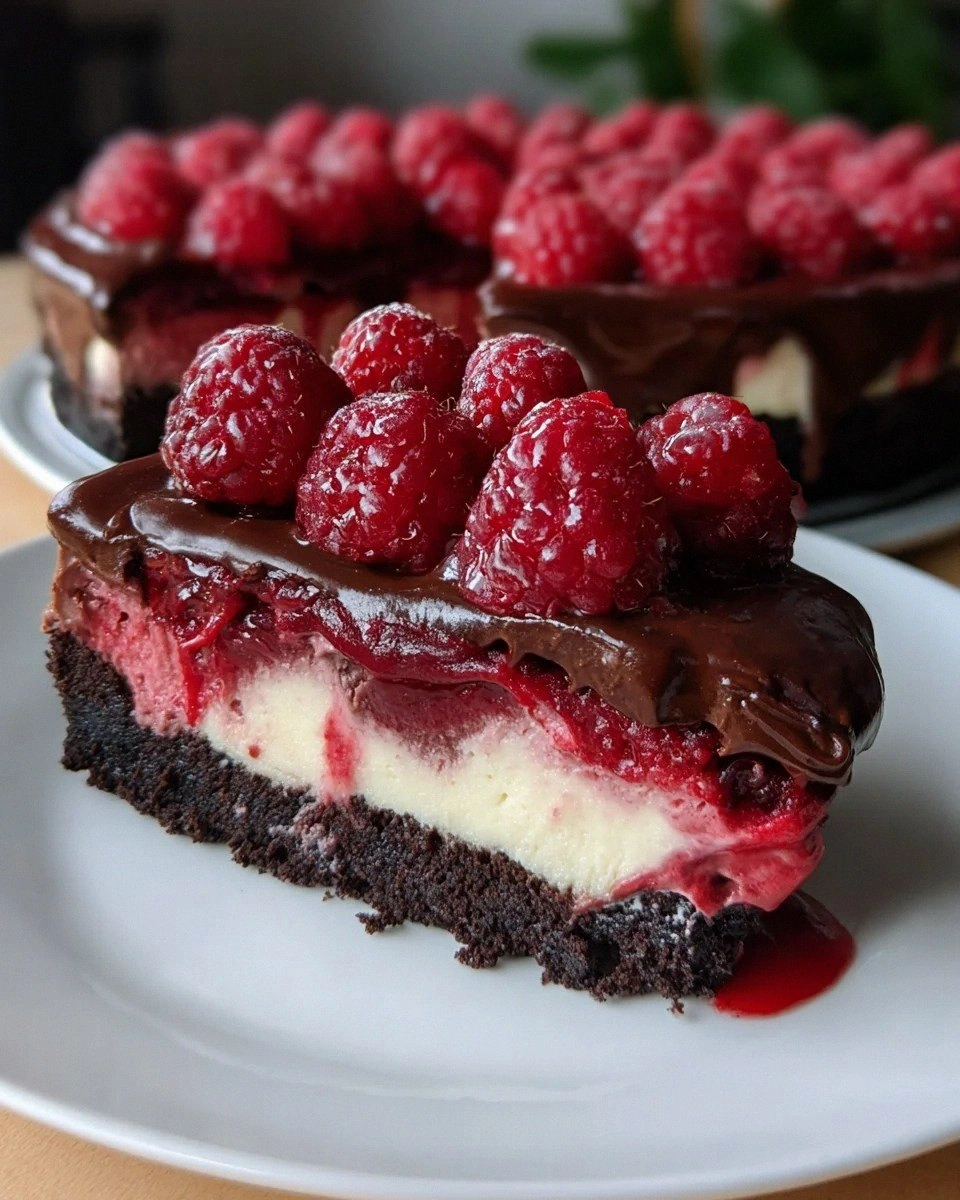
Imagine the first bite: a velvety dark chocolate swirl that hugs the tangy raspberry like a lover’s whisper, a buttery crumb base that shatters with a delicate snap, and a creamy, slightly tangy cheese layer that feels like a cloud made of silk. The texture contrast is so dramatic that your tongue does a little dance—soft, smooth, then a flash of crunch, then a burst of juicy fruit. The flavor profile is a daring duet of bitter, sweet, and tart, each note playing off the other without ever stealing the spotlight. That’s the magic I’m talking about, and I dare you to taste this and not go back for seconds.
Most recipes get this completely wrong. They either drown the raspberries in chocolate, leave the crust soggy, or over‑bake the filling until it turns into a rubbery slab. Here’s what actually works: a crust that stays crisp, a filling that stays creamy, and a raspberry swirl that stays vibrant. The secret isn’t a fancy gadget; it’s a simple technique of tempering the dark chocolate with a splash of cream cheese, and a timing trick that lets the cheesecake set just enough before the final chill. I’m about to walk you through every single step — by the end, you’ll wonder how you ever made it any other way.
Picture yourself pulling this out of the oven, the whole kitchen smelling like a chocolate‑raspberry dream, the top glistening with a glossy sheen that catches the light like a midnight lake. The moment you slice into it, the knife slides through with a clean cut, revealing a pink‑streaked interior that looks as good as it tastes. And the best part? You can make it ahead, freeze it, and still serve it with that same fresh‑out‑of‑the‑oven allure. Okay, ready for the game‑changer? Let’s dive into what makes this cheesecake a true decadent delight.
What Makes This Version Stand Out
- Flavor Fusion: Dark chocolate and raspberry are a classic pair, but the added cream cheese creates a creamy bridge that lets both flavors shine without one overpowering the other.
- Texture Harmony: A crisp chocolate‑cookie crust, a silky, slightly tangy filling, and a burst of fresh raspberry provide three distinct textures that keep every bite interesting.
- Simplicity: No fancy equipment required—just a springform pan, a mixer, and a handful of pantry staples, making it accessible for even the most timid home bakers.
- Ingredient Quality: Using 60‑72% dark chocolate and full‑fat cream cheese guarantees depth of flavor and richness that cheap substitutes simply can’t match.
- Crowd Reaction: This cheesecake has a built‑in “wow” factor; guests often ask for the recipe within minutes of the first slice.
- Make‑Ahead Magic: The cheesecake can be chilled for up to 48 hours, allowing the flavors to meld and the texture to firm up perfectly.
- Versatility: Swap the raspberry for strawberries or blackberries, or replace the chocolate with white chocolate for a completely new experience.
- Visual Appeal: The pink raspberry ribbons against the deep chocolate create a striking contrast that looks stunning on any dessert table.
Inside the Ingredient List
The Flavor Base
Crushed chocolate cookies are the foundation of this cheesecake, providing that deep cocoa flavor and a buttery crunch that holds everything together. If you opt for classic Oreos, you’ll get a subtle vanilla hint that pairs beautifully with dark chocolate. For a gluten‑free twist, try gluten‑free chocolate wafers or even a mix of almond flour and cocoa powder. Skipping this ingredient would leave the cheesecake floating without a solid base, turning it into a soggy mess that slides off the plate.
The Binding Agent
Melted unsalted butter is the glue that unites the crushed cookies into a cohesive crust. Its richness adds a luxurious mouthfeel and prevents the crumbs from crumbling apart when you cut a slice. If you’re watching your saturated fat intake, you can substitute half the butter with coconut oil, but the flavor profile will shift slightly toward a tropical note.
The Creamy Core
Full‑fat cream cheese is the star of the show—its tanginess balances the sweetness of the sugar and the bitterness of the dark chocolate. Make sure the cheese is softened to room temperature; otherwise you’ll end up with lumps that ruin the smooth texture. If you try using a low‑fat version, expect a watery filling that won’t set properly and loses that indulgent mouthfeel.
The Sweetener
Granulated sugar does more than sweeten; it helps stabilize the egg proteins during baking, giving the cheesecake its signature firmness. You can swap it for coconut sugar for a caramel‑like undertone, but keep the quantity the same to maintain the structural integrity. Skipping the sugar entirely would make the dessert taste flat and overly bitter from the chocolate.
The Dark Chocolate
Melted dark chocolate (60‑72% cocoa) provides the deep, slightly bitter backbone that makes this cheesecake feel like a true adult dessert. I prefer a high‑quality bar that you can shave, because it melts evenly and retains its glossy sheen. If you need a dairy‑free version, opt for a good quality dark chocolate made with coconut oil; the texture will stay just as luscious.
The Aromatic Boost
Vanilla extract adds warmth and depth, rounding out the sharp edges of the chocolate and raspberry. Pure vanilla beans are the gold standard, but a high‑quality pure extract works just as well. A fake vanilla can introduce a metallic aftertaste that clashes with the dark chocolate, so avoid that if you can.
The Structure Builders
Large eggs act as the scaffold that holds the filling together, giving it that custard‑like firmness after baking. Bring them to room temperature before whisking; cold eggs cause the mixture to seize and create a grainy texture. Skipping the eggs or using a substitute like flaxseed will result in a wobblier, less reliable set.
The Fresh Burst
Fresh raspberries are the bright, tangy highlight that cuts through the richness of chocolate and cream cheese. Choose berries that are plump and deep red; over‑ripe ones become mushy and lose their vibrant color. If you’re out of fresh raspberries, a good quality frozen variety works—just thaw and pat dry to avoid excess water.
Everything's prepped? Good. Let’s get into the real action…
The Method — Step by Step
Preheat your oven to 325°F (163°C). While the oven warms, line the bottom of a 9‑inch springform pan with parchment paper; this will make the removal effortless later. I like to set a timer for the preheat because if you forget, the crust can over‑bake and become too hard.
Combine the crushed chocolate cookies with the melted unsalted butter in a large bowl. Stir until the mixture looks like wet sand, then press it firmly into the bottom of the pan, creating an even layer about ½‑inch thick. Pro tip: Use the bottom of a measuring cup to flatten it evenly.
Kitchen Hack: Chill the crust for 10 minutes before adding the filling; this prevents the butter from melting when the hot batter hits it.In the bowl of a stand mixer, beat the full‑fat cream cheese on medium speed until it’s smooth and free of lumps—about 2 minutes. Gradually add the granulated sugar, continuing to beat until the mixture is light and fluffy. The sugar should dissolve completely; if you feel any graininess, keep mixing a minute longer.
Melt the dark chocolate in a heat‑proof bowl over a simmering pot of water (bain‑marie) or in 30‑second bursts in the microwave, stirring in between. Once melted, let it cool for a minute so it’s warm but not hot, then slowly pour it into the cream cheese mixture while the mixer is on low. This gradual incorporation prevents the chocolate from seizing and creates a glossy swirl.
Add the vanilla extract and mix just until incorporated. Then, add the large eggs one at a time, beating on low after each addition. The batter should look silky and slightly thickened—this is the point where the structure forms.
Gently fold in the fresh raspberries with a spatula, being careful not to crush them. The berries should remain whole, creating little pockets of pink throughout the batter. Watch Out: Over‑mixing at this stage can turn the raspberries into a puree, which will bleed into the chocolate and lose that striking color contrast.
Watch Out: If your raspberries are very juicy, dust them lightly with a teaspoon of sugar before folding; this helps absorb excess moisture.Pour the batter over the chilled crust, smoothing the top with a rubber spatula. Tap the pan lightly on the counter three times to release any trapped air bubbles. The batter should spread evenly, and you’ll notice the raspberry bits beginning to settle.
Place the springform pan in a larger roasting pan and fill the outer pan with hot water until it reaches halfway up the sides of the springform. This water bath (bain‑marie) ensures gentle, even cooking and prevents the top from cracking. Bake for 30‑35 minutes, or until the edges are set but the center still has a slight wobble when you gently shake the pan.
Turn off the oven, crack the door open a few inches, and let the cheesecake sit inside for 15 minutes. This gradual cooling step reduces the risk of a cracked surface. Afterward, remove the pan from the water bath and let it cool completely on a wire rack—about an hour.
Once cooled, cover the cheesecake with plastic wrap and refrigerate for at least 4 hours, preferably overnight. The chilling time lets the flavors meld, the chocolate set, and the raspberries become tender yet still burst with juice. When you’re ready to serve, run a thin knife around the edge, release the springform, and slice with a hot, wet knife for clean cuts.
Kitchen Hack: Warm the knife under hot water, wipe dry, and slice—repeat for each cut. This prevents the creamy filling from sticking to the blade.
That's it — you did it. But hold on, I've got a few more tricks that'll take this to another level…
Insider Tricks for Flawless Results
The Temperature Rule Nobody Follows
Never pour a hot batter onto a cold crust. The sudden temperature shock can cause the crust to crumble or the filling to separate. I always let the melted chocolate and butter cool to around 110°F before mixing them with the cream cheese. This subtle temperature balance ensures a smooth, cohesive batter that sets perfectly.
Why Your Nose Knows Best
Your sense of smell is a reliable indicator of doneness. When the cheesecake is nearing the end of its bake, you’ll notice a faint, nutty aroma from the chocolate and a sweet raspberry perfume rising from the pan. If you can smell a caramelized note, the edges are likely set and the center is ready for that gentle wobble.
The 5‑Minute Rest That Changes Everything
After removing the cheesecake from the oven, let it rest in the turned‑off oven with the door ajar for exactly five minutes. This short steam‑infused pause helps the center finish cooking without a harsh temperature drop, reducing the risk of cracks. Trust me, that tiny pause makes the difference between a glossy finish and a cracked surface.
Raspberry Swirl Mastery
If you want those gorgeous pink ribbons, use a skewer or the tip of a butter knife to gently swirl the raspberry puree into the batter before baking. Do not over‑mix; just a few elegant strokes are enough. The result is a marble‑like pattern that looks as good as it tastes.
The Chill‑Before‑Serve Secret
Even after a solid four‑hour chill, give the cheesecake a final 10‑minute rest at room temperature before slicing. This softens the edges just enough for a clean cut while preserving the creamy interior. If you slice it straight from the fridge, the knife will stick, and you’ll end up with ragged edges.
Creative Twists and Variations
This recipe is a playground. Here are some of my favorite ways to switch things up:
White Chocolate & Strawberry Dream
Swap the dark chocolate for white chocolate and replace raspberries with fresh sliced strawberries. The result is a lighter, sweeter dessert that still boasts that luxurious cream cheese base. Perfect for spring brunches.
Salted Caramel Swirl
Add a drizzle of homemade salted caramel over the top before chilling. The salty caramel cuts through the bitterness of the chocolate and adds a glossy finish that looks restaurant‑ready.
Nutty Crunch Variation
Mix chopped toasted hazelnuts or almonds into the crust for an extra layer of crunch. The nutty notes complement the chocolate and give the crust a richer texture.
Vegan Adaptation
Replace the cream cheese with a vegan cream cheese alternative, use coconut oil instead of butter, and choose a dairy‑free dark chocolate. The flavor profile stays remarkably close, and you’ll have a dessert that fits plant‑based diets.
Spiced Autumn Edition
Add a pinch of ground cinnamon and a dash of espresso powder to the chocolate mixture. The warm spices bring a cozy, autumnal vibe that pairs beautifully with the raspberries.
Storing and Bringing It Back to Life
Fridge Storage
Cover the cheesecake tightly with plastic wrap or store it in an airtight container. It will keep fresh for up to 5 days. For optimal texture, let it sit at room temperature for 10 minutes before serving.
Freezer Friendly
Slice the cheesecake into individual portions, wrap each piece in cling film, then place them in a freezer‑safe bag. Freeze for up to 2 months. When you’re ready to enjoy, transfer to the fridge to thaw overnight.
Best Reheating Method
Cheesecake isn’t typically reheated, but if you need a slightly softer slice, place a single piece on a microwave‑safe plate, add a tiny splash of water (about a teaspoon), and microwave on low for 10‑15 seconds. The steam revives the creaminess without melting the chocolate.