I was standing in my kitchen at 2 a.m., half‑asleep, with a half‑finished batch of store‑bought butter cookies that had gone stale faster than my motivation to finish a novel. I stared at the sad, crumbly circles and thought, “There’s got to be a better way.” The next morning, armed with a bag of unsalted butter that practically melted in my hand, I set out on a quest to create the ultimate Danish butter cookie. I’m not kidding when I say the moment the dough hit the mixing bowl, the whole apartment filled with a buttery perfume that could make a grown‑up weep with nostalgia. That scent—sweet, nutty, and just a whisper of vanilla—was the first clue that I was on to something special.
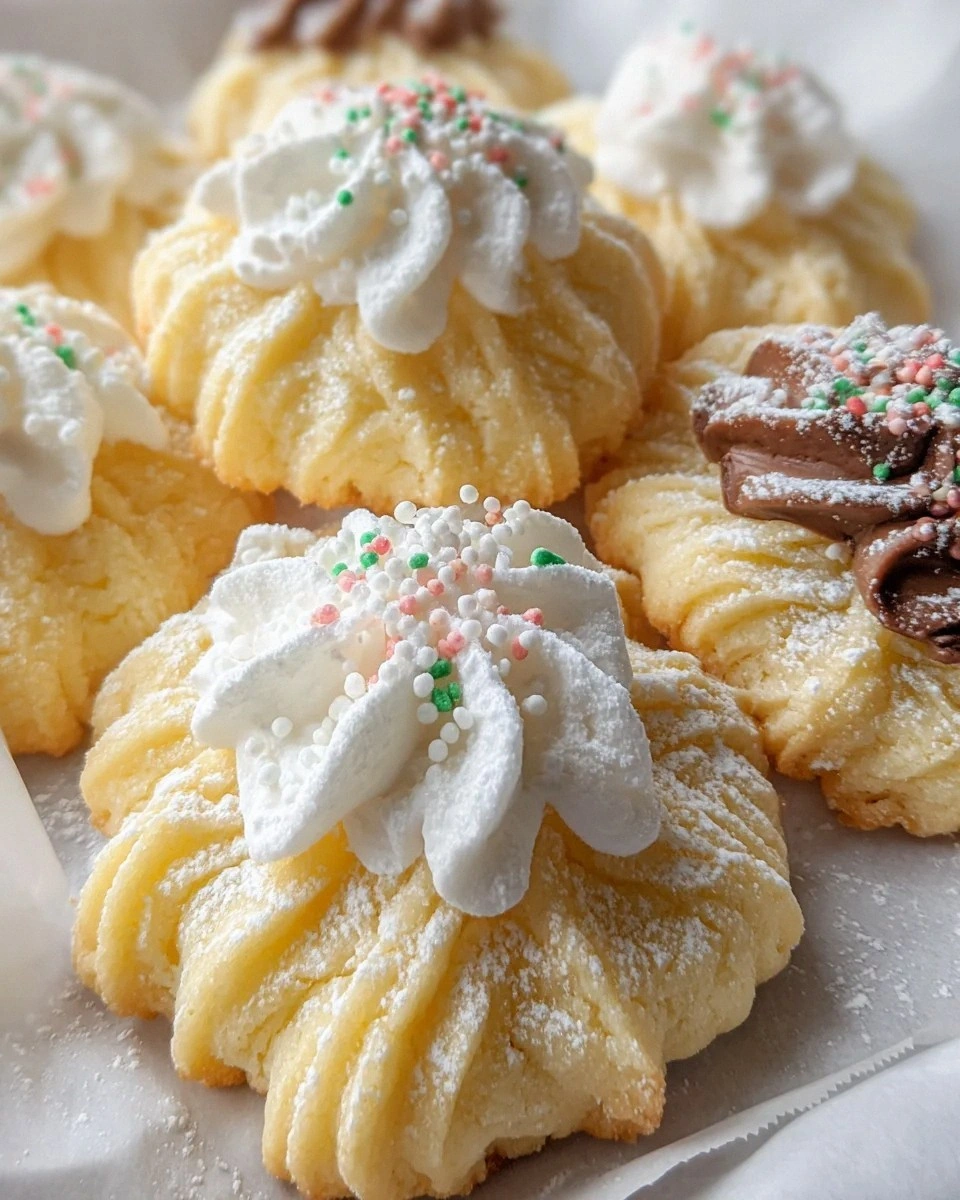
Picture this: a golden‑brown batch of cookies cooling on a wire rack, each one perfectly round, with edges that crackle like thin ice and a center that’s soft enough to melt on your tongue. The first bite is a symphony—crisp, buttery, and just a hint of vanilla that lingers like a good conversation. I dare you to taste this and not go back for seconds. Most recipes get the texture wrong, delivering either a hard, dry biscuit or a soggy, doughy mess. This version? It’s hands down the best version you’ll ever make at home, and I’m about to prove why.
Why does this recipe stand out? It’s a marriage of science and love. I use a pinch of cornstarch to lighten the crumb, a splash of heavy cream to coax the dough into a pipe‑ready consistency, and a secret technique—chilling the dough for exactly 30 minutes—that guarantees flawless shape and a melt‑in‑your‑mouth texture. Most cooks skip the chill, and the result is a sad, spread‑out cookie that looks like a failed art project. I’ll be honest — I ate half the batch before anyone else got a chance to try it, but that’s only because the aroma was so intoxicating that I couldn’t resist.
And here’s the kicker: I’m going to share a tiny, optional twist that most bakers overlook—a quick dip in melted chocolate or almond bark that adds a glossy finish and an extra layer of decadence. Okay, ready for the game‑changer? Let me walk you through every single step — by the end, you’ll wonder how you ever made it any other way.
What Makes This Version Stand Out
- Butter‑Forward Flavor: Using high‑quality unsalted butter gives the cookies a rich, creamy backbone that you can taste in every bite.
- Silky Texture: The combination of powdered sugar and cornstarch creates a melt‑in‑your‑mouth crumb that’s smoother than a jazz sax solo.
- Simple Technique: No fancy equipment, just a stand mixer, a piping bag, and a timer—perfect for beginners and pros alike.
- Customizable Finish: Optional chocolate dip or sprinkles turn a classic cookie into a festive masterpiece in seconds.
- Crowd‑Pleaser: These cookies have a universal appeal—kids love the sweet crunch, adults appreciate the buttery depth.
- Ingredient Quality: Each component is chosen for its role; the butter is the star, the vanilla is the supporting actor, and the cornstarch is the unsung hero.
- Even Baking: By chilling the dough and using a precise 175 °C (350 °F) oven, you get uniform browning without burning.
- Make‑Ahead Potential: The dough can be prepared up to 48 hours in advance, frozen, and baked whenever the craving hits.
Inside the Ingredient List
The Flavor Base
Unsalted butter is the heart‑beat of this cookie. It provides a rich, creamy flavor that you can’t fake with margarine or low‑fat spreads. I always buy European‑style butter with at least 82 % butterfat; the higher fat content translates to a deeper, more luxurious taste. If you skimp on the butter, you’ll end up with a cookie that tastes more like a shortbread that’s been watered down. A quick tip: let the butter sit at room temperature for about 30 minutes—soft enough to cream but not melted, which would cause the dough to spread too much.
Powdered sugar is the silent sweetener that keeps the texture silky. Because it’s finely ground, it dissolves instantly, preventing any gritty feel that granulated sugar would leave behind. If you’re feeling adventurous, you can substitute a third of the powdered sugar with fine coconut sugar for a subtle caramel note, but be aware that it will introduce a faint amber hue.
The Texture Crew
All‑purpose flour gives the structure, but the secret weapon is cornstarch. Adding just a quarter cup of cornstarch lightens the crumb, turning each bite into a melt‑away experience. Skipping the cornstarch is a common mistake; you’ll notice a denser, more biscuit‑like texture that’s still good but lacks that signature melt‑in‑the‑mouth quality. If you’re gluten‑free, replace the flour with a 1:1 gluten‑free blend and keep the cornstarch for that same delicate feel.
Heavy cream is optional, but it’s a lifesaver when the dough feels too stiff after chilling. Just a teaspoon or two will loosen the mixture enough for piping without turning it into a batter. Think of it as the culinary equivalent of a “soft‑serve” for dough—just enough to make it pliable, not runny.
The Unexpected Star
Vanilla extract is the aromatic whisper that brightens the buttery base. A high‑quality pure vanilla gives a warm, floral note that makes the cookies feel like a hug from a grandma. If you’re out of vanilla, a splash of almond extract works, but use half the amount—almond can dominate the flavor profile.
The Final Flourish
Chocolate chips or almond bark are the optional decadence that turns a classic cookie into a party‑ready treat. Melt them gently in a double boiler, dip half of each cookie, and let them set on parchment. The contrast of buttery crumb and glossy chocolate is what makes guests swoon. Candied sprinkles add color and a subtle crunch—perfect for holidays or a bright pop on a plain‑white plate.
Everything’s prepped? Good. Let’s get into the real action…
The Method — Step by Step
First, cut your unsalted butter into small cubes and let it sit at room temperature until it’s soft but still holds its shape. In the bowl of a stand mixer, combine the butter with powdered sugar and beat on medium‑high for about 3 minutes, until the mixture is pale, fluffy, and smells like a bakery on a Sunday morning. This aeration step is crucial; it incorporates air that later translates into a lighter cookie.
Add the vanilla extract and a pinch of salt, then continue beating for another minute. At this point, the dough should be smooth and glossy. If you’re using heavy cream, drizzle it in now—just a teaspoon or two—and mix until fully incorporated. The dough will look slightly glossy, which is a sign you’re on the right track.
In a separate bowl, whisk together the all‑purpose flour and cornstarch. This ensures the cornstarch is evenly distributed and prevents any pockets that could cause uneven texture. Gradually add the dry mixture to the butter‑sugar blend, beating on low speed. Scrape the sides of the bowl frequently to make sure everything is incorporated.
Once the dough comes together, turn it out onto a lightly floured surface and knead gently—just enough to form a smooth ball. This should take no more than 30 seconds; over‑kneading will develop gluten and make the cookie tougher.
Transfer the dough to a piping bag fitted with a large star tip (about 1 cm opening). This shape gives the classic “tandem” look that Danish cookies are famous for. Pipe the dough onto a parchment‑lined baking sheet, spacing each mound about 2 inches apart. The dough should be about 1‑inch tall; if it spreads too much, the chill will rescue you later.
Now comes the most critical step: chill the piped dough for exactly 30 minutes. This firms the butter, preventing the cookies from spreading too much during baking. While you wait, preheat your oven to 175 °C (350 °F) and set a timer. The kitchen will fill with that buttery aroma again—trust me, it’s worth the patience.
Slide the tray into the pre‑heated oven and bake for 12‑15 minutes, or until the edges turn a light golden brown and the tops are set but still pale. The cookies will continue to firm up as they cool, so don’t over‑bake. When you pull them out, the scent should be intoxicating—think fresh‑baked pastry meets summer sunshine.
Allow the cookies to cool on the sheet for 5 minutes, then transfer them to a wire rack. If you’re adding chocolate, melt the chips or almond bark in a heat‑proof bowl over simmering water, dip half of each cookie, and let them set on parchment. Sprinkle with candied sprinkles while the chocolate is still wet for that festive pop.
Finally, store the cookies in an airtight container. They’ll stay soft for up to a week, and the flavor actually deepens after a day or two. That’s it — you did it. But hold on, I’ve got a few more tricks that’ll take this to another level…
Insider Tricks for Flawless Results
The Temperature Rule Nobody Follows
Never let your butter get too soft. If it’s butter‑soft, the dough will spread before the oven even has a chance to set the edges. The sweet spot is about 65 °F (18 °C). If your kitchen is warm, pop the butter in the fridge for 10 minutes before cubing it. This tiny adjustment can be the difference between a cookie that looks like a perfect snowball and one that looks like a sad pancake.
Why Your Nose Knows Best
When the cookies are in the oven, trust your sense of smell more than the timer. As soon as you detect a faint nutty, toasty aroma, it’s time to start checking. The edges should begin to pull away from the parchment, and the tops will look set but not browned. This sensory cue prevents over‑baking, which is the fastest way to turn a buttery masterpiece into a dry disappointment.
The 5‑Minute Rest That Changes Everything
After piping, give the dough a quick 5‑minute rest on the counter before chilling. This allows the gluten to relax just enough to keep the cookie tender. One of my friends tried skipping this rest and ended up with a cookie that cracked on the surface—trust me, that’s a texture nightmare.
Chocolate Dip Timing
If you’re dipping in chocolate, do it while the cookies are still warm (but not hot). The residual heat helps the chocolate set with a glossy finish and prevents it from sliding off. A quick dip, a gentle tap on the edge of the bowl, and you’re ready for the sprinkles.
The Secret of the Sprinkles
Don’t just sprinkle the candy on top; press them gently into the wet chocolate. This ensures they stick and don’t fall off when you bite. It also creates a tiny crunch that contrasts beautifully with the buttery melt‑in‑your‑mouth crumb.
Creative Twists and Variations
This recipe is a playground. Here are some of my favorite ways to switch things up:
Lemon Zest Delight
Add the zest of one large lemon to the butter‑sugar mixture. The citrus brightens the buttery base, making it perfect for spring brunches. Pair with a light glaze of powdered sugar and lemon juice for an extra zing.
Spiced Holiday Version
Mix a teaspoon of ground cinnamon, a pinch of nutmeg, and a dash of clove into the dry ingredients. The warm spices turn the cookies into a festive treat that pairs beautifully with hot cocoa.
Nutty Crunch
Stir in ½ cup finely chopped toasted almonds or hazelnuts just before piping. The nuts add a pleasant crunch and a nutty aroma that complements the butter perfectly.
Coffee‑Infused
Replace the vanilla extract with 1 tsp of espresso powder dissolved in a tablespoon of hot water. The coffee flavor deepens the chocolate dip, creating a sophisticated mocha‑kissed cookie.
Vegan Swap
Use a plant‑based butter (at least 80 % fat) and replace the heavy cream with coconut cream. The texture stays buttery, and the flavor profile gets a subtle coconut hint—perfect for dairy‑free guests.
Storing and Bringing It Back to Life
Fridge Storage
Place the cooled cookies in an airtight container with a sheet of parchment between layers. Store in the refrigerator for up to 5 days. The cool environment keeps them from getting soggy, especially if you’ve added chocolate.
Freezer Friendly
Arrange cookies on a baking sheet, freeze until solid (about 1 hour), then transfer to a zip‑top freezer bag. They’ll keep for up to 3 months. When you’re ready, bake straight from frozen, adding an extra minute to the baking time.
Best Reheating Method
To revive that fresh‑out‑of‑the‑oven softness, preheat the oven to 150 °C (300 °F), place the cookies on a parchment sheet, and add a tiny splash of water to the tray (just a few drops). Heat for 5‑7 minutes. The steam gently restores moisture, and the cookies will feel like they were just baked.