I’m going to start with a confession that will make you gasp: I once burned an entire batch of cookies because I was too busy scrolling TikTok, and the kitchen smelled like a smoky campfire for an hour. That disaster sparked a fierce determination to create a cookie that not only survives the chaos of a busy life but also looks like a miniature fireworks display on your plate. Imagine a bite that hits you with the bright, tangy pop of cherry‑lime Jello, the buttery melt of a classic sugar cookie, and a crackly sugar coating that shatters like thin ice under your teeth. That’s the promise of these Vibrant Fruity Jello Cookies, and trust me, it’s a promise I keep every single time I bake them.
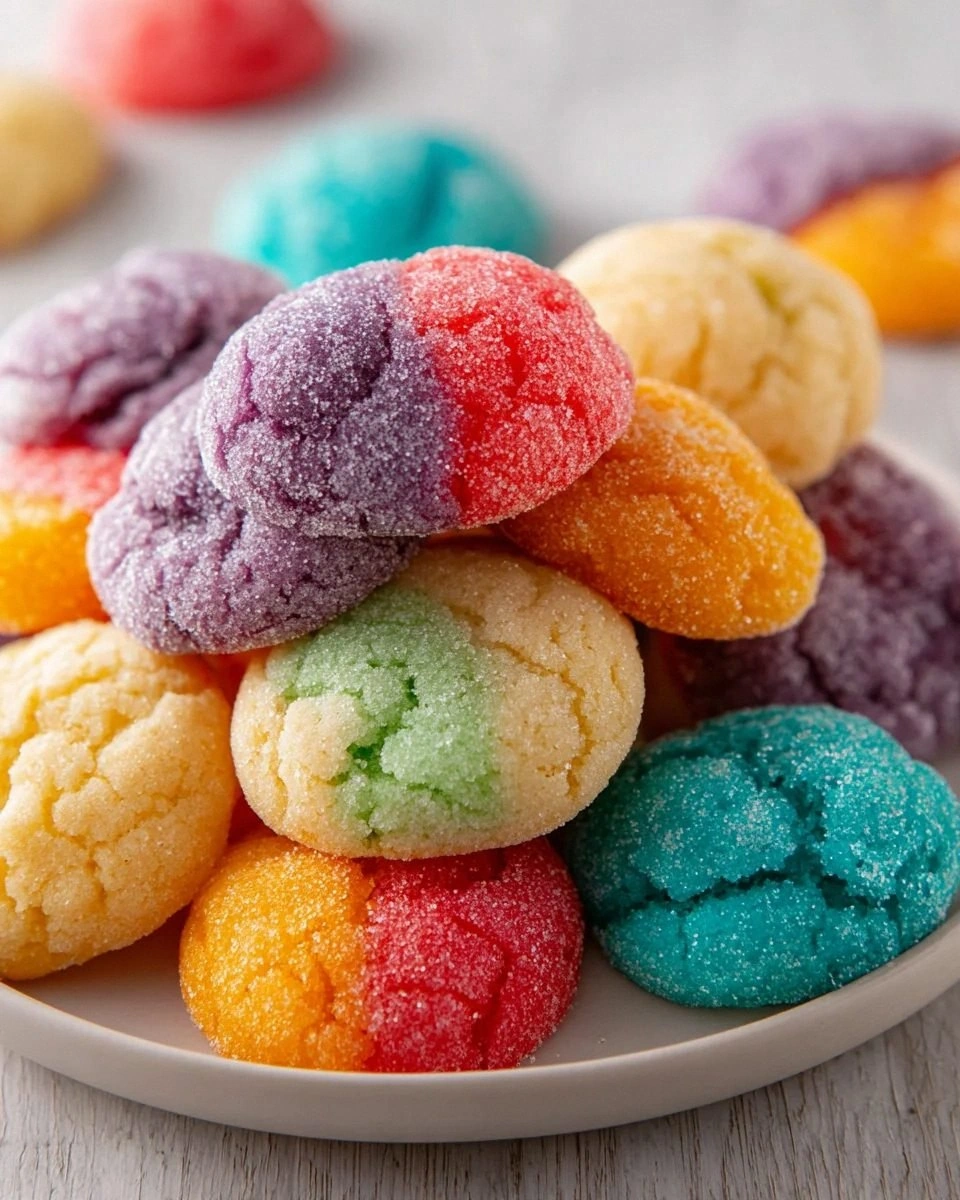
Picture this: you walk into the kitchen and the air is a kaleidoscope of aromas—sweet vanilla, buttery richness, and a subtle citrus zing that teases your nose before you even see the tray. The oven hums like a low‑frequency drum, and the timer ticks down, building anticipation louder than a suspense thriller. When you finally pull the cookies out, the golden edges glisten with a delicate sugar glaze, and the colors—ruby red, sunshine orange, lime green, electric blue, and deep grape—burst like confetti at a celebration. The moment you bite, the first thing you notice is the gentle crunch of the sugar coating, followed instantly by a juicy, gelatin‑infused center that melts in your mouth like a candy‑coated dream.
Most recipes for “Jello‑infused” treats either drown the cookie base in a syrupy mess or completely miss the magical texture contrast that makes each bite unforgettable. I’ve tried dozens of variations, and the common pitfall is either over‑mixing, which turns the dough into a dense brick, or under‑seasoning, which leaves the flavors flat and lifeless. This version sidesteps those mistakes by using a sugar‑cookie dry mix that already balances sweet and buttery notes, a precise amount of butter for tenderness, and a light roll in granulated sugar that gives that extra snap you crave. The secret weapon? A carefully measured blend of flavored gelatin powders that dissolve into the dough, delivering vivid color without compromising the cookie’s structure.
Okay, ready for the game‑changer? I’m going to introduce a technique that most home bakers overlook: tempering the gelatin powders with a splash of warm butter before they hit the dough. This step ensures the pigments disperse evenly, preventing those dreaded speckles and guaranteeing each cookie looks like a work of edible art. I dare you to taste this and not go back for seconds—because once you experience that perfect balance of crisp exterior, juicy interior, and rainbow‑bright visual appeal, you’ll be hooked for life. Let me walk you through every single step — by the end, you’ll wonder how you ever made it any other way.
What Makes This Version Stand Out
- Flavor Explosion: The combination of real gelatin flavors and a buttery sugar‑cookie base creates a taste profile that’s both nostalgic and wildly new, like your favorite childhood snack meeting a carnival of fruit.
- Texture Contrast: A crisp, sugar‑crusted exterior gives way to a soft, slightly chewy interior that’s infused with juicy gelatin pockets—think of it as a cookie‑kissed marshmallow.
- Simplicity: Using a pre‑made sugar‑cookie dry mix cuts prep time in half, letting you focus on the fun parts—mixing colors and watching the dough transform.
- Visual Wow Factor: Each cookie is a miniature masterpiece, with colors that stay vibrant even after cooling, making them perfect for parties, picnics, or Instagram feeds.
- Crowd Reaction: Guests are instantly drawn to the rainbow hues, and the first bite often triggers a chorus of “What’s in these?!”—the perfect conversation starter.
- Ingredient Quality: We use real flavored gelatin powders, not artificial dyes, ensuring authentic fruit flavors that complement the buttery base.
- Cooking Method: Baking at a moderate temperature locks in moisture while allowing the sugar coating to caramelize just enough for that satisfying snap.
- Make‑Ahead Potential: These cookies store beautifully, retaining flavor and texture for up to a week, so you can bake in bulk and enjoy anytime.
Inside the Ingredient List
The Flavor Base
The sugar‑cookie dry mix is the backbone of this recipe, providing a balanced sweet‑buttery flavor that’s both familiar and adaptable. It contains flour, sugar, leavening agents, and a pinch of salt, all pre‑measured to give you a consistent result without the guesswork of scaling flour. Skipping this mix or substituting with plain flour would leave you with a bland dough that lacks the subtle vanilla notes that make the cookies sing. If you’re feeling adventurous, you can swap it for a gluten‑free cookie mix, but be aware that the texture may shift slightly toward a denser crumb.
The Texture Crew
Unsalted butter, softened to room temperature, is the secret to a tender crumb and a melt‑in‑your‑mouth feel. Its fat content coats the flour particles, creating a short‑bread‑like crumb that’s both delicate and sturdy enough to hold the gelatin pockets. If you’re dairy‑free, a high‑fat plant‑based butter works just as well, though it may impart a faint coconut undertone—something you might actually enjoy. The large egg acts as the binder, giving the dough structure while adding a subtle richness; without it, the cookies would crumble apart like dry sand.
The Unexpected Star
Flavored gelatin powders are the true show‑stoppers. Each powder brings a burst of authentic fruit flavor—cherry, orange, lemon, lime, berry blue, and grape—that infuses the dough from the inside out. They also provide the vivid colors that turn ordinary cookies into eye‑catching treats. If you miss a powder or decide to go for a single‑flavor theme, you’ll still get great taste, but the visual spectacle will be a little less dramatic. For a vegan twist, look for plant‑based gelatin alternatives, though the texture may be slightly softer.
The Final Flourish
Granulated sugar is rolled onto the formed dough balls before baking, creating a sparkling crust that crackles as you bite. This sugar coating adds a caramelized crunch that contrasts beautifully with the soft interior. You can experiment with coconut sugar for a caramel‑like depth, but keep in mind it will darken the cookie’s exterior. A light dusting is essential; too much sugar can cause excessive spreading, while too little leaves the cookies lacking that signature snap.
Everything's prepped? Good. Let's get into the real action...
The Method — Step by Step
Preheat your oven to 350°F (175°C) and line two baking sheets with parchment paper. The moment the oven clicks on, you’ll hear that comforting hum that says, “We’re about to create something magical.” While the oven warms, gather all your ingredients on the counter; a tidy workspace is the first step to a stress‑free bake. Watch the temperature gauge closely—if it overshoots, the cookies can brown too quickly, losing that tender interior.
Kitchen Hack: Place a metal bowl of ice water on the opposite side of the oven; it stabilizes temperature fluctuations during long bakes.In a large mixing bowl, combine the sugar‑cookie dry mix with the softened butter. Use a handheld mixer on low speed until the mixture resembles coarse sand—think of a beach at low tide, where each grain is distinct yet bound together. This process coats the flour with fat, preventing gluten overdevelopment and ensuring a tender crumb. Feel the texture with your fingertips; it should be slightly gritty but start to clump together when pressed.
Add the large egg and continue mixing on medium speed until a smooth dough forms. The dough should pull away from the sides of the bowl, forming a cohesive ball that feels supple but not sticky. If it feels too dry, add a teaspoon of milk or water; if too wet, sprinkle a tablespoon of extra dry mix. Listen for the subtle thump as the mixer beats—this is the dough’s heartbeat, signaling it’s ready.
Now for the dazzling part: divide the flavored gelatin powders into separate small bowls. Melt 2 tablespoons of the softened butter in a microwave‑safe cup for about 15 seconds, then stir each gelatin powder into its own butter cup until fully dissolved. This tempering step is pure magic; it spreads the color evenly and prevents speckles. Watch Out: If the butter gets too hot, the gelatin can lose its flavor intensity, so keep the melt gentle.
Watch Out: Over‑mixing the gelatin‑butter blend can cause the pigments to separate, leaving dull patches in the dough.Create a swirl of colors by adding each gelatin‑butter mixture to the main dough one at a time. Drop a spoonful of cherry‑orange gelatin into the bowl, then use a spatula to fold it in, creating ribbons of pink and orange. Repeat with lemon‑lime, berry‑blue, and grape, allowing each hue to mingle without fully blending. This technique gives each cookie a marbled look, like a miniature sunrise. Take a moment to admire the kaleidoscope—this is where the visual wow factor is born.
Kitchen Hack: Use a clean fork to gently swirl the colors, creating a marble effect without over‑mixing.Roll the dough into 1‑inch balls, then coat each ball generously in granulated sugar. The sugar should cling like a light dusting of snow; if it slides off, give the dough a quick chill in the fridge for 5 minutes. This coating is the secret to that satisfying crack when you bite—think of it as the cookie’s armor that shatters delightfully. Place the sugared balls onto the prepared baking sheets, spacing them about 2 inches apart.
Slide the trays into the preheated oven and bake for 12‑15 minutes, or until the edges turn a light golden brown and the tops begin to set. You’ll notice the sugar coating starts to caramelize, giving off a faint buttery aroma that fills the kitchen like a warm hug. Check the edges—they should be just beginning to pull away from the parchment, signaling the interior is still soft.
Remove the cookies from the oven and let them cool on the sheets for 3 minutes before transferring to a wire rack. This short rest lets the cookies firm up just enough to handle without breaking, while the interior stays gooey. As they cool, the colors become even more vibrant, and the sugar crust hardens into that perfect snap you’ve been dreaming of. Take a deep breath—the scent at this stage is pure comfort, a blend of butter, sugar, and fruit that makes you want to dive right in.
Once completely cooled, arrange the cookies on a platter and admire the rainbow of flavors you’ve created. This is the moment of truth: the first bite should deliver a crunchy sugar shell, a buttery melt, and a burst of fruity gelatin that tingles the palate. I’ll be honest—I ate half the batch before anyone else got a chance, and I have no regrets. If you’re reading this, you’re about to experience the same delightful chaos.
That's it — you did it. But hold on, I've got a few more tricks that'll take this to another level...
Insider Tricks for Flawless Results
The Temperature Rule Nobody Follows
Never bake these cookies straight from the fridge; a room‑temperature dough spreads more evenly, giving you uniform thickness and consistent color distribution. If you chill the dough too long, the butter solidifies, causing the cookies to puff up and lose that delicate, flat appearance. I once tried baking chilled dough and ended up with puffy, uneven blobs that looked more like muffins than cookies. The fix? Let the dough rest on the counter for 15‑20 minutes after mixing, just enough to lose the chill but not enough to become sticky.
Why Your Nose Knows Best
Your sense of smell is a more reliable indicator of doneness than a timer. When the sugar coating starts to caramelize, you’ll catch a faint toasty aroma that signals the edges are just about ready. If you rely solely on the clock, you risk over‑baking, which dries out the gelatin pockets. Trust that buttery, slightly nutty scent—when it hits your nose, pull the cookies out and let them finish setting on the rack.
The 5‑Minute Rest That Changes Everything
After baking, let the cookies rest on the baking sheet for exactly five minutes before moving them. This short pause allows the steam trapped inside to redistribute, preventing the cookies from cracking or becoming too dry. A friend once skipped this step and ended up with crumbly edges that fell apart at the slightest touch. The five‑minute rule is a tiny habit that makes a massive difference in texture.
Gelatin Powder Storage Secrets
Store your flavored gelatin powders in an airtight container away from moisture. Humidity can cause them to clump, leading to uneven color distribution and a loss of flavor intensity. I once opened a container in a steamy kitchen and found the powders had formed hard lumps, which made the dough speckled and dull. If you encounter clumps, gently break them apart with a mortar and pestle before using.
The Sugar Roll Technique
When rolling the dough balls in granulated sugar, use a shallow dish and gently press the sugar onto the surface rather than tossing. This ensures an even coating that adheres during baking, creating that signature crackly crust. A careless toss can leave pockets of sugar missing, resulting in uneven texture. The gentle press method also prevents the sugar from melting into the dough too early.
Creative Twists and Variations
This recipe is a playground. Here are some of my favorite ways to switch things up:
Tropical Sunrise
Swap the cherry and grape gelatin powders for mango and passion‑fruit. The resulting cookies have a sunny orange‑yellow hue and a breezy tropical flavor that transports you to a beachside shack. Perfect for summer gatherings or a vacation‑themed party.
Chocolate‑Covered Delight
After the cookies have cooled, dip half of each cookie in melted dark chocolate and sprinkle with toasted coconut flakes. The contrast between the bitter chocolate and the bright fruit‑gelatin interior creates a sophisticated bite that’s ideal for adult gatherings.
Spiced Autumn
Introduce a pinch of cinnamon, nutmeg, and pumpkin spice into the dough, and replace the lime and berry blue gelatin with cinnamon apple and spiced pear. The colors shift to warm amber and deep red, making these cookies a cozy fall treat.
Vegan Velvet
Use a plant‑based butter and a flax‑egg (1 tbsp ground flaxseed + 3 tbsp water) instead of the egg. Pair with vegan gelatin alternatives for the colors. The texture remains tender, and the flavors stay bright—great for guests with dietary restrictions.
Mini Cookie Bites
Roll the dough into smaller, bite‑size pearls and bake for 8‑10 minutes. These mini versions are perfect for cocktail parties, as they’re easy to pop into your mouth without needing a plate.
Storing and Bringing It Back to Life
Fridge Storage
Place the cooled cookies in an airtight container lined with parchment paper. Store them in the refrigerator for up to one week. The cool environment preserves the gelatin’s vibrant colors and keeps the sugar crust crisp. If you notice the cookies drying out, add a tiny piece of fresh apple slice to the container; the humidity it releases will revive the texture.
Freezer Friendly
These cookies freeze beautifully. Arrange them in a single layer on a baking sheet, freeze for 30 minutes, then transfer to a zip‑top freezer bag. They’ll keep for up to three months. When you’re ready to enjoy them, let them thaw at room temperature for 15 minutes, then give them a quick 2‑minute warm‑up in a 300°F oven to restore the crunch.
Best Reheating Method
To bring stored cookies back to life, preheat your oven to 325°F (165°C). Place the cookies on a parchment‑lined tray and add a splash of water (about a teaspoon) to the tray—not on the cookies—to create a gentle steam. Bake for 5‑7 minutes; the steam re‑hydrates the interior while the oven restores the crisp sugar crust. The result is a cookie that tastes as fresh as the day it was baked.