I still remember the first time I made chicken with hot cherry peppers. It was a Wednesday night that felt like a Monday, the kind where your socks don't match and the dog's already judging your life choices. I was staring at a pack of chicken thighs and a jar of those neon-red peppers my Italian neighbor swore would change my life. Spoiler alert: she was right. What happened next was pure kitchen alchemy—crispy chicken that hissed like a summer grill, peppers that popped like tiny firecrackers, and a sauce so addictive I caught myself licking the spoon like nobody was watching. By the time my roommate walked in, the whole apartment smelled like we'd teleported to a tiny trattoria in Naples where grandmothers whisper secrets to tomatoes.
Here's the thing: most recipes for this dish play it safe. They treat those cherry peppers like shy wallflowers, barely letting them dance with the chicken. But I'm here to tell you that's culinary criminal behavior. Those peppers are the life of the party—they should be doing the tango across your taste buds, not hiding in the corner wearing a "mild" name tag. When done right, this isn't just dinner; it's a full-body experience that starts with that first sizzle and ends with you unconsciously humming while you chew. The chicken stays juicy thanks to a technique I learned from a cranky chef in Boston who threw a ladle at me when I asked too many questions. Worth it.
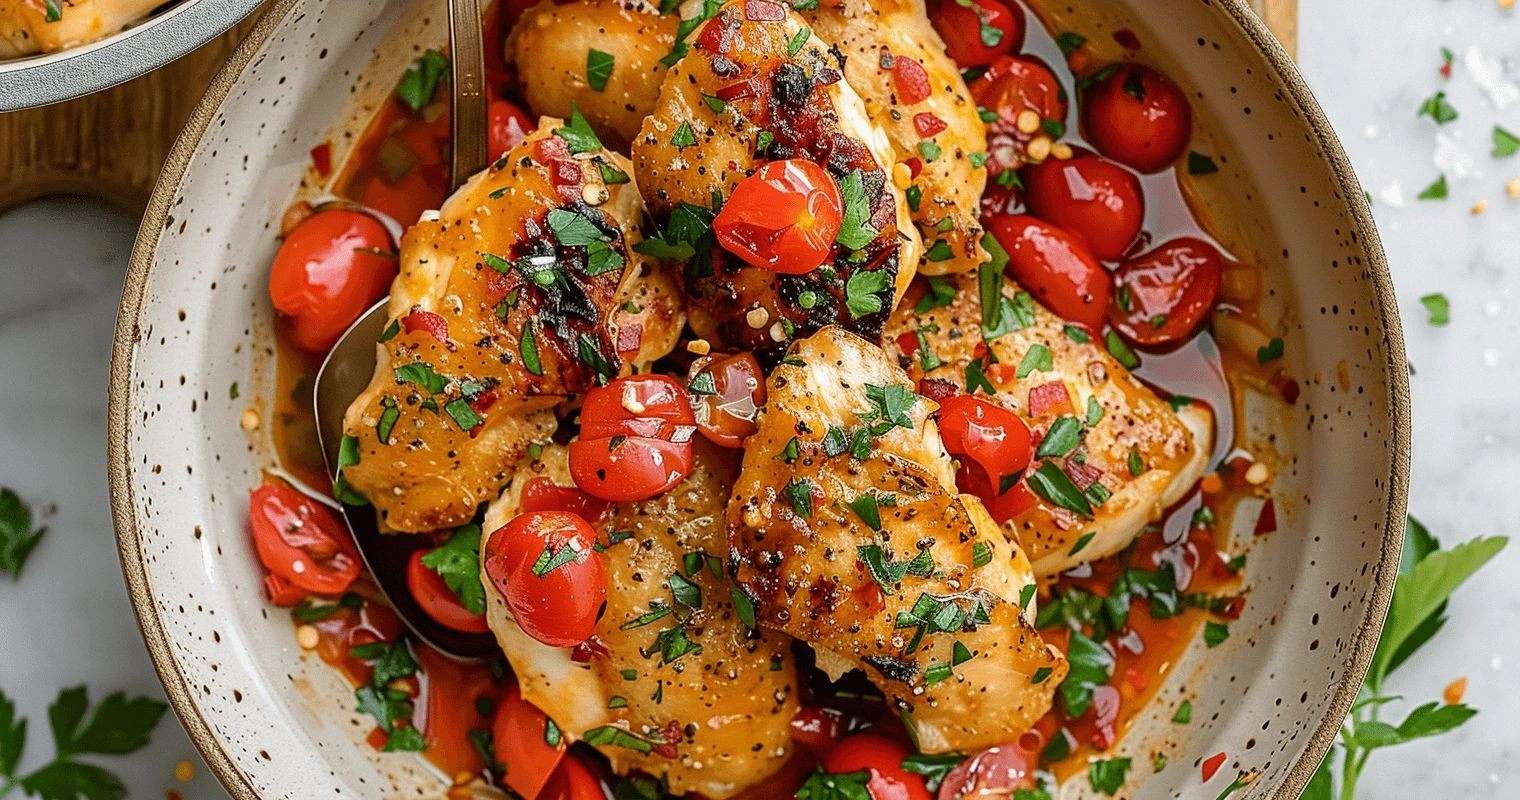
What you're about to make isn't some sad, dry chicken breast masquerading as Italian food. This is the real deal—crispy edges that shatter like thin ice, meat so tender you could cut it with the side of your fork, and a sauce that coats everything in this glossy, spicy-sweet magic. I dare you to taste this and not go back for seconds. Actually, I double-dog dare you, because I've been perfecting this for three years and I've never seen anyone resist the urge. My last dinner party had guests hovering over the stove like vultures, and I'm not even sorry.
Picture yourself pulling this out of the oven, the whole kitchen smelling like you've got your own cooking show. The chicken's golden and crackling, the peppers are blistered and glistening, and that sauce—oh, that sauce—is bubbling away like liquid confidence. Your neighbors will start showing up with "extra" wine they just happened to have. Your family will develop sudden amnesia about takeout. And you'll become the person everyone begs for the recipe, which you'll pretend is complicated but is actually easier than ordering pizza. Let me walk you through every single step—by the end, you'll wonder how you ever made it any other way.
What Makes This Version Stand Out
I've eaten my way through enough versions of this dish to write a dissertation, and trust me, this one hits different. While other recipes leave you with sad, steamed chicken swimming in a watery sauce, this method creates something that makes professional chefs jealous. The secret isn't just in the ingredients—it's in the technique, the timing, and a few rebellious moves that go against everything your grandmother taught you. Get ready, because once you taste this, there's no going back to bland chicken ever again.
- Crispy Edge Magic: We're starting with skin-on thighs and rendering that fat like we're printing money. The result? Crackling skin that shatters between your teeth while the meat stays so juicy it practically sighs when you cut into it. Most recipes skip this step and end up with rubbery disappointment.
- Pepper Power Play: Those jarred cherry peppers aren't just garnish—they're co-stars. We use both the peppers and their brine, creating layers of heat that build like a crescendo instead of punching you in the face all at once. It's sophisticated spice, not frat-boy dare spice.
- One-Pan Wonder: Everything happens in a single skillet, which means the chicken drippings become the sauce's secret weapon. Those browned bits (fond, if we're being fancy) dissolve into pure flavor gold. Less dishes, more deliciousness—my forever motto.
- Speed Demon: From fridge to plate in 45 minutes flat, including the time it takes to convince yourself you deserve this level of deliciousness on a Tuesday. Most braised chicken dishes take hours; this one tricks you into thinking it did too.
- Make-Ahead Champion: The flavors actually improve overnight, transforming into something even more magnificent. I make double batches just so I can eat it cold for breakfast standing in front of the fridge like a sophisticated raccoon.
- Crowd Control: Scale it up for parties and people will follow you around like you're the Pied Piper of flavor. I've seen grown adults fight over the last piece using nothing but butter knives and determination.
Alright, let's break down exactly what goes into this masterpiece. Don't worry—it's probably stuff you already have lurking in your kitchen, waiting for their moment to shine.
Inside the Ingredient List
Every ingredient in this dish pulls its weight like a perfectly choreographed dance troupe. No wallflowers, no unnecessary divas—just pure harmony on a plate. I've tested this with everything from budget chicken to the fancy heritage stuff, and while quality matters, technique matters more. That said, a few smart choices can elevate this from great to legendary. Here's your shopping list decoded, demystified, and delivered with all the secrets I've learned through delicious trial and error.
The Flavor Foundation
The chicken thighs are the canvas, and please, please don't try to substitute breasts here. I know, I know—breasts seem healthier, but they'll dry out faster than a comedy show without jokes. Thighs stay juicy, forgive overcooking, and have enough fat to create those gorgeous crispy edges we crave. Look for ones with the skin on; that's where the magic lives. If you can only find skinless, still make it, but know you're missing the crackling symphony that makes angels sing. The bone-in versus boneless debate? Boneless cooks faster, but bone-in adds flavor. I go boneless for weeknights, bone-in for weekends when I'm feeling fancy.
Olive oil gets the party started, but here's where I get controversial: use the regular stuff for cooking, save your fancy cold-pressed for finishing. The heat kills all those delicate flavors anyway, so you're basically throwing money in the pan. I buy the big bottles from Costco and use them with abandon. The chicken's going to render its own fat, so we just need enough oil to prevent sticking in the beginning. Think of it as the opening act, not the headliner.
The Heat Brigade
Hot cherry peppers are the rock stars here, and jarred is absolutely fine—actually preferred. Fresh ones are unpredictable heat bombs that could blow your head off or taste like bell peppers. The jarred variety gives you consistency, plus that precious brine we're going to use like liquid gold. When shopping, look for ones packed in vinegar, not oil. The vinegar brightens everything up and cuts through the richness of the chicken. If you're sensitive to heat, start with half the amount; if you're a spice warrior, add extra and live your best life.
The garlic isn't just there for show—it creates this aromatic base that makes your neighbors jealous. I use a ridiculous amount because vampires aren't real but flavor certainly is. Smash the cloves with the flat of your knife and let them sit for ten minutes before cooking. This activates the allicin, which sounds like a magic spell and basically is. It transforms from sharp and aggressive to sweet and mellow when it hits the hot fat. Don't you dare use the pre-minced stuff in the jar. I can taste that sadness from here.
The Texture Crew
White wine adds acidity and depth, but here's the trick: use something you'd actually drink. That six-dollar bottle that's been sitting in your pantry since your cousin's wedding? Pass. The alcohol cooks off, but the flavor concentrates, so if it tastes like vinegar now, it'll taste like expensive vinegar later. I keep a box of decent white wine in my fridge specifically for cooking. It's always there, it's always good, and it makes me feel like a sophisticated adult even when I'm eating cereal for dinner.
Butter might seem excessive when you're already using chicken fat and olive oil, but trust the process. It adds this silky richness that makes the sauce coat your tongue like velvet. I add it right at the end, swirling it in until it disappears into glossy perfection. This is called mounting with butter, and it's the difference between a good sauce and a restaurant-quality sauce that makes people close their eyes when they taste it. Use cold butter straight from the fridge—it emulsifies better and creates this gorgeous sheen.
The Final Flourish
Parsley gets added at the very end for freshness and color. I know it's tempting to skip it—dried parsley is a crime against humanity that tastes like green dust. Fresh parsley brightens everything up and makes the dish look like it has its life together. Chop it right before serving; if you add it too early, it turns that sad army green color that screams "I've been sitting under a heat lamp." Italian parsley has more flavor than curly, but use what you can find. Even the fancy grocery store near me sometimes only has curly, and dinner must go on.
Lemon juice is my secret weapon that nobody expects but everyone raves about. Just a squeeze at the end wakes up all the flavors and makes them sing in harmony. It's like the conductor in an orchestra—you might not notice it's there, but everything falls apart without it. Use fresh lemon; the bottled stuff tastes like furniture polish and will ruin all your hard work. One lemon should do it, but taste and adjust. You're looking for brightness, not lemon chicken.
Everything's prepped? Good. Let's get into the real action...
The Method — Step by Step
Okay, ready for the game-changer? This is where we separate the kitchen heroes from the takeout addicts. Every step builds on the last, creating layers of flavor that'll make you wonder why you ever settled for boring chicken. Don't rush—good things come to those who sizzle. Keep your phone handy because you're going to want to document this transformation. By the time you're done, you'll have created something that looks like it came from a magazine but tastes like home.
- Start by patting your chicken thighs absolutely dry with paper towels. I mean dry like the Sahara in August. Moisture is the enemy of crispiness, and we're going for shatteringly crispy skin that crackles like a fireplace. Season both sides generously with salt and pepper—be brave here. Most people under-season chicken, then wonder why it tastes like disappointment. Let it sit while you prep everything else; this gives the salt time to work its magic and draw out moisture. Your chicken should look like it's been vacationing in the desert, not swimming in a pool.
- Heat your largest skillet over medium-high heat and add just enough olive oil to coat the bottom. When the oil shimmers like a mirage and moves like water, it's showtime. Lay the chicken in skin-side down and don't you dare move it for at least six minutes. That sizzle when it hits the pan? Absolute perfection. The skin needs uninterrupted time to render and crisp. If you mess with it, you'll tear the skin and all the fat will stay trapped underneath. Resist the urge to peek—trust the process and let science do its thing.
- While the chicken works its magic, slice your cherry peppers into rings. I keep the seeds in because I live dangerously, but remove them if you're spice-shy. Save all that precious brine—we're using every drop. The peppers should look like little red wheels of fortune, and they add this pop of color that makes the whole dish look like a celebration. Taste one raw if you're brave; it's like a spicy surprise party in your mouth. Chop your garlic too, but keep it chunky. We want big, glorious pieces that'll toast in the fat and turn into sweet, mellow flavor bombs.
- After six minutes, peek under one corner of the chicken. If it's golden brown and gorgeous, flip it over. If not, give it another minute or two. The skin should release easily from the pan when it's ready—if it's sticking, it's not done crisping. Once flipped, cook for another 4-5 minutes until the bottom is browned. Remove the chicken to a plate; it'll finish cooking later in the sauce. Don't worry if it's not fully cooked through yet—that's intentional. We're building flavor layers here, not just cooking chicken.
- This next part? Pure magic. Pour off all but about 2 tablespoons of the fat from the pan. Don't you dare throw it away—save it for roasting potatoes later. Return the pan to medium heat and add your sliced cherry peppers. They should sizzle dramatically and start to blister almost immediately. The smell will transport you to an Italian grandmother's kitchen. Let them cook for about 2 minutes, stirring occasionally, until they start to soften and the edges caramelize. This is where they develop that sweet-heat complexity that makes the dish sing.
- Add the garlic and cook for just 30 seconds. We're not browning it here—just taking the raw edge off and letting it perfume the oil. The garlic should smell sweet and aromatic, not bitter or burnt. If it starts to brown too quickly, lower the heat. This is the foundation of our sauce, and burnt garlic will ruin everything with its bitter nastiness. Stir constantly and keep a close eye; garlic goes from perfect to pathetic in the blink of an eye.
- Pour in the white wine and prepare for the dramatic sizzle and steam. Use a wooden spoon to scrape up all those gorgeous browned bits from the bottom of the pan. These are flavor gold—concentrated chicken essence that'll dissolve into the sauce and make it taste like you spent hours on it. Let the wine bubble away for about 3 minutes, reducing by half. It should start to thicken and look glossy. The alcohol burns off, leaving behind acidity and depth that brightens everything up.
- Now the fun part: add the cherry pepper brine and return the chicken to the pan. The brine adds this tangy, spicy complexity that makes the sauce absolutely addictive. Nestle the chicken in the sauce, skin-side up so it stays crispy. Add any juices that collected on the plate too—that's flavor we can't afford to waste. Cover the pan and let it simmer gently for 10 minutes. The chicken will finish cooking and absorb all those gorgeous flavors while staying incredibly moist.
- Remove the lid and let the sauce reduce for another 5 minutes. It should thicken slightly and coat the back of a spoon. If it gets too thick, add a splash of water or chicken broth. Taste it—this is where you adjust. Need more heat? Add more brine. Too spicy? A pat of butter will tame the flames. The sauce should be glossy and slightly thickened, clinging to the chicken like it never wants to let go. This is the moment of truth where you decide if you're making dinner or making memories.
- Remove from heat and swirl in the cold butter. This is called mounting, and it's what separates restaurant sauces from home cooking. The cold butter emulsifies into the sauce, creating this silky, glossy finish that makes everything taste richer and more luxurious. Don't skip this step even if you're tempted. Add the chopped parsley and a squeeze of fresh lemon juice. The parsley adds color and freshness, while the lemon brightens everything up like turning on the lights at a party. Serve immediately and prepare for applause.
That's it—you did it. But hold on, I've got a few more tricks that'll take this to another level...
Insider Tricks for Flawless Results
After making this dish approximately four hundred times (give or take), I've discovered some secrets that separate the good from the legendary. These aren't in any cookbook—they come from late nights, hungry experiments, and that one time I accidentally created the best version while half-asleep. Some of these tips seem counterintuitive, but trust me, they're the difference between dinner and an experience. Keep these in your back pocket and you'll become the person everyone asks to bring the main dish to potlucks.
The Temperature Rule Nobody Follows
Here's what separates the pros from the pretenders: room temperature chicken. I know, I know—food safety classes gave you trust issues. But taking your chicken out of the fridge 30 minutes before cooking makes the difference between evenly cooked meat and that sad gray band around the edges. The chicken cooks more evenly, stays juicier, and develops better browning. Just don't leave it out for hours like you're defying death. Thirty minutes is the sweet spot where safety meets perfection. Your chicken will thank you by cooking evenly instead of being raw in the middle and shoe leather on the outside.
Why Your Nose Knows Best
Your nose is the most underutilized kitchen tool you own. When the garlic hits the pan, it should smell sweet and aromatic, not sharp and aggressive. When the wine reduces, it should smell like you want to dive into the pan face-first. If anything smells bitter or burnt, you've gone too far. I once had a friend who made this dish and called me complaining it tasted "weird." Turns out she burned the garlic and didn't notice because she was too busy scrolling through TikTok. Trust your nose—it evolved specifically to keep you from eating gross things. It's like having a built-in quality control system that never needs batteries.
The 5-Minute Rest That Changes Everything
After you finish cooking, let the dish rest for five minutes before serving. I know you're hungry. I know it smells incredible. But those five minutes allow the juices to redistribute through the chicken and the sauce to thicken slightly. It's like letting a steak rest, but for braised dishes. The chicken absorbs some of that gorgeous sauce back into itself, becoming even more flavorful. Plus, the sauce has a moment to settle and become its best self. Think of it as the dish's meditation moment before it meets its destiny. Five minutes is also just enough time to set the table, pour yourself a glass of that wine you opened for cooking, and prepare for the compliments headed your way.
The Spoon Test for Sauce Perfection
Here's how to tell if your sauce is done: drag a wooden spoon across the bottom of the pan. If it leaves a visible trail that takes a second to fill back in, you're golden. If it immediately floods back like nothing happened, keep reducing. If it sits there like molasses, you've gone too far and need to thin it out. The sauce should coat the back of a spoon (nappe, if we're being French about it) but still flow like liquid silk. I learned this from a chef who made me practice with chocolate sauce until I could do it blindfolded. Overkill? Maybe. But my sauces have been perfect ever since.
The Leftover Transformation
Here's where this recipe becomes a gift that keeps on giving. The leftovers are arguably better than the original dish. The chicken continues to absorb flavors overnight, becoming this incredibly tasty powerhouse. Shred it over salads, stuff it into sandwiches, or chop it up and toss it with pasta. The sauce becomes this concentrated flavor bomb that's incredible drizzled over roasted vegetables or used as a base for soup. I once made chicken salad with the leftovers and had three people demand the recipe. The secret? Nothing—just the magic of time and chemistry working together while you sleep.
Creative Twists and Variations
This recipe is a playground. Here are some of my favorite ways to switch things up:
The Sausage Remix
Swap half the chicken for Italian sausage—sweet or hot, your choice. Brown the sausage first, then use the rendered fat to cook the chicken. The sausage adds this incredible depth and richness that makes the whole dish taste like it's been simmering for hours. Cut the sausage into chunky pieces so they stay juicy and create these little pockets of spice throughout. This version is particularly good for feeding crowds of hungry people who think they don't like chicken.
The Creamy Dream Version
Add a splash of heavy cream at the very end for a creamy, dreamy sauce that'll make you want to bathe in it. The cream tames the heat slightly and creates this luxurious texture that coats everything in pure comfort. Don't add too much—just enough to turn the sauce a gorgeous blush pink. This version is perfect for people who think they don't like spicy food, or for those nights when you need a hug in food form. Serve it over wide pappardelle noodles and prepare for marriage proposals.
The Veggie Power Play
Add sliced bell peppers and onions to the pan after the chicken comes out. Let them caramelize in all those gorgeous chicken drippings until they're soft and slightly charred. They add sweetness and texture, plus they make the whole dish feel more substantial. I like using a mix of colors for the visual appeal—red, yellow, and orange peppers create this gorgeous rainbow that makes the dish look like a party. This is how I sneak vegetables into my life when I'm feeling virtuous.
The Seafood Surprise
Replace the chicken with shrimp for a lightning-fast version that tastes like you spent way more time on it than you did. Sear the shrimp for just 2 minutes per side, then remove and add back at the very end. The shrimp pick up all the spicy, tangy flavors but stay tender and sweet. This version is perfect for those "I need dinner in 20 minutes" emergencies when you want to feel fancy but have zero energy. Serve it over rice or polenta and accept your compliments gracefully.
The Slow Cooker Cheat
For days when you want to come home to dinner waiting, throw everything except the butter and parsley into a slow cooker. Cook on low for 6 hours, then add the butter and parsley right before serving. The chicken becomes fall-apart tender, and the sauce develops this incredible depth. It's not quite the same as the stovetop version—no crispy skin—but it's incredibly delicious in its own right. Plus, your house will smell like an Italian restaurant all day, which is never a bad thing.
The Breakfast Remix
Chop up the leftovers and fold them into scrambled eggs with some shredded cheese. The spicy, tangy chicken transforms into the most incredible breakfast that'll make you excited to wake up. Add some crusty bread for sopping up the sauce, and you've got breakfast fit for royalty. I discovered this by accident one morning when I was starving and the only thing in my fridge was leftover chicken. Now I make extra just for breakfast. It's especially good for curing Saturday morning headaches, if you know what I mean.
Storing and Bringing It Back to Life
Fridge Storage
Store leftovers in an airtight container in the fridge for up to 4 days. I like to separate the chicken from the sauce if possible—it helps everything reheat more evenly. The sauce will thicken considerably when cold, but don't panic. It'll loosen up beautifully when reheated. If you stored them together, the chicken will continue to absorb flavor, which is actually fantastic. Just make sure to cool everything completely before refrigerating. Hot food in the fridge is like inviting bacteria to a house party, and nobody wants that kind of guest.
Freezer Friendly
This dish freezes beautifully for up to 3 months, though the chicken texture changes slightly. Freeze in portion-sized containers so you can defrost exactly what you need. The sauce might separate slightly when thawed, but a vigorous stir while reheating brings it back together. I freeze the chicken and sauce together because the sauce protects the chicken from freezer burn. Thaw overnight in the fridge—not on the counter, unless you enjoy playing food poisoning roulette. Once thawed, use within 24 hours for best quality.
Best Reheating Method
Gentle is the name of the game here. Reheat in a covered skillet over low heat, adding a splash of water or chicken broth to loosen the sauce. Covering creates steam that helps reheat everything evenly without drying out the chicken. Stir occasionally and be patient—rushing with high heat is how you get tough, stringy chicken that tastes like disappointment. If you're in a hurry, microwave on 50% power with a damp paper towel over the top. But honestly, the stovetop method only takes 10 minutes and tastes infinitely better. Add a fresh sprinkle of parsley at the end to brighten everything up.