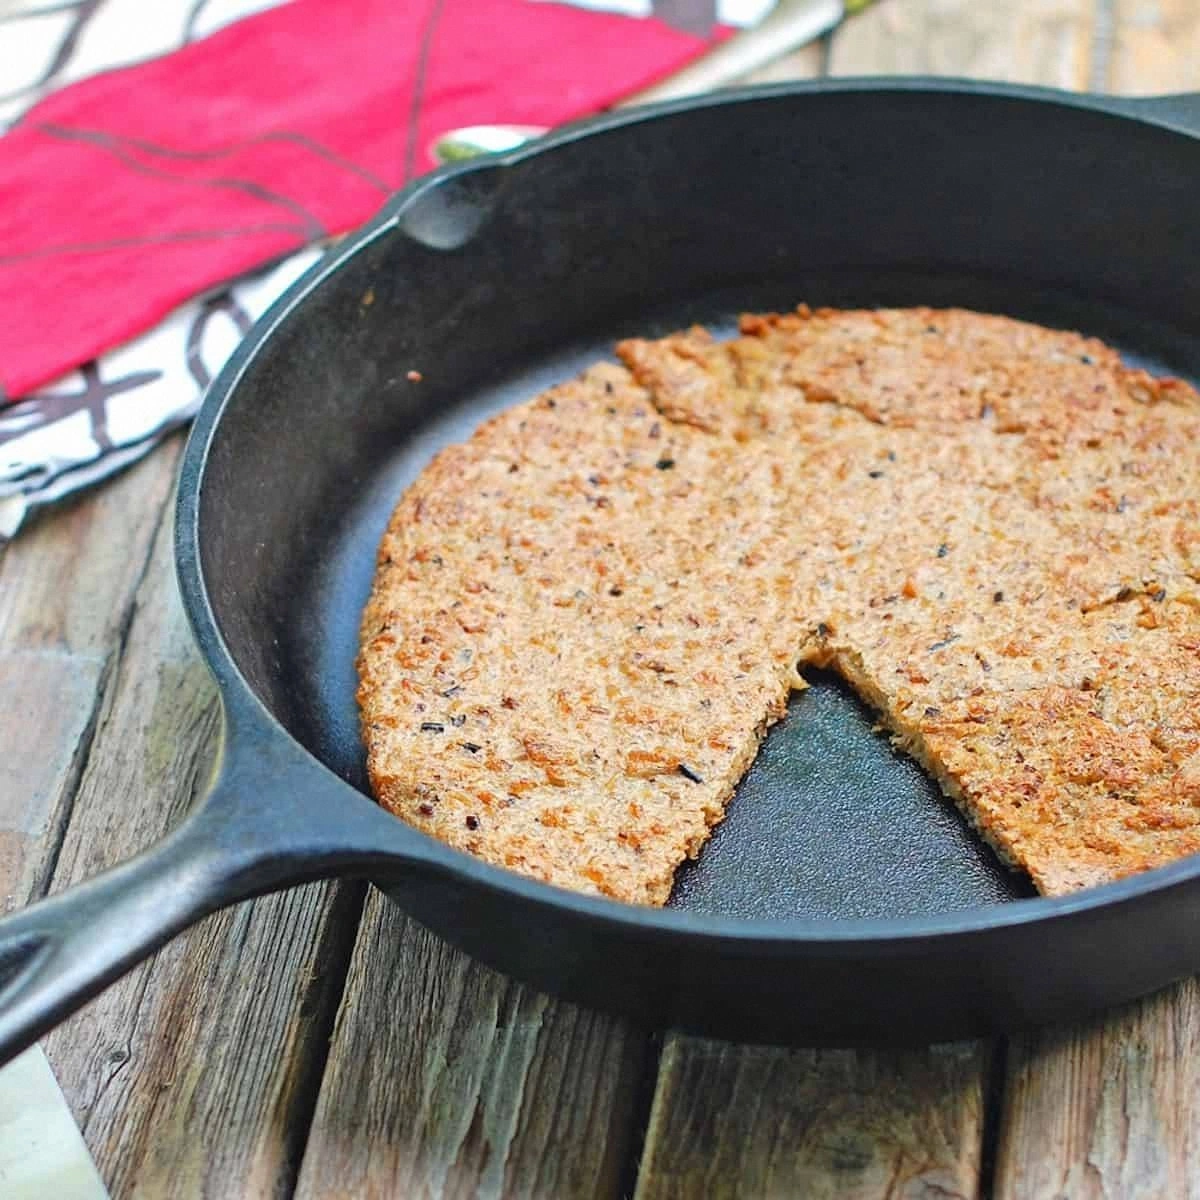
Picture this: it’s a rainy Saturday afternoon, the kind that makes you want to curl up with a blanket and a bowl of something warm, but the pantry is looking a little sad. I was rummaging through my cupboards, feeling the weight of stale crackers and wilted veggies, when a stubborn packet of wild rice stared back at me like a dare. I thought, “What if I could turn this humble grain into something that feels like a gourmet cheat‑day snack?” The idea sparked a mini kitchen rebellion, and after a few frantic Googles and a lot of trial‑and‑error, I finally landed on a flatbread that’s crisp on the edges, chewy in the middle, and packed with nutty, earthy flavor that makes you forget you ever used rice at all. That first bite was a revelation – the kind of moment that makes you whisper, “I’ve just discovered the best thing since sliced bread.”
The scent that hit me as the dough hit the hot skillet was nothing short of intoxicating; it was a toasty, buttery perfume that reminded me of a bakery on a crisp morning, but with a forest‑floor twist from the wild rice. The sound? A gentle sizzle, like rain on a tin roof, promising a golden crust that will crackle under your fork. When I finally lifted that flatbread from the pan, the steam rose in a fragrant cloud that filled the whole kitchen, making my neighbors wonder what culinary magic was happening next door. The first bite? A perfect marriage of nutty rice and airy dough, the texture dancing between crunchy and soft, like a well‑rehearsed tango.
Most flatbread recipes either skip the grain entirely or drown the dough in too many herbs, losing the star of the show – the wild rice. This version, however, embraces the rice’s natural chew and nutty depth, while keeping the dough light enough to fold over your favorite spreads or serve as a sturdy base for hearty toppings. The secret? A simple technique of pre‑cooking the rice, then letting it cool to room temperature before folding it into a lightly kneaded dough. This ensures the rice stays distinct, not mushy, and adds a surprising bite that most recipes miss. I also tossed in a splash of honey for a subtle sweetness that balances the salt and pepper, a move most cooks overlook.
And now, the fun part: I’m going to walk you through every single step, from picking the perfect wild rice to achieving that coveted crisp‑edge, melt‑in‑your‑mouth center. By the end, you’ll wonder how you ever made flatbread any other way, and I dare you to taste this and not go back for seconds. Let’s dive in and make something that will become the centerpiece of every gathering you host.
What Makes This Version Stand Out
- Flavor Fusion: The nutty, slightly sweet wild rice pairs with a subtle hint of honey and rosemary, creating a complex palate that feels both rustic and refined.
- Texture Triumph: You get a crisp, caramelized edge while the interior stays soft and pillowy, thanks to the perfect flour‑to‑water ratio and a quick rest.
- Simplicity: Only nine pantry staples are needed, and the technique is straightforward enough for a beginner yet satisfying for a seasoned baker.
- Unique Ingredient: Wild rice isn’t just a garnish here; it’s the hero, providing a hearty bite that most flatbreads lack.
- Crowd‑Pleaser: Guests often claim they can’t tell it’s gluten‑free friendly, and they’ll be asking for the recipe before the first slice disappears.
- Ingredient Quality: Using high‑quality, organic wild rice and cold‑pressed olive oil elevates the whole dish from everyday to extraordinary.
- Cooking Method: A skillet‑first sear locks in flavor, followed by a short oven finish that guarantees uniform browning.
- Make‑Ahead Potential: The dough can be refrigerated for up to 24 hours, letting the flavors meld even deeper before cooking.
Inside the Ingredient List
The Flavor Base
Wild rice, the star of the show, brings an earthy, nutty depth that ordinary flour simply can’t provide. I use a cup of cooked, cooled wild rice – if you overcook it, the grains become mushy and lose their satisfying bite, turning the dough gummy. For the best texture, rinse the rice before cooking and simmer it in a low‑sodium broth; this infuses extra flavor without adding salt. If you can’t find wild rice, try a blend of brown rice and barley for a similar chew, but the authentic taste will be missed.
The Texture Crew
All‑purpose flour forms the structural backbone, giving the flatbread its airy lift. Two cups is the sweet spot; any more and the dough becomes dense, any less and it won’t hold together. I recommend sifting the flour with the baking powder to ensure even distribution, which prevents pockets of blandness. If you’re gluten‑free, swap in a 1‑to‑1 blend of rice flour and tapioca starch, but expect a slightly different crumb.
The Unexpected Star
Olive oil isn’t just for greasing; it enriches the dough, lending a buttery mouthfeel and helping the crust achieve that coveted golden sheen. Two tablespoons strike a balance between richness and a light crumb. For a smoky twist, substitute half the oil with toasted sesame oil – the aroma will make your kitchen feel like a high‑end Asian bistro.
The Final Flourish
A pinch of salt and a dash of black pepper amplify the wild rice’s natural flavors, while a teaspoon of honey adds a whisper of sweetness that rounds out the savory profile. Don’t underestimate the honey; it also helps the crust caramelize beautifully. If you’re avoiding sugar, a drizzle of maple syrup works just as well, giving a subtle maple undertone that pairs nicely with rosemary.
Everything's prepped? Good. Let’s get into the real action and turn these humble ingredients into a masterpiece that will have everyone reaching for seconds.
The Method — Step by Step
Start by cooking the wild rice. Rinse one cup of wild rice under cold water, then combine it with two cups of low‑sodium broth in a saucepan. Bring to a boil, reduce to a simmer, cover, and let it cook for about 45 minutes until the grains burst open and become tender. Once done, drain any excess liquid and spread the rice on a baking sheet to cool – that cooling step is crucial because hot rice will melt the butter in the dough, resulting in a greasy flatbread. The rice should be at room temperature before you add it to the flour.
In a large mixing bowl, whisk together two cups of all‑purpose flour, one teaspoon of baking powder, and a pinch of salt. I like to use a fork to create a well in the center; this ensures the wet ingredients don’t clump prematurely. If you’re using a stand mixer, attach the paddle attachment and give it a quick 30‑second stir to aerate the flour. This step sets the stage for a light, airy crumb.
Combine three‑quarters cup of warm water (about 110°F), two tablespoons of olive oil, and one teaspoon of honey in a measuring cup. Stir until the honey dissolves completely – you’ll see a glossy sheen that signals the mixture is ready. Pour this liquid into the flour well, then add the cooled wild rice and a half‑teaspoon of freshly ground black pepper. Using a wooden spoon, bring everything together until a shaggy dough forms.
Turn the dough onto a lightly floured surface and knead gently for about two minutes. The goal isn’t to develop gluten like with pizza dough; you just want everything to bind. The dough should feel tacky but not sticky; if it’s too sticky, sprinkle a little extra flour, but be careful not to over‑flour, or you’ll lose the delicate crumb. After kneading, shape the dough into a ball, cover it with a damp towel, and let it rest for exactly ten minutes. This rest period lets the flour hydrate fully, preventing the flatbread from shrinking when it hits the heat.
While the dough rests, preheat a cast‑iron skillet over medium‑high heat. You want it hot enough that a drop of water sizzles and evaporates instantly – that’s the sweet spot for a quick sear. Lightly brush the skillet with a thin layer of olive oil; too much oil will fry the flatbread rather than bake it.
Divide the rested dough into four equal portions. On a floured surface, roll each portion into a ¼‑inch thick circle, about 8 inches in diameter. If you prefer a rustic look, you can stretch the dough by hand, leaving a few uneven edges for extra texture. The edges should be slightly thinner than the center; this ensures they crisp up nicely while the middle stays soft.
Place one rolled‑out circle onto the hot skillet. You’ll hear an immediate sizzle – that’s the sound of flavor forming. Cook for 2‑3 minutes, or until the bottom is golden brown and the edges start to pull away from the pan. Flip carefully using a spatula; the other side should brown in another 2 minutes. If you notice the flatbread puffing up, gently press it down with the spatula to keep it flat and even.
Transfer the cooked flatbread to a pre‑heated oven (375°F) for a quick 5‑minute finish. This step ensures the interior cooks through without becoming soggy and gives the entire piece a uniform golden hue. Once out, let the flatbread rest on a cooling rack for a minute – this allows the steam to escape, preserving that perfect crunch. Slice, drizzle with a little extra olive oil if desired, and serve warm.
That’s it — you did it. But hold on, I’ve got a few more tricks that’ll take this to another level, because I’m not one to leave a masterpiece half‑finished.
Insider Tricks for Flawless Results
The Temperature Rule Nobody Follows
Never underestimate the power of a truly hot skillet. If the pan isn’t hot enough, the flatbread will steam rather than sear, resulting in a pale, soggy surface. I always preheat the skillet for at least five minutes and test it with a few drops of water – they should dance and evaporate instantly. This simple check guarantees that crisp, caramelized edges you crave.
Why Your Nose Knows Best
Cooking is as much about scent as it is about sight. When the flatbread is ready to flip, you’ll detect a buttery, nutty aroma rising from the pan. If the smell is still raw or floury, give it a few more seconds; the flavor compounds need time to develop. Trusting your nose prevents premature flipping, which can cause the flatbread to split.
The 5‑Minute Rest That Changes Everything
After kneading, a brief rest allows the gluten to relax and the flour to fully absorb the liquid. Skipping this step is a common mistake that leads to a tough, rubbery crust. I set a timer for exactly ten minutes, covering the dough with a damp towel – this keeps it from drying out and ensures a tender bite.
Friend’s Failure: Skipping the Oven Finish
A buddy once tried to skip the oven finish, thinking the skillet alone would do the trick. The result? A flatbread that was beautifully crisp on the bottom but gummy in the middle, like a soggy pancake. The brief oven blast is the secret to an even crumb and a uniform golden color.
Herb Infusion Hack
For an aromatic boost, sprinkle fresh rosemary or thyme onto the dough just before it hits the skillet. The herbs release their essential oils instantly when they meet the heat, infusing the flatbread with a fragrant layer that elevates the entire dish. A little goes a long way – you’ll get a burst of flavor without overpowering the wild rice.
Creative Twists and Variations
This recipe is a playground. Here are some of my favorite ways to switch things up:
Cheesy Garlic Burst
Mix in a quarter cup of grated Parmesan and a teaspoon of garlic powder into the dough. The cheese melts into pockets of gooey goodness, while the garlic adds a punch that pairs perfectly with the nutty rice.
Spicy Chipotle Kick
Stir in one tablespoon of chipotle in adobo sauce and a pinch of smoked paprika. The smoky heat balances the sweet honey, creating a bold flavor profile that will make your taste buds dance.
Sweet Breakfast Version
Swap the salt for a pinch of cinnamon, add a tablespoon of maple syrup, and top the finished flatbread with fresh berries and a dollop of Greek yogurt. It transforms the dish into a delightful brunch centerpiece.
Herb‑Infused Mediterranean
Fold in chopped sun‑dried tomatoes, Kalamata olives, and a tablespoon of fresh oregano. The Mediterranean twist adds briny depth and a burst of color that makes the flatbread look as good as it tastes.
Vegan Nutty Delight
Replace the honey with agave nectar and use a splash of coconut oil instead of olive oil. The result is a vegan‑friendly flatbread that retains its crispness and nutty aroma.
Stuffed Pocket Surprise
After rolling the dough, place a spoonful of sautéed mushrooms and caramelized onions on half of the circle, fold over, and seal the edges. Cook as usual; the filling steams inside, creating a handheld pocket of umami.
Storing and Bringing It Back to Life
Fridge Storage
Place cooled flatbread slices in an airtight container or a zip‑top bag, separating layers with parchment paper to prevent sticking. They’ll stay fresh for up to three days. When you’re ready to eat, reheat in a skillet over medium heat for two minutes per side, adding a tiny splash of water to the pan to create steam that revives the crispness.
Freezer Friendly
Wrap each flatbread tightly in plastic wrap, then place them in a freezer‑safe bag. They’ll keep for up to two months. To reheat, thaw overnight in the fridge, then pop them in a 350°F oven for five minutes, or use a toaster oven for a quick crunch.
Best Reheating Method
The secret to bringing back that fresh‑out‑of‑the‑oven snap is steam. Before reheating, drizzle a few drops of water over the flatbread, then cover it loosely with foil and heat in a 375°F oven for six minutes. The steam revives the interior softness while the foil protects the edges from over‑browning.