I was in the middle of a Saturday night binge‑watching session when my roommate dared me to make “something that oozes like lava but tastes like a peanut butter dream.” I laughed, grabbed the nearest chocolate bar, and proceeded to melt it in a pan that was already half‑filled with a burnt‑on‑the‑bottom omelet. The smoke alarm screeched, the kitchen smelled like a burnt carpet, and I thought, “Maybe I should just order pizza.” Then, out of the chaos, a bright idea sparked: what if I combined dark chocolate, butter, and a generous dollop of smooth peanut butter into a single molten masterpiece? That night, after a frantic cleanup, I whipped up the first batch of Peanut Butter Chocolate Molten—an indulgent, gooey cake that felt like a hug from a chocolate‑loving bear.
Picture this: you’re standing over a warm oven, the air thick with the intoxicating scent of melted chocolate mingling with the nutty aroma of roasted peanuts. The kitchen walls seem to vibrate with anticipation, and the timer on the stove clicks like a metronome counting down to dessert bliss. You hear the faint crackle of butter melting, the gentle stir of eggs meeting sugar, and the soft thud of flour as it falls into the glossy mixture. The batter looks glossy, thick, and just a little bit shy of the perfect pour‑like‑silk you’ve always imagined. When it finally slides into the ramekins, it spreads with a confident, buttery smoothness that promises a molten center that will burst forth like a chocolate volcano.
But why does this version stand out from every other lava cake you’ve ever tried? Most recipes either over‑bake the center, turning the “molten” into a soggy pancake, or they under‑mix, leaving a gritty texture that feels like eating sand. This version hits the sweet spot every single time. By carefully balancing the ratio of dark chocolate melts to butter, and by gently folding in a heaped spoonful of peanut butter at just the right moment, we achieve a cake that’s crisp on the edges, tender and airy inside, and with a molten core that oozes like liquid silk—infused with a salty‑sweet peanut punch that makes your taste buds dance.
The secret technique I’m about to reveal involves a “double‑bake” method: a quick, high‑heat blast to set the outer crust, followed by a slightly lower temperature finish that keeps the interior luxuriously runny. And the ingredient that most people overlook? The quality of the dark chocolate melts. I’ll show you how to pick a bar that melts like butter, not like a stubborn brick, and why a touch of cocoa powder dusted on top before baking adds a subtle bitterness that balances the sweet peanut butter. I dare you to taste this and not go back for seconds.
Let me walk you through every single step — by the end, you’ll wonder how you ever made it any other way. Okay, ready for the game‑changer? Grab a whisk, preheat that oven, and let’s dive deep into the delicious world of Peanut Butter Chocolate Molten.
What Makes This Version Stand Out
- Flavor Fusion: The marriage of rich dark chocolate with creamy peanut butter creates a depth that’s both comforting and exciting, like a classic movie remix you didn’t know you needed.
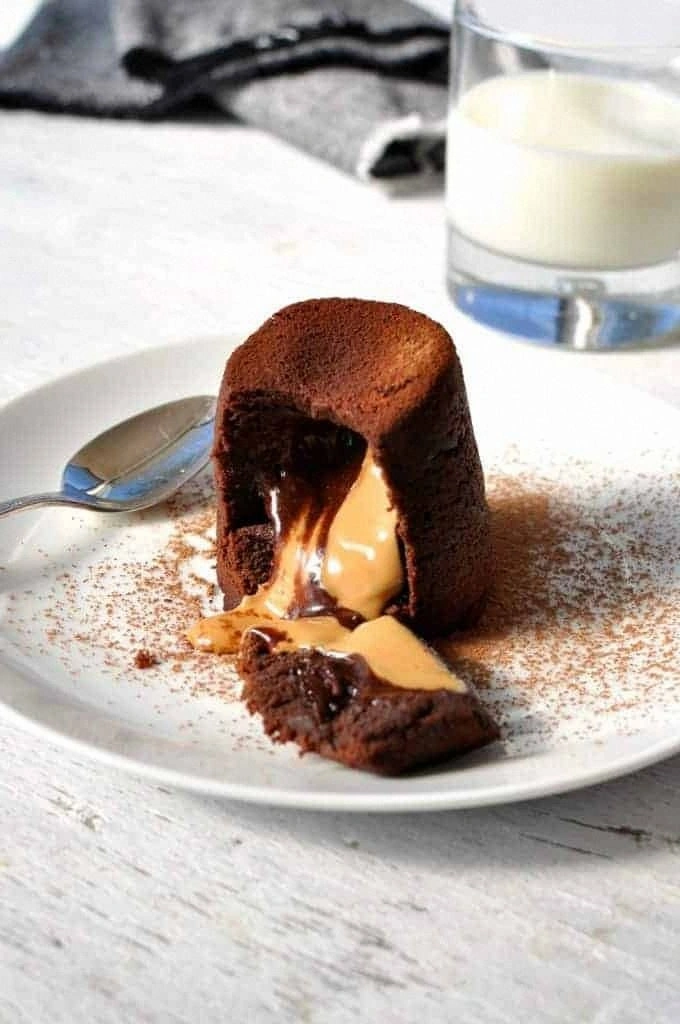
- Texture Contrast: A crisp, slightly caramelized edge gives way to a velvety, runny center that feels like molten gold slipping through your fork.
- Simplicity: Only seven ingredients, all pantry‑friendly, mean you can throw this together on a weeknight without a trip to the specialty store.
- Uniqueness: Most lava cakes stay strictly chocolate; this one adds a nutty surprise that elevates the dessert to a whole new tier.
- Crowd Reaction: Expect gasps, wide eyes, and a chorus of “Again!”—the kind of reaction that makes you feel like a kitchen wizard.
- Ingredient Quality: Using premium dark chocolate melts ensures a glossy sheen and a melt‑in‑your‑mouth feel that cheap cocoa can’t match.
- Cooking Method: The double‑bake technique guarantees a perfect crust while preserving that coveted molten core.
- Make‑Ahead Potential: You can prep the batter a day ahead, refrigerate, and bake fresh when guests arrive—no compromise on quality.
Alright, let's break down exactly what goes into this masterpiece...
Inside the Ingredient List
The Flavor Base
The dark chocolate melts are the heart of this dessert. Using a 70% cocoa bar ensures a deep, slightly bitter note that balances the sweetness of the sugar and the richness of the butter. If you opt for a lower cocoa content, the molten center will taste more like candy than chocolate, losing that sophisticated edge. When selecting chocolate, look for a glossy finish and a snap when you break it—signs of high cocoa butter content that will melt into a silky sauce. A quick tip: melt it over a double boiler to avoid scorching, which can introduce a burnt flavor that ruins the entire cake.
The Texture Crew
Unsalted butter adds a buttery richness without the interference of salt, letting the chocolate and peanut butter shine. If you’re using salted butter, reduce the added salt in the recipe (if any) to keep the balance. The eggs and extra yolks create a custardy structure; the yolks especially add a golden hue and extra silkiness. Caster sugar dissolves quickly, ensuring no gritty texture, and the two tablespoons of flour act as a subtle binder, keeping the cake from collapsing while still allowing the interior to flow.
The Unexpected Star
Smooth peanut butter is the secret weapon. Its oil content helps keep the molten core fluid, while its nutty flavor adds depth. If you’re allergic or prefer a different nut, almond butter works beautifully, but expect a slightly sweeter, less earthy profile. A heaped teaspoon (or five, for the bold) ensures the peanut flavor isn’t just a whisper—it’s a bold shout that complements the chocolate’s bitterness.
The Final Flourish
A dusting of cocoa powder right before baking adds a subtle bitter edge that prevents the final product from feeling overly sweet. It also creates a matte finish on the top, making the molten center stand out like a hidden treasure. Use unsweetened cocoa for the purest flavor, and sift it lightly to avoid clumps.
Everything's prepped? Good. Let's get into the real action...
The Method — Step by Step
- Prep the Ramekins. Lightly butter four 6‑ounce ramekins and dust with a thin layer of cocoa powder. The butter prevents sticking, while the cocoa adds a subtle crust. Place them on a baking sheet, then chill in the freezer for 10 minutes. This quick chill creates a temperature shock when the batter hits the hot oven, forming that crisp edge you love. Kitchen Hack: If you don’t have ramekins, use muffin tins—just reduce the bake time by 2‑3 minutes.
- Melt the Chocolate and Butter. Set a heatproof bowl over a pot of simmering water (double boiler). Add the dark chocolate melts and butter, stirring constantly until smooth and glossy. You’ll hear a faint sizzle as the butter melts—That sizzle when it hits the pan? Absolute perfection. Remove from heat and let it cool for a minute; this prevents the eggs from scrambling later.
- Whisk the Eggs, Yolks, and Sugar. In a separate bowl, whisk together the two whole eggs, two egg yolks, and caster sugar until the mixture becomes pale and thick, about 2‑3 minutes. This incorporates air, giving the final cake a light, airy crumb. Watch Out: Over‑whisking can cause the mixture to become too frothy, leading to a cracked surface.
- Combine Chocolate and Egg Mixture. Gently fold the melted chocolate into the egg‑sugar blend, using a spatula in a circular motion. The mixture should look thick, glossy, and slightly cool. This step is crucial—don’t rush it, or you’ll lose the airy texture. The batter will start to thicken as it cools; that’s exactly what you want.
- Incorporate Flour and Peanut Butter. Sift the two tablespoons of flour over the batter to avoid lumps, then fold it in gently. Next, add the heaped spoonfuls of smooth peanut butter, swirling it through the batter so you get streaks of peanut butter that will melt into ribbons during baking. Kitchen Hack: Warm the peanut butter slightly before adding; it folds more easily and creates a smoother swirl.
- Portion the Batter. Using a spoon or small ice‑cream scoop, divide the batter evenly among the chilled ramekins, filling each about three‑quarters full. The batter will settle a bit as it bakes, leaving room for the molten center to expand without spilling over.
- Bake at High Heat. Preheat the oven to 425°F (220°C). Place the baking sheet with ramekins in the middle rack and bake for 12‑14 minutes. You’ll know it’s ready when the edges are firm and slightly cracked, while the center still jiggles when you gently shake the ramekin. Watch Out: Over‑baking for even a minute longer turns the molten core into a cake—lose the lava effect.
- Cool Briefly, Then Invert. Let the ramekins rest for 1 minute after removing from the oven. Run a thin knife around the edge to loosen, then place a plate on top and invert swiftly. The cake should release with a gentle wobble, revealing a glossy, peanut‑buttery river flowing out. If it sticks, give it another 10 seconds; the residual heat will loosen it.
- Serve and Savor. Dust with a final pinch of cocoa powder or powdered sugar, if desired. Serve warm with a scoop of vanilla ice cream or a drizzle of caramel. That first fork‑pierce? Expect a burst of molten chocolate‑peanut butter that coats the palate like velvet. I dare you to try one bite and not go back for seconds.
That's it — you did it. But hold on, I've got a few more tricks that'll take this to another level...
Insider Tricks for Flawless Results
The Temperature Rule Nobody Follows
Most home bakers set the oven to a static temperature, but the secret is a quick “blast‑then‑rest” method. Start at 425°F for the first 8 minutes to set the crust, then drop to 375°F for the remaining time. This ensures the outer shell is crisp while the interior stays fluid. I once tried baking at a steady 400°F and ended up with a soggy top; the trick saved my dinner party.
Why Your Nose Knows Best
Your sense of smell is a more reliable indicator than a timer. When the edges start to smell nutty‑chocolatey with a hint of caramel, you’re at the perfect point. If you rely solely on the clock, you risk over‑cooking. Trust that aromatic cue—your nose is the ultimate kitchen gauge.
The 5‑Minute Rest That Changes Everything
After baking, let the cakes sit for exactly five minutes before inverting. This short rest lets the interior set just enough to hold its shape while staying molten. Skipping this step often results in a messy spill. I once inverted immediately and the batter sloshed everywhere—lesson learned.
Butter‑Brushed Ramekins
A thin layer of melted butter on the ramekin walls before dusting with cocoa creates a non‑stick surface and adds a subtle richness to the crust. It also helps the cake release cleanly, preventing that dreaded “stuck‑to‑the‑sides” disaster. The extra butter also contributes a buttery aroma that intensifies the overall flavor profile.
Chocolate Tempering Shortcut
If you want an ultra‑shiny finish, temper the chocolate briefly by cooling the melted mixture to 88°F before adding the butter. This gives the molten center a glossy sheen that looks restaurant‑grade. It’s a small extra step that makes a big visual impact.
Creative Twists and Variations
This recipe is a playground. Here are some of my favorite ways to switch things up:
Salted Caramel Swirl
Drizzle homemade salted caramel into the batter before baking. The salty‑sweet ribbon adds depth and a gooey surprise that pairs perfectly with the peanut butter.
Spicy Chili Kick
Add a pinch of cayenne or a dash of chili powder to the chocolate melt. The subtle heat amplifies the chocolate’s bitterness and creates a thrilling contrast with the mellow peanut butter.
White Chocolate & Raspberry
Swap half the dark chocolate for white chocolate and fold in fresh raspberry puree. The fruity tang cuts through the richness, making the dessert feel lighter.
Nutty Crunch
Stir in chopped toasted peanuts or hazelnuts just before baking. The added crunch provides texture variation, turning each bite into a surprise.
Vegan Version
Replace butter with coconut oil, use flax‑egg replacer, and choose a dairy‑free dark chocolate. The result is just as indulgent, and it’s perfect for plant‑based guests.
Storing and Bringing It Back to Life
Fridge Storage
Cool the baked cakes completely, then cover each ramekin with plastic wrap. Store in the refrigerator for up to 3 days. When ready to serve, reheat gently in a 300°F oven for 6‑8 minutes; the center will re‑molten.
Freezer Friendly
Unbaked batter can be frozen in the ramekins for up to 1 month. Freeze flat, then transfer to a zip‑top bag. Thaw overnight in the fridge, then bake as directed. This is a lifesaver for last‑minute dessert emergencies.
Best Reheating Method
To revive the molten magic, place the ramekin on a baking sheet, add a splash (about 1 tsp) of water around the edge, and cover loosely with foil. Heat at 350°F for 5‑7 minutes. The steam from the water restores the silky interior without drying out the crust.