I still remember the night I burned a batch of cinnamon rolls in the middle of a rainy Sunday. The kitchen smelled of scorched sugar, the oven door was stuck, and my friends were staring at me like I’d just invented a new form of dessert. That disaster was the spark that pushed me to create a twist on a classic: Easy Homemade Cinnamon Twists. The moment the dough hit the pan, the air filled with a sweet, buttery aroma that made my mouth water even before the first bite.
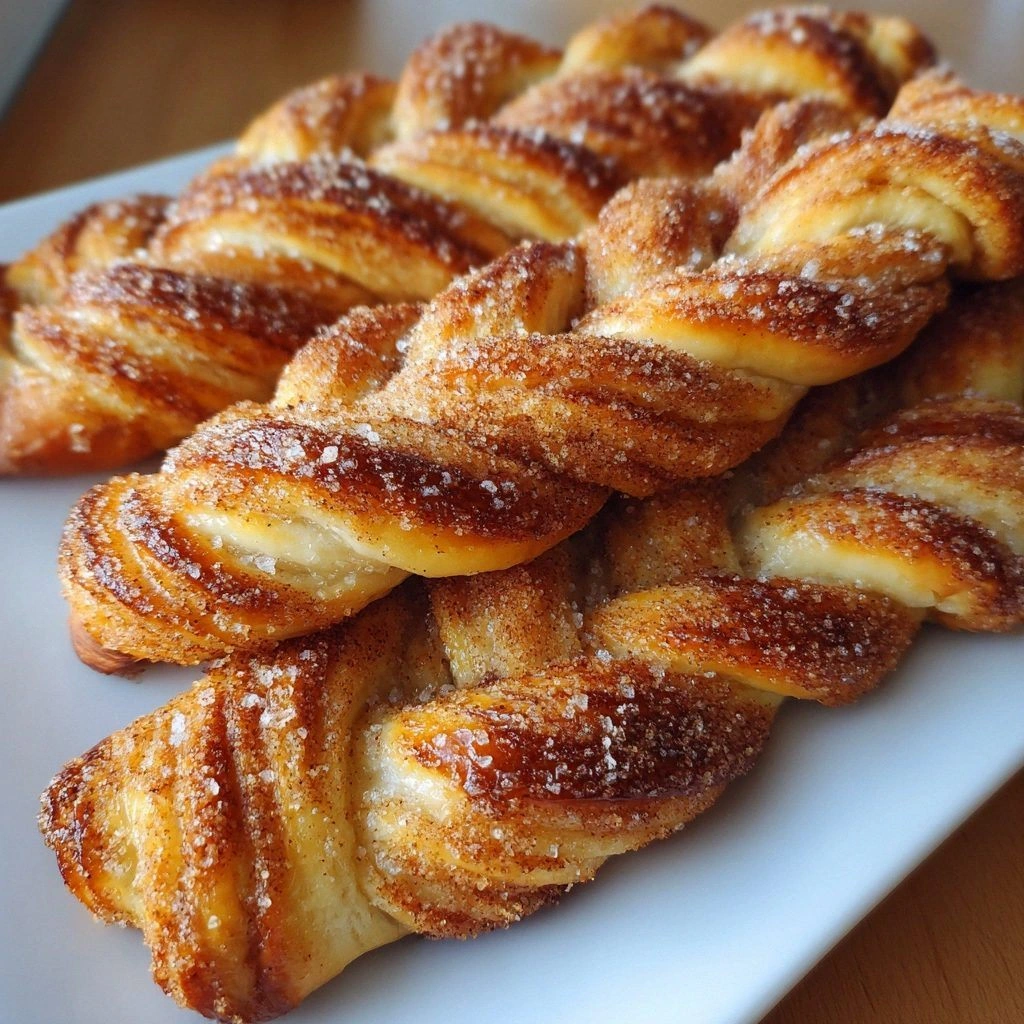
Picture this: a golden swirl of dough, crisp on the outside yet tender inside, with a sugary crunch that crackles like a tiny fireworks show. The sound of the first bite is a satisfying pop, followed by a caramelized burst of cinnamon that tingles the tongue. The texture is a paradox—soft, buttery, and yet with a subtle snap that satisfies the craving for something crunchy. The aroma is a heady mix of vanilla and warm spices that lingers long after the last bite. The sight of the twists, glistening with a glossy sugar glaze, is enough to make anyone’s mouth water.
What sets this version apart is the meticulous balance between sweetness, spice, and texture. I’ve tweaked the dough to hold its shape without spreading, used a blend of brown and white sugar for depth, and added a pinch of baking soda to give the twists a light lift. The result is a snack that feels indulgent yet surprisingly light, a crowd‑pleaser that can be made in under an hour. It’s the kind of recipe that turns an ordinary weekend into a culinary celebration.
And here’s the kicker: I’ll reveal a secret ingredient that most people overlook—just a splash of milk before baking. That simple tweak locks in moisture and gives the twists an extra golden sheen. Ready to walk through every single step? By the end, you’ll wonder how you ever made it any other way.
What Makes This Version Stand Out
- Taste: The blend of brown and white sugar creates a caramelized sweetness that pairs perfectly with the robust cinnamon flavor. The subtle hint of vanilla deepens the profile, making each bite feel layered. This combination is the secret sauce that elevates the twists from ordinary to unforgettable.
- Texture: A dough that stays intact yet yields to the bite, giving a crisp exterior and a soft, airy interior. The addition of baking soda helps the twists rise just enough to create that signature puff. The result is a snack that crunches delightfully before melting in your mouth.
- Simplicity: No fancy equipment or exotic ingredients required. Just pantry staples and a few minutes of prep. This makes the recipe perfect for busy mornings or spontaneous snack sessions.
- Uniqueness: The twist—literally—comes from a subtle drizzle of milk that locks in moisture and creates a glossy finish. It’s a small change that makes a huge difference in flavor and appearance.
- Crowd Reaction: Friends who’ve tried this version rave about how the twists hold up when served at parties. They’re the kind of treat that keeps coming back for seconds. I dare you to taste this and not go back for seconds.
- Ingredient Quality: Using real butter instead of margarine gives a richer flavor that’s hard to beat. Freshly ground cinnamon adds a depth that pre-ground spice can’t match.
- Make‑Ahead Potential:
Inside the Ingredient List
The Flour Foundation
All-purpose flour provides the structural backbone of the twists. It absorbs the butter and sugar, creating a dough that holds its shape. Skipping flour would leave you with a sticky mess that never rises. When selecting flour, choose a brand with a consistent protein content for the best rise.
The Leavening Crew
Baking powder and baking soda work in tandem to give the twists a light lift. Baking powder alone isn’t enough; baking soda adds a subtle tang that balances the sweetness. If you don’t have baking soda, you can substitute it with an equal amount of baking powder, but the texture will shift slightly.
The Sweet & Spicy Duo
Brown sugar brings a caramel depth, while white sugar adds a clean sweetness that cuts through the spice. The ground cinnamon is the star—use freshly ground for a richer aroma. A pinch of salt enhances both the sweetness and the spice, preventing the dough from tasting flat.
The Final Flourish
Butter is the secret to that buttery, melt-in-your-mouth texture. Use unsalted butter for precise control over salt levels. A splash of milk before baking locks in moisture and gives a glossy sheen that makes the twists visually irresistible. Vanilla extract adds a subtle warmth that rounds out the flavor profile.
Everything’s prepped? Good. Let’s get into the real action and start creating the magic.
The Method — Step by Step
- In a large bowl, whisk together flour, baking powder, baking soda, and salt. The dry mix ensures even distribution of leavening agents. This step prevents pockets of unbaked dough that could result in uneven texture. Keep the mixture aside while you move on to the wet ingredients.
- In a separate bowl, combine melted butter, brown sugar, white sugar, cinnamon, and vanilla. Stir until the sugars dissolve and the mixture is glossy. The butter’s fat coats the flour particles, creating a tender crumb. This is the moment where the aroma starts to build.
- Add the wet mixture to the dry ingredients and fold gently with a spatula. Mix just until the dough comes together; overmixing will make the twists tough. The dough should be slightly sticky but manageable. If it feels dry, add a tablespoon of milk to bring it together.
- Cut the dough into 1-inch squares using a sharp knife or pizza cutter. The squares should be uniform to ensure even cooking. If you prefer a more rustic look, use a cookie cutter for fun shapes. This step is where the magic of the twists begins.
- Take each square and roll it into a tight twist, tucking the ends underneath. The twist should be tight enough that it holds its shape during baking. If the dough is too soft, chill it for 10 minutes before twisting. This creates that signature spiral that looks as good as it tastes.
- Place the twists on a parchment-lined baking sheet, spacing them about 2 inches apart. This gives them room to expand without merging. Lightly brush the tops with a thin layer of milk to help them brown. Preheat the oven to 375°F (190°C) while you arrange the twists.
- Bake for 12-15 minutes or until the tops are golden brown and the twists sound hollow when tapped. The baking time may vary slightly depending on your oven’s accuracy. Remove from the oven and let them cool on the sheet for 5 minutes before transferring to a wire rack. This resting period allows the structure to set.
- Serve warm or at room temperature. The twists are best enjoyed fresh but can be stored for a few days. If you’re serving at a gathering, set them on a platter with a drizzle of melted butter and a dusting of powdered sugar. The presentation alone will make guests swoon.
That’s it — you did it. But hold on, I’ve got a few more tricks that will take this to another level.
Insider Tricks for Flawless Results
The Temperature Rule Nobody Follows
Many bakers bake at the lowest temperature, but a slightly higher heat gives the twists a crisp crust. Set your oven to 375°F (190°C) and preheat for at least 20 minutes. This ensures even baking and a golden finish. I once baked at 350°F and the twists stayed soft on the outside, ruining the crunch factor.
Why Your Nose Knows Best
The scent of cinnamon rising from the oven is a reliable indicator that the twists are ready. When the aroma hits its peak, the twists are perfectly browned. If you’re unsure, give them a quick tap; a hollow sound means they’re done. This sensory cue saves you from guessing time.
The 5-Minute Rest That Changes Everything
Letting the twists rest on the baking sheet for 5 minutes before transferring them to a rack locks in the structure. The dough continues to bake slightly from residual heat, creating a crisp outer layer. Skipping this step often results in a soft, doughy center. I learned this trick from a seasoned baker who said, “Don’t rush the rest.”
Chill the Dough for a Neater Twist
If the dough is too warm, it will spread and lose its shape. Chill for 10–15 minutes before rolling. The dough becomes firmer, making it easier to twist. This is especially helpful on humid days when the dough feels tacky.
Use Fresh Butter for a Richer Flavor
Butter is the heart of the dough’s flavor. Fresh, high-quality butter gives a richer, creamier taste compared to margarine or butter substitutes. The difference is subtle but noticeable, especially when the twists are warm. I’ve tried using plant-based butter, but the flavor was flat.
Add a Splash of Milk for Moisture
The milk before baking locks in moisture and gives the twists a glossy sheen. It also helps the sugars dissolve more evenly, preventing a gritty texture. A tablespoon is enough for a batch of four servings. I discovered this trick while experimenting with a recipe that left my twists dry.
Creative Twists and Variations
This recipe is a playground. Here are some of my favorite ways to switch things up:
Nutty Crunch Edition
Add 1/2 cup chopped pecans or walnuts to the dough for an extra crunch. The nuts soak up the buttery flavor and add a delightful texture. This variation is perfect for holiday gatherings where guests love a nutty treat. Serve with a dusting of powdered sugar for extra sparkle.
Chocolate‑Infused Delight
Swirl in 1/4 cup melted dark chocolate into the dough before twisting. The chocolate adds a rich depth that pairs beautifully with cinnamon. This version is a hit with chocolate lovers and makes a great dessert option. Let the chocolate cool slightly before adding to avoid melting the dough.
Spicy Cinnamon Twist
Add a pinch of cayenne pepper or chili powder to the cinnamon-sugar mix. The heat balances the sweetness and adds a surprising kick. This spicy version works well as a unique party snack. Keep the amount small to avoid overpowering the cinnamon.
Maple Syrup Glaze
Drizzle a thin layer of maple syrup over the warm twists for a sweet glaze. The syrup caramelizes slightly, creating a glossy finish. Maple pairs wonderfully with the buttery dough and cinnamon. This glaze is especially appealing to those who prefer natural sweeteners.
Lemon‑Zest Twist
Add 1 tablespoon of lemon zest to the dough for a bright, citrusy note. The zest cuts through the richness and adds a fresh aroma. This variation is perfect for spring or summer when you want a lighter flavor profile. Serve with a dusting of powdered sugar for a classic touch.
Almond Flour Alternative
Replace half of the all-purpose flour with almond flour for a gluten‑free option. The almond flour adds a subtle nutty flavor and keeps the twists moist. Adjust the liquid by adding a tablespoon of almond milk if the dough feels dry. This version is a favorite among those with dietary restrictions.
Storing and Bringing It Back to Life
Fridge Storage
Store the twists in an airtight container at room temperature for up to three days. The airtight seal prevents the dough from drying out. If you’re storing them for longer, keep them in the refrigerator to maintain freshness. When you’re ready to eat, let them sit at room temperature for 10 minutes before serving.
Freezer Friendly
Wrap individual twists in parchment paper and place them in a freezer bag. They’ll keep for up to two months without losing quality. When you’re ready to enjoy, pop them out and let them thaw at room temperature for 15 minutes. The twists will retain their texture and flavor.
Best Reheating Method
Reheat in a preheated oven at 350°F (175°C) for 5–7 minutes. The heat will revive the crispness without drying them out. If you prefer a quick fix, microwave for 15 seconds, but watch closely to avoid overcooking. Add a splash of water before reheating to create steam that restores moisture.