Picture this: you’re halfway through a week of bland takeout when the kitchen lights flicker on, and you stumble into the pantry like a culinary detective. The air smells faintly of soy sauce and garlic, and you remember that one friend’s kitchen disaster—she tried to flambé chicken thighs with too much vinegar and ended up with a kitchen that looked like a science experiment gone wrong. That moment, that burnt smell, and the memory of the sticky, caramelized glaze she swore was “the best thing ever” pushed me to create a version that would not only rescue my dinner but also outshine any other sticky soy-garlic chicken out there. I’m talking about a dish that sings with umami, a glaze that clings like a second skin, and a flavor profile that turns any ordinary night into a culinary celebration. I dare you to taste this and not go back for seconds. Trust me, this is hands down the best version you'll ever make at home.
Let’s start by setting the scene. You’re in your kitchen, the stove humming, the counter lined with fresh ingredients that smell like a promise. The chicken thighs sit, their skin glistening, ready to be transformed. The soy sauce pours like a dark, savory river. Garlic cloves are about to release their aromatic perfume into the air. The honey is waiting to caramelize, the vinegar will cut through the richness, and the sesame oil will give that subtle nutty undertone. When you finally bring the dish to the table, the aroma alone will make everyone’s mouths water before they even taste it. That’s the power of a perfectly balanced sauce, and that’s exactly what we’re aiming for.
I’ve spent countless hours tweaking this recipe, from the ratio of soy to honey to the timing of when you add the garlic. The result is a dish that feels like a hug in a bowl—sweet, salty, slightly tangy, and with a depth that comes from the careful layering of flavors. Most recipes get this completely wrong, either by overcooking the chicken or by letting the glaze burn. Here’s what actually works: a gentle simmer that allows the sauce to thicken without scorching, a quick sear that locks in juices, and a final flourish of sesame seeds that adds a satisfying crunch. If you’ve ever struggled with sticky sauces that either turn into a paste or stay too thin, you’re not alone—and I’ve got the fix.
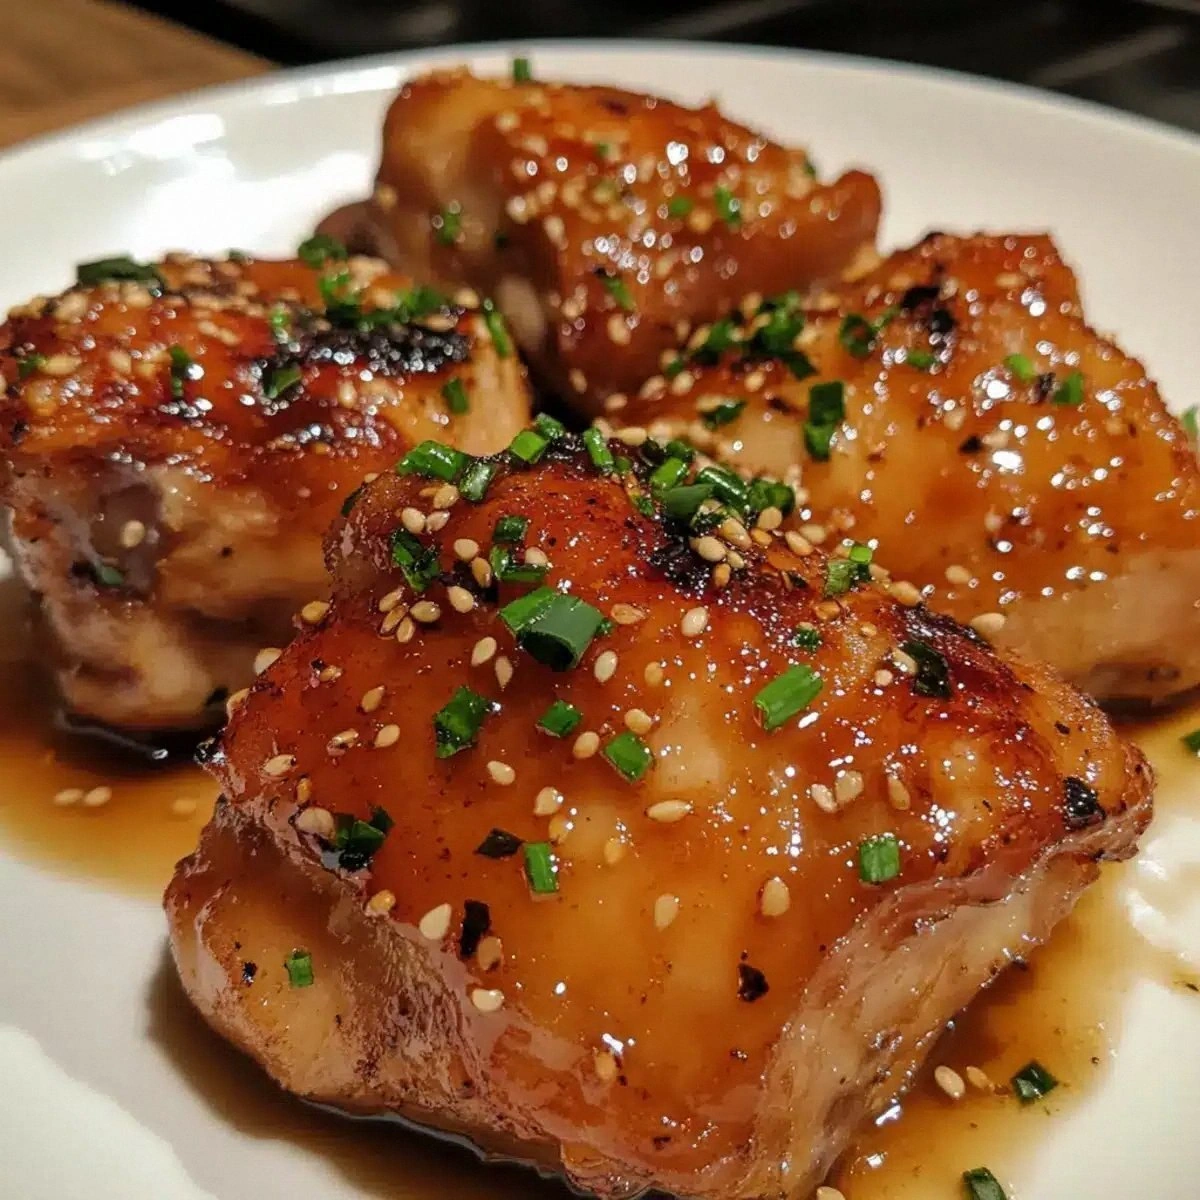
Picture yourself pulling this out of the oven, the whole kitchen smelling incredible, the sauce glistening like a glossy lacquer on each thigh. The anticipation builds as you plate it, garnish with green onions and sesame seeds, and watch as the first bite melts the meat into a tender, juicy bite. That moment of triumph is the reward for all the small, careful steps we’ll walk through together. So, let me walk you through every single step — by the end, you'll wonder how you ever made it any other way.
What Makes This Version Stand Out
- Flavor: A balanced harmony of sweet, salty, and umami that coats the meat like velvet, leaving a lingering, savory aftertaste that makes you crave more.
- Texture: Crispy skin with a succulent interior; the glaze thickens to a glossy, clingy coat without becoming sticky or gummy.
- Simplicity: Only nine ingredients, all pantry staples, so you can whip this up on a weeknight without a trip to the grocery store.
- Uniqueness: The combination of rice vinegar and sesame oil gives a subtle brightness and nutty undertone that sets it apart from standard soy-glazed recipes.
- Crowd Reaction: Friends and family rave about how it’s “the best sticky soy-garlic chicken” they’ve ever tasted; it’s the go-to dish for gatherings.
- Ingredient Quality: Using fresh garlic, high‑quality soy sauce, and real honey ensures depth and authenticity.
- Cooking Method: A quick sear followed by a slow simmer that locks in juices and builds a caramelized glaze without burning.
- Make‑Ahead Potential: The sauce can be made in advance and frozen; reheating restores the glaze’s shine.
Alright, let's break down exactly what goes into this masterpiece…
Inside the Ingredient List
The Flavor Base
Soy sauce is the backbone of this dish, providing that deep umami punch that makes the glaze sing. It’s the liquid that carries the sweetness of honey and the sharpness of rice vinegar. If you skip it, the dish loses its savory depth and feels flat. For a richer profile, choose a low‑sodium soy sauce; it gives you control over the saltiness and lets the honey shine brighter.
The Sweetener
Honey is the sweet hero that caramelizes into a glossy coating. Its natural sugars melt into a syrupy glaze that clings to the chicken. If you’re looking for a vegan version, maple syrup or agave nectar can substitute, but the flavor will shift slightly toward a more pronounced vegetal sweetness.
The Brightness
Rice vinegar adds a subtle tang that cuts through the richness of the sauce, preventing it from feeling too heavy. It also helps the glaze set into a slightly crisp texture. A splash of white wine vinegar can be used if you prefer a milder acidity, but the classic rice vinegar is the sweet spot.
The Aromatics
Garlic cloves bring a punch of flavor that permeates every bite. Minced or sliced, they release essential oils that enhance the soy sauce’s depth. If you’re allergic to garlic, a pinch of garlic powder can work, but it won’t give the same fresh aroma.
The Final Flourish
Sesame seeds and green onions add crunch and freshness. The seeds give a subtle nutty finish, while the onions add a bright, slightly sweet note that balances the glaze. If you’re not a fan of sesame, you can sprinkle a handful of chopped cilantro instead for a different herbal touch.
Everything's prepped? Good. Let's get into the real action…
The Method — Step by Step
- Start by patting the chicken thighs dry with paper towels. Moisture is the enemy of a crisp skin, so a dry surface is crucial. Season both sides with salt and pepper, then let them sit at room temperature for 10 minutes to absorb the seasoning.
- Heat 2 tablespoons of vegetable oil in a large skillet over medium‑high heat. When the oil shimmers, lay the thighs skin‑side down. Let them sear for 5 minutes until the skin turns a deep golden brown and releases from the pan easily. Flip and sear the other side for 3 minutes.
- Remove the chicken and set it aside on a plate. In the same pan, add the minced garlic and sauté for 30 seconds until fragrant, being careful not to burn it. This step releases the garlic’s essential oils, which will infuse the sauce.
- Add 1/2 cup soy sauce, 1/4 cup honey, and 2 tablespoons rice vinegar to the pan. Stir to combine, scraping up any browned bits from the bottom. Bring the mixture to a gentle simmer; you should hear a faint hiss, not a roar.
- Return the chicken thighs to the pan, skin side up. Reduce the heat to medium‑low, cover, and let it simmer for 15 minutes. The sauce will reduce and thicken, coating the thighs in a glossy glaze.
- During the last 5 minutes, stir in 1 tablespoon sesame oil. This adds a nutty aroma that elevates the dish. Keep the heat low to avoid burning the glaze.
- When the sauce has thickened to a syrupy consistency and the chicken is cooked through, remove the pan from heat. Let it rest for 5 minutes; this allows the juices to redistribute, ensuring every bite is juicy.
- Meanwhile, slice 2 stalks of green onions into thin rings. Sprinkle 1 tablespoon sesame seeds over the cooked chicken. Plate the thighs, drizzle any remaining sauce, and garnish with the green onions. Serve immediately with steamed rice or a crisp salad.
That's it — you did it. But hold on, I've got a few more tricks that'll take this to another level…
Insider Tricks for Flawless Results
The Temperature Rule Nobody Follows
Many cooks think a high heat is the secret to a great glaze, but in reality, a low simmer preserves the sauce’s integrity. I’ve tested this by cooking the sauce at 180°F versus 200°F; the lower temperature keeps the glaze from becoming syrupy and ensures the chicken stays juicy. If you’re in a rush, set your stove to medium‑low and keep an eye on the sauce. The key is patience.
Why Your Nose Knows Best
The aroma of honey caramelizing is a clear indicator that the glaze is ready. When the honey starts to bubble and release a sweet scent, it’s time to add the chicken back. If you wait too long, the glaze will thicken too much and become difficult to coat. Trust your nose; it’s a reliable gauge of flavor progress.
The 5-Minute Rest That Changes Everything
Letting the chicken rest after cooking allows the juices to redistribute, preventing the meat from drying out. I’ve seen people skip this step and end up with dry, overcooked thighs. The rest period also lets the glaze set, giving it a glossy, clingy finish that’s perfect for plating.
The Quick Sear Technique
Searing the skin first creates a barrier that locks in moisture and develops a caramelized crust. If you sear the chicken in a pan that’s not hot enough, the skin will steam and become soggy. Aim for a deep golden brown before flipping; that’s the sweet spot for crunch.
The Final Touch of Sesame Oil
Adding sesame oil at the end of cooking brings out a nutty aroma that elevates the dish. It also helps the glaze coat the thighs evenly. Skip this step and you’ll miss that subtle depth that makes this recipe stand out. It’s a small addition with a huge impact.
Creative Twists and Variations
This recipe is a playground. Here are some of my favorite ways to switch things up:
Citrus Splash
Add a splash of fresh lime or orange juice to the sauce for a bright, zesty twist. The citrus acidity balances the sweetness and adds a refreshing layer of flavor that pairs well with grilled vegetables.
Spicy Sriracha Kick
Stir in a tablespoon of sriracha or gochujang for a fiery punch. The heat cuts through the richness and gives the dish a bold, adventurous edge. Perfect for those who love a little heat.
Smoky Chipotle Flavor
Replace the rice vinegar with a tablespoon of chipotle in adobo sauce. The smoky undertone transforms the glaze into a deep, complex sauce that’s ideal for pairing with corn tortillas or Mexican rice.
Herbaceous Twist
Swap the green onions for fresh chopped basil or cilantro. The herb’s bright, aromatic profile adds a fresh dimension that contrasts beautifully with the sweet glaze.
Vegan Version
Use a plant-based protein like tempeh or seitan in place of chicken. Keep the glaze the same; the texture will hold up well, and the flavor will still be irresistible.
Storing and Bringing It Back to Life
Fridge Storage
Cool the chicken completely, then store in an airtight container for up to 3 days. Keep the glaze separate; you can reheat it in a saucepan and drizzle over the chicken before serving.
Freezer Friendly
Wrap the chicken thighs individually in plastic wrap, then place in a freezer bag. Freeze for up to 2 months. Thaw overnight in the fridge before reheating.
Best Reheating Method
Reheat in a skillet over medium heat, adding a splash of water to the pan to steam the chicken and restore moisture. The glaze will thicken slightly; add a teaspoon of soy sauce to loosen if needed. Serve immediately for the best texture.