I was standing in my kitchen on a rainy Tuesday, staring at a half‑finished sourdough starter that looked more like a science experiment gone rogue than a living culture. My roommate had dared me to bake something that would make even the most skeptical grandmothers nod in approval, and I thought, “Why not a loaf that smells like a crisp autumn orchard and tastes like a hug from a bakery?” The first attempt was a disaster – a dense, gummy brick that could have doubled as a doorstop. That failure sparked an obsessive quest for the perfect balance of tang, sweetness, and that unmistakable sourdough chew.
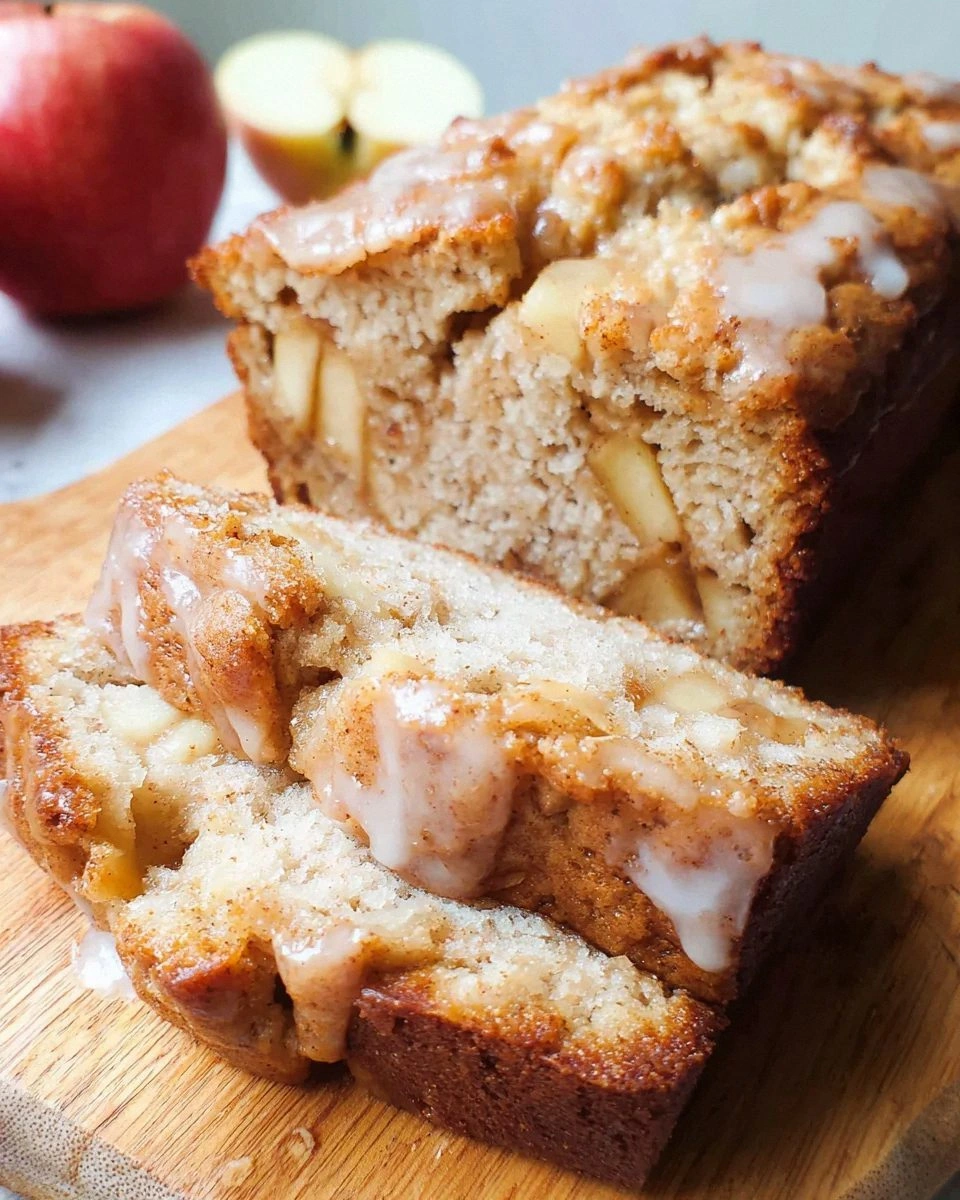
Picture this: a golden‑brown crust that cracks open with a gentle tap, releasing a steam‑filled cloud scented with caramelized apples, warm cinnamon, and a whisper of sourdough acidity. Inside, the crumb is airy yet moist, speckled with tender apple pieces that burst like tiny fireworks of flavor. The texture is a delightful contradiction – the crust is crisp enough to shatter like thin ice, while the interior remains soft enough to melt on your tongue. When you slice into it, the aroma rises like a fragrant curtain, inviting you to dive right in.
Most apple breads out there either drown in sugar or forget the sourdough backbone that gives them character. This version, however, embraces the natural fermentation of a mature starter, letting the wild yeasts coax out the apples’ hidden sweetness while adding a subtle tang that cuts through the richness. The result is a loaf that feels both nostalgic and revolutionary – the kind of recipe you’ll brag about at brunches and keep returning to because it never disappoints.
And here’s the kicker: I’m throwing in a splash of cold‑pressed apple cider vinegar during the final proof. It sounds crazy, but that tiny acid boost sharpens the apple flavor and gives the crumb an extra lift, turning a good loaf into a legendary one. I dare you to taste this and not go back for seconds. Let me walk you through every single step — by the end, you’ll wonder how you ever made it any other way.
What Makes This Version Stand Out
- Tangy Depth: The active sourdough starter provides a natural acidity that balances the sweetness of the apples, creating a flavor profile that feels both comforting and sophisticated.
- Moisture Mastery: Grated apples release juices during baking, keeping the crumb moist without turning it soggy – a texture most quick breads miss.
- Simple Steps: Despite the impressive results, the method uses only a handful of techniques that even beginners can master.
- Unexpected Boost: A splash of apple cider vinegar during the final proof adds a bright lift that most recipes overlook.
- Crowd‑Pleaser: This loaf gets rave reviews at potlucks; people ask for the recipe before the first slice even hits the plate.
- Ingredient Quality: Using a mix of bread flour and whole‑wheat flour gives the crust that satisfying snap while preserving a tender interior.
- One‑Pan Simplicity: Bake it in a cast‑iron Dutch oven, and you’ll have a perfectly domed loaf without fiddling with steam trays.
- Make‑Ahead Magic: The dough can be refrigerated overnight, allowing the flavors to deepen even further.
Inside the Ingredient List
The Flavor Base
The heart of this loaf is the active sourdough starter. A 100 % hydration starter (equal parts flour and water) brings both leavening power and that signature tang. If you skip the starter and use commercial yeast, you’ll lose the depth that only wild fermentation can provide. For a reliable starter, feed it 12 hours before you plan to bake, keeping it at room temperature so it’s bubbly and lively.
Next up, apple cider vinegar. Just a tablespoon folded in during the final proof adds a bright acidity that sharpens the apple flavor and helps the crumb stay airy. If you don’t have vinegar, a splash of lemon juice works in a pinch, though the flavor won’t be as rounded.
The Texture Crew
Bread flour (2 cups) supplies the gluten network that gives the loaf its structure and chew. Pair it with whole‑wheat flour (1 cup) for a nutty undertone and a slightly denser crumb that holds the apple pieces in place. Swapping the whole‑wheat for rye flour creates a heartier loaf, but be prepared for a stronger flavor.
Butter (¼ cup, melted) adds richness and a tender crumb. If you’re dairy‑free, substitute with coconut oil, but the flavor profile will shift toward tropical notes. Finally, eggs (2 large) provide structure and a glossy crust; omitting them will result in a flatter loaf that’s less golden.
The Unexpected Star
Apples (2 medium, peeled and diced) are the show‑stopper. I recommend a mix of Granny Smith for tartness and Honeycrisp for sweetness – the contrast creates a complex flavor that sings. If you’re out of fresh apples, frozen diced apples work, just thaw and dry them thoroughly to avoid excess moisture.
Cinnamon and nutmeg (1 tsp and ½ tsp) bring that classic autumnal warmth. A dash of these spices can turn a good loaf into a nostalgic memory of crisp fall mornings. Feel free to experiment with a pinch of cardamom for an exotic twist.
The Final Flourish
Brown sugar (½ cup) sweetens the loaf without overpowering the natural apple flavor. It also contributes to a caramelized crust. If you prefer a less sweet bread, reduce the sugar to ¼ cup or swap it for maple syrup for a deeper, woodsy sweetness.
Salt (1 tsp) is essential for flavor balance and for tightening the gluten network. Skipping it will leave the loaf tasting flat and the crumb overly slack. Finally, a pinch of baking soda (¼ tsp) reacts with the apple’s acidity, giving the loaf a subtle lift that complements the sourdough’s rise.
Everything’s prepped? Good. Let’s get into the real action…
The Method — Step by Step
Begin by whisking together the active sourdough starter, warm milk, and melted butter in a large mixing bowl. The mixture should look slightly frothy and emit a faint, yeasty aroma. This is the moment where the starter awakens, so give it a minute to bloom before moving on. If the starter looks sluggish, give it a quick 30‑minute feed and let it become bubbly again.
In a separate bowl, combine the bread flour, whole‑wheat flour, and salt. Sprinkle the dry ingredients over the wet mixture and stir until just incorporated. At this stage, the dough will be shaggy and sticky – that’s perfectly normal. Let the dough rest for 30 minutes; this autolyse period hydrates the flour, making the gluten easier to develop later.
Kitchen Hack: Cover the bowl with a damp towel during the autolyse. The humidity prevents a skin from forming and keeps the dough supple.After the autolyse, add the eggs, brown sugar, and the diced apples. Knead the dough by hand or with a stand mixer on low speed for about 5‑7 minutes, until it becomes smooth and elastic. You’ll notice the dough pulling away from the sides of the bowl and forming a glossy surface. This is the gluten coming alive, creating that signature chew.
Fold in the cinnamon, nutmeg, and the optional baking soda. The spices should coat the dough evenly, creating a fragrant cloud that hints at the final flavor. If you’re using the baking soda, sprinkle it over the dough and give it a quick turn‑over to distribute it without over‑mixing.
Transfer the dough to a lightly oiled container, cover it, and let it bulk ferment at room temperature for 3‑4 hours. Every 30 minutes, perform a series of stretch‑and‑folds: pull a portion of the dough up, then fold it over itself. This technique builds structure without excessive kneading. You’ll feel the dough become more resilient and less sticky with each fold.
Watch Out: If the dough feels too dry after a fold, mist it lightly with water. Too much moisture will make the loaf gummy.Once the dough has risen about 30 % in volume and feels airy, gently turn it out onto a lightly floured surface. Shape it into a tight round boule by folding the edges toward the center and then rotating the dough while tucking the seam underneath. This tension creates a beautiful rise in the oven.
Place the shaped boule into a proofing basket (or a bowl lined with a well‑floured kitchen towel). Sprinkle a tablespoon of apple cider vinegar onto the surface, then cover and refrigerate overnight (or for at least 8 hours). The cold retardation deepens flavor and makes the final proof more predictable.
When you’re ready to bake, preheat your oven to 475 °F (245 °C) with a 6‑inch cast‑iron Dutch oven inside. The high heat creates an initial “oven spring” that lifts the loaf dramatically. Once the oven is scorching, carefully transfer the dough onto a parchment square, score the top with a sharp blade, and place it inside the hot Dutch oven. Cover and bake for 20 minutes.
After the first 20 minutes, remove the lid to let the crust develop a deep caramel color. Bake uncovered for another 20‑25 minutes, or until the crust is a deep amber and the internal temperature reaches 200 °F (93 °C). The loaf should emit a sweet, apple‑laden perfume that makes your kitchen feel like a bakery on a crisp fall morning.
That’s it — you did it. But hold on, I’ve got a few more tricks that'll take this to another level…
Insider Tricks for Flawless Results
The Temperature Rule Nobody Follows
Never let your starter sit in a cold kitchen for more than an hour before mixing. A starter at 78 °F (25 °C) will ferment faster and produce a more pronounced tang. If your house is chilly, give the starter a 15‑minute warm bath in a bowl of warm water before you begin. I once tried to bake in a drafty garage and ended up with a flat loaf – lesson learned.
Why Your Nose Knows Best
During bulk fermentation, trust the scent. When the dough starts to smell slightly sour with a faint hint of apples, it’s ready for the next fold. If it still smells like raw flour, give it a few more minutes. Your nose is a more reliable gauge than a timer.
The 5‑Minute Rest That Changes Everything
After shaping, let the boule rest uncovered for exactly five minutes before placing it in the proofing basket. This short pause lets the gluten relax, making the final shape tighter and the crumb more uniform. A friend once skipped this step and ended up with a loaf that spread out like a pancake – not the look we’re after.
Cold Retardation is Your Secret Weapon
Refrigerating the dough overnight does more than just fit your schedule. The slow fermentation allows the enzymes to break down starches into sugars, intensifying the apple‑cinnamon flavor. It also strengthens the gluten, giving the loaf a higher rise and a crisper crust.
Steam Is the Unsung Hero
The lid on the Dutch oven traps steam, which delays crust formation long enough for the loaf to expand fully. If you don’t have a Dutch oven, create a makeshift steam chamber by placing a pan of hot water on the oven floor and spraying the loaf with water before the first 10 minutes of baking.
Creative Twists and Variations
This recipe is a playground. Here are some of my favorite ways to switch things up:
Maple‑Pecan Delight
Swap half of the brown sugar for pure maple syrup and fold in a quarter cup of toasted pecans. The result is a nutty, caramel‑rich loaf that pairs beautifully with a cup of black coffee.
Cranberry‑Orange Burst
Add a handful of dried cranberries and a tablespoon of orange zest. The tart cranberries contrast with the sweet apples, while the orange zest lifts the flavor profile into a festive, winter‑ready bread.
Whole‑Grain Rustic
Replace the bread flour entirely with spelt or rye flour. Expect a denser crumb and a deeper, earthy flavor. You’ll need a longer bulk fermentation – give the dough an extra hour to develop.
Vegan Apple Bliss
Swap the butter for coconut oil, replace eggs with a flax‑egg (1 tbsp ground flaxseed + 3 tbsp water), and use a plant‑based milk. The loaf stays moist, and the coconut oil adds a subtle tropical note that’s surprisingly harmonious.
Spiced Chai Twist
Introduce a pinch of ground cardamom, ginger, and cloves alongside the cinnamon. The chai‑spiced loaf feels like a cozy sweater in loaf form – perfect for an afternoon tea.
Storing and Bringing It Back to Life
Fridge Storage
Wrap the cooled loaf tightly in a double layer of parchment, then place it in an airtight container. It will stay fresh for up to five days. The parchment prevents condensation, which can make the crust soggy.
Freezer Friendly
Slice the bread before freezing; this way you can pull out individual slices without thawing the whole loaf. Wrap each slice in foil, then store in a freezer‑grade bag for up to three months. When you’re ready to eat, pop a slice in the toaster or oven.
Best Reheating Method
Preheat your oven to 350 °F (175 °C). Lightly mist the loaf with a teaspoon of water, then bake for 10‑12 minutes. The steam revives the crust, making it crisp again while the interior stays soft. This trick works wonders for day‑old loaves that have lost their initial snap.