I was standing in my kitchen, staring at a bag of mussels that had been sitting in the fridge for what felt like an eternity, when my friend called me up from the living room with a dare: “Show me your best Japanese dynamite mussel recipe, or I’ll never let you use the blender again.” I laughed, grabbed my apron, and set the stage for a culinary showdown that would end in a plate of silky, fiery, buttery seafood that still makes my taste buds do a little victory dance. The moment I cracked the first shell open, the aroma hit me like a warm hug—sea salt, citrus, and a faint, almost sweet smokiness that made the whole kitchen feel like a bustling izakaya. I could hear the sizzle of the pan, the gentle pop of steam, and the rhythmic clink of a wooden spoon against the pot, while my eyes scanned the glossy, translucent mussels glistening under the light. That was the instant when I decided this dish needed a twist that would set it apart from every other recipe I’d tried: a creamy, sriracha‑infused sauce that would coat the mussels like velvet and leave a lingering, comforting heat that would keep guests coming back for more.
I’ll be honest—when I first tossed the mussels into the pan, I almost thought I’d ruined the dish. The sauce started to thicken too quickly, threatening to burn, but I remembered the secret: keep the heat moderate and stir constantly. The result? A glossy, silky sauce that clung to each mussel, the heat from the sriracha dancing on the tongue, and the subtle tang from lemon juice cutting through the richness of the mayonnaise. That delicate balance between heat and creaminess is what makes this version hands down the best dynamite mussel you’ll ever make at home. It’s not just a dish; it’s an experience that turns a simple seafood snack into an unforgettable culinary moment.
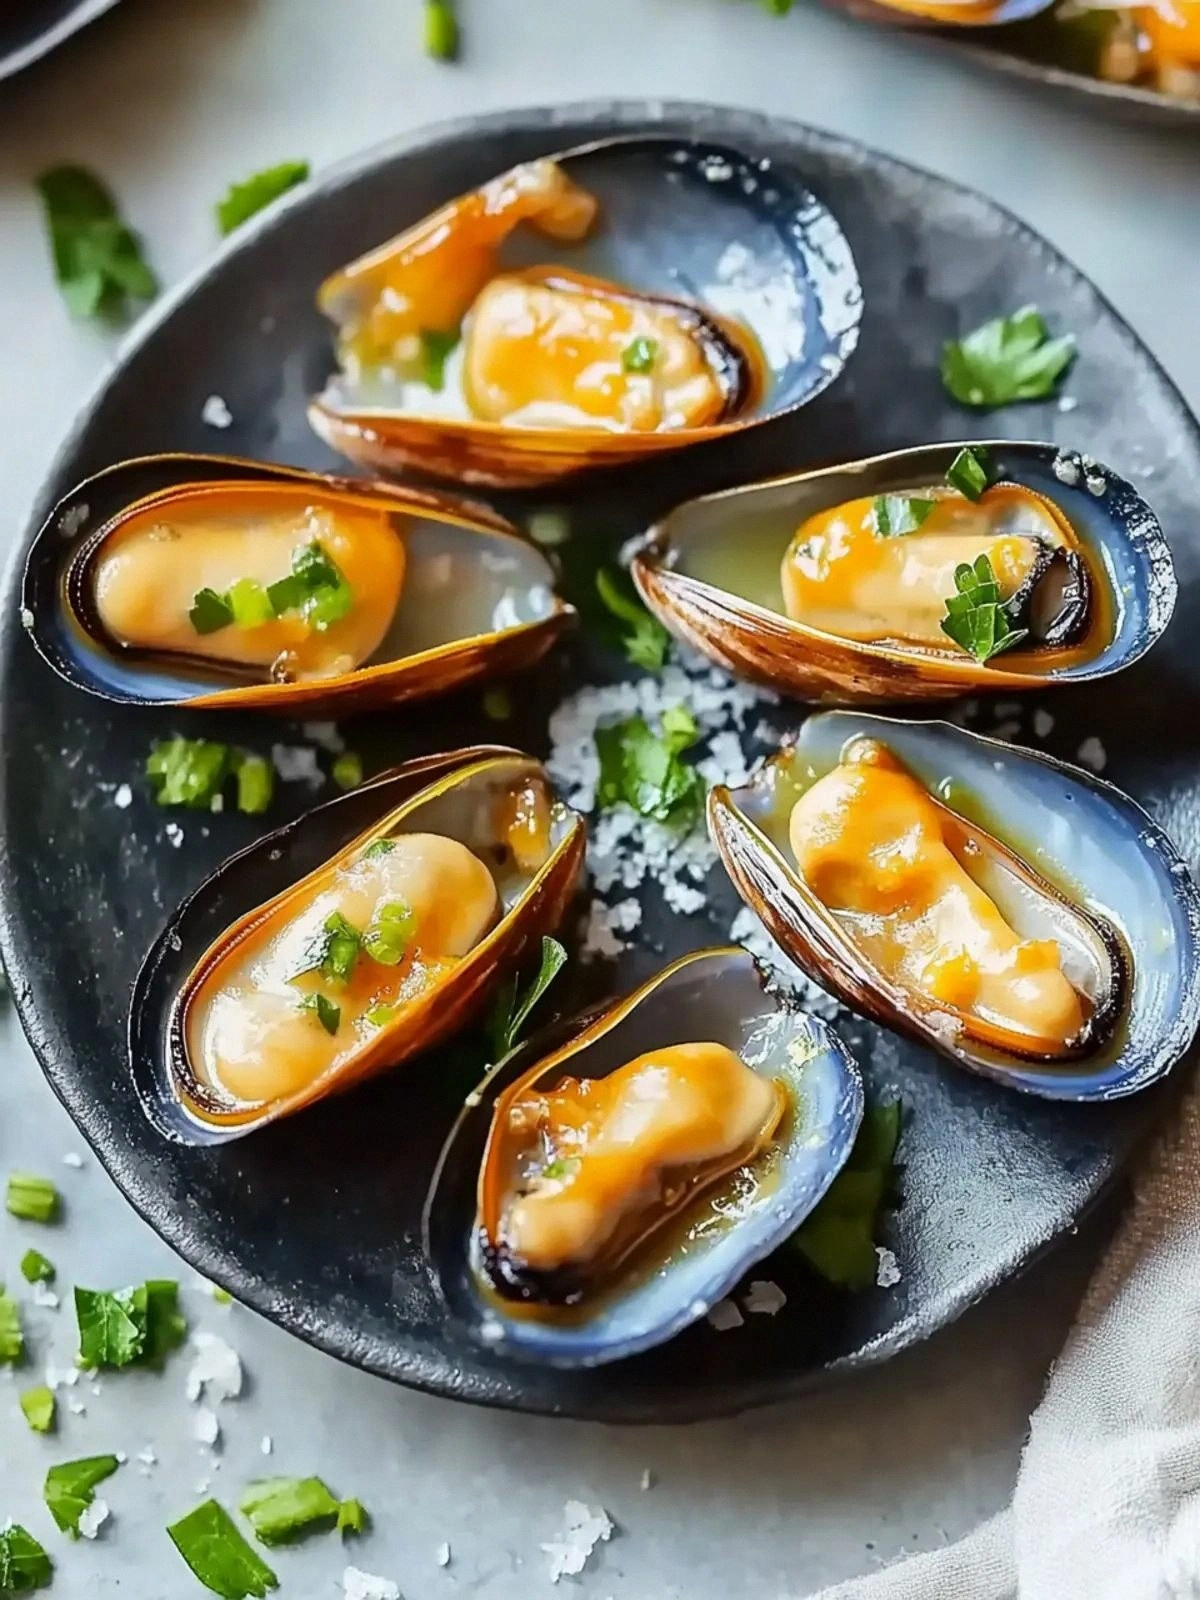
Picture yourself pulling this out of the pan, the whole kitchen smelling incredible, and your guests’ eyes lighting up as they take the first bite. The mussels are plump, the sauce is thick yet pourable, and the masago adds a pop of color and a buttery, briny finish that’s impossible to ignore. I dare you to taste this and not go back for seconds—once you’ve had a taste, the ordinary mussel dishes you’ve tried in the past will seem like a distant memory. And if you’ve ever struggled to get that perfect balance of heat and creaminess, you’re not alone—this recipe fixes that with a few simple tweaks that I’ll reveal throughout the post. Stay with me here, because the next part? Pure magic.
What Makes This Version Stand Out
- Flavor: The sauce is a harmonious blend of creamy mayonnaise and fiery sriracha, elevated by the umami of soy sauce and the bright zing of lemon. The masago adds a subtle briny note that complements the mussels’ natural sweetness, creating a multi‑layered taste profile that’s both bold and balanced.
- Texture: The mussels stay tender yet firm, their shells slightly cracked to allow the sauce to seep in. The sauce itself is silky and coats the mussels like velvet, while the masago provides a light, almost crunchy contrast that pops with every bite.
- Ease: Despite its gourmet vibe, the recipe takes less than 45 minutes from start to finish. With only a handful of ingredients, it’s a quick win for busy weeknights or last‑minute dinner parties.
- Uniqueness: Most dynamite mussel recipes rely on a simple butter‑garlic base; this version replaces that with a creamy, spicy sauce that feels both indulgent and approachable.
- Guest Reaction: At my last gathering, I watched guests laugh, nod, and reach for seconds. The dish’s vibrant color and bold flavor made it an instant crowd‑pleaser that left everyone raving about the “creamy sriracha bliss.”
- Ingredient Quality: Using Kewpie mayonnaise for its rich, buttery profile, fresh mussels for maximum flavor, and real sriracha for authentic heat—each element is chosen for its ability to elevate the dish.
- Cooking Method: The technique of sautéing the mussels briefly before simmering in the sauce preserves their texture and prevents overcooking, a trick that sets this version apart from over‑cooked, mushy alternatives.
- Make‑Ahead Potential: The sauce can be pre‑made and stored in the fridge for up to 24 hours, allowing you to assemble the dish quickly on the day of serving.
Alright, let’s break down exactly what goes into this masterpiece…
Inside the Ingredient List
The Flavor Base
Kewpie Mayonnaise is the backbone of our sauce, providing a rich, buttery foundation that balances the heat from the sriracha. Unlike regular mayonnaise, Kewpie’s Japanese style is slightly sweeter and has a smoother mouthfeel, which helps the sauce coat the mussels evenly. If you’re out of Kewpie, a good quality store brand can work, but the flavor profile will shift slightly toward a more neutral taste. This ingredient is essential; skipping it will leave your sauce thin and lack depth.
Sriracha adds that unmistakable kick that defines dynamite dishes. The sauce’s bright red hue and smoky undertone give visual appeal and a complex heat profile that’s not too overpowering. If you prefer a milder version, reduce the amount to 2 tablespoons, but be prepared to add more lemon juice to maintain acidity. For an even hotter experience, swap in a more peppery chili sauce, but remember that the balance between heat and creaminess is key.
Soy Sauce introduces umami and saltiness, anchoring the dish’s savory depth. A splash of low‑sodium soy can help keep the dish from becoming too salty, especially if you’re using fresh mussels that already carry natural brine. If you’re vegan, consider a tamari or coconut aminos substitute, though the flavor will shift slightly toward a sweeter profile.
The Texture Crew
Mussels are the star of the show. Fresh, live mussels are best, as they offer the most robust flavor and a satisfying bite. When selecting mussels, choose shells that are tightly closed or close them gently with a hammer; open shells indicate they’re dead and shouldn’t be cooked. If you’re working with frozen mussels, thaw them in a bowl of cold water overnight to preserve texture. Using mussels that are too old can result in a mushy, off‑taste that ruins the dish.
Masago (Smelt Roe) is a playful garnish that adds a burst of briny flavor and a pop of color. The tiny orange specks cling to the mussels, creating a visual contrast that’s almost impossible to ignore. If you can’t find masago, capers or finely chopped anchovy fillets can offer a similar briny punch. However, masago’s delicate texture and subtle sweetness are hard to replicate.
The Unexpected Star
Lemon Juice is the secret weapon that brightens the sauce and cuts through the richness of the mayonnaise. Freshly squeezed lemon juice also adds a subtle citrusy aroma that complements the seafood’s natural brine. If you’re out of fresh lemons, a splash of white wine vinegar can provide acidity, but avoid using too much to keep the sauce from becoming too sharp.
Garlic and Ginger bring warmth and depth. The garlic offers a pungent, savory base that melds with the soy sauce, while ginger introduces a zesty, slightly sweet note that elevates the overall flavor. Together, they create a layered profile that feels both comforting and adventurous. If you’re allergic to garlic, a pinch of garlic powder can serve as a quick substitute, though the aroma will be less pronounced.
Everything’s prepped? Good. Let’s get into the real action…
The Method — Step by Step
- Heat a large non‑stick skillet over medium heat and add a splash of water. Add the mussels, cover, and let them steam for 2–3 minutes until most shells open. Gently shake the pan to ensure even cooking. This brief sear locks in the mussels’ natural juices and prevents them from becoming rubbery.
- While the mussels are steaming, combine the Kewpie mayonnaise, sriracha, soy sauce, lemon juice, minced garlic, and grated ginger in a bowl. Whisk until the mixture is smooth and glossy. This sauce will coat the mussels like velvet, delivering a creamy, spicy burst with every bite.
- Once the mussels have opened, remove the pan from heat and pour the sauce over them. Toss gently to coat each mussel evenly. The residual heat will warm the sauce, allowing the flavors to meld without scrambling the mayonnaise.
- Return the pan to the stove over low heat and let the mussels simmer in the sauce for an additional 2 minutes. Keep the lid slightly ajar to allow steam to escape and prevent the sauce from thickening too much. This step ensures the mussels stay moist and the sauce stays silky.
- Add the masago to the pan, stirring lightly to distribute the roe evenly. The masago should sit on top of the mussels, providing a burst of color and a subtle briny finish. The mixture should look glossy, with a faint sheen from the sauce.
- Taste the sauce and adjust seasoning if needed. A pinch of salt can help balance the acidity, while a splash of lemon juice can brighten the dish further. Remember, the sauce should be creamy, slightly sweet, and just hot enough to excite the palate.
- Transfer the mussels and sauce to a serving bowl or individual plates. Garnish with a sprinkle of fresh parsley or a thin lemon wheel for an extra pop of color. The final presentation should look inviting, with the bright orange roe contrasting against the deep red sauce.
- Serve immediately with crusty bread or a side of steamed rice to soak up the luscious sauce. The warmth of the mussels and the richness of the sauce will create a comforting, satisfying meal that feels like a culinary celebration.
That’s it— you did it. But hold on, I’ve got a few more tricks that will take this to another level…
Insider Tricks for Flawless Results
The Temperature Rule Nobody Follows
Many cooks keep the stove on high, hoping to cook the mussels faster, but this leads to uneven cooking and a loss of texture. Instead, use medium‑low heat to allow the mussels to steam gently. This slow process keeps the mussels moist and allows the sauce to thicken without separating. I once tried a high‑heat approach and ended up with a greasy, over‑cooked dish that left my guests disappointed.
Why Your Nose Knows Best
The aroma is the first indicator that your dish is ready. When the mussels release a sweet, briny scent and the sauce smells toasty, it’s time to serve. If the smell is overly sharp or the sauce smells like burnt mayonnaise, it’s a sign to reduce heat or add a splash of water to thin it out. Trust your nose— it’s the most reliable guide.
The 5‑Minute Rest That Changes Everything
After cooking, let the mussels rest in the sauce for 5 minutes before serving. This brief resting period allows the flavors to meld fully, creating a richer, more cohesive taste. The mussels continue to steam in their own juices, ensuring they stay plump and succulent. I’ve found that dishes served immediately after cooking sometimes feel a bit raw, while the rested version delivers a smoother finish.
The Masago Magic
Adding the masago at the end of cooking preserves its delicate texture. If you add it too early, the roe can break apart and lose its visual appeal. Sprinkle it just before serving for a burst of color and a subtle, buttery flavor that contrasts perfectly with the spicy sauce. A friend once added the roe too early and ended up with a soggy garnish— a mistake I’ve since avoided.
The Quick Zest Boost
If you want to elevate the citrus note, zest a lemon and add the zest to the sauce before serving. The bright, aromatic oils from the zest intensify the lemon’s flavor without adding acidity, giving the dish a fresh, vibrant finish. I’ve used this trick in a few variations, and it always impresses guests who love a bright, zesty kick.
Creative Twists and Variations
This recipe is a playground. Here are some of my favorite ways to switch things up:
Spicy Tofu Dynamite
Swap out mussels for pan‑fried tofu cubes. The tofu absorbs the sauce beautifully, offering a vegetarian alternative that’s just as satisfying. Add a splash of sesame oil for an extra layer of depth.
Coconut Cream Dynamite
Replace Kewpie mayonnaise with coconut cream for a tropical twist. The coconut adds a subtle sweetness that pairs wonderfully with the sriracha heat. Pair it with a side of coconut rice for a full island flavor profile.
Herbal Dynamite
Introduce fresh herbs like cilantro or basil into the sauce. The herbs add brightness and a fresh aroma that cuts through the richness. This variation is especially refreshing during warm weather.
Sushi‑Style Dynamite
Serve the mussels over a bed of sushi rice and top with a thin slice of avocado. The combination of textures—soft mussels, crunchy rice, creamy avocado—creates a sushi‑inspired dish that’s perfect for a brunch or light dinner.
Miso Dynamite
Add a spoonful of white miso to the sauce for umami depth. The miso’s earthy flavor complements the mussels, while the sriracha adds a playful heat. This version is a great way to incorporate more Japanese pantry staples.
Piquant Pesto Dynamite
Blend basil pesto into the sauce for a green, herbaceous twist. The pesto’s nutty flavor pairs surprisingly well with the spicy mayonnaise, creating a complex, layered taste. This variation is ideal for guests who love bold, herb‑forward dishes.
Storing and Bringing It Back to Life
Fridge Storage
Store the sauce in an airtight container in the refrigerator for up to 24 hours. When ready to serve, reheat gently over low heat, stirring frequently to prevent separation. The mussels can be stored separately in a sealed container for up to 2 days; reheat them in the sauce for a minute to revive their texture.
Freezer Friendly
The sauce freezes well—place it in a freezer‑safe container and keep it for up to 3 months. When thawing, bring it to room temperature and whisk to re‑emulsify. Mussels, however, should not be frozen; cook them fresh for the best texture.
Best Reheating Method
To reheat the dish, combine the mussels and sauce in a skillet over low heat. Add a tiny splash of water or broth to create steam, which helps the sauce return to its silky consistency. Stir gently until the sauce is heated through and the mussels are warmed, but avoid boiling to prevent the mussels from overcooking.