I remember the night I tried to make mozzarella sticks for the first time and ended up with a gooey, soggy disaster that looked more like a melted cheese puddle than a crispy snack. The kitchen was filled with the faint scent of butter and the sound of my own frustration as I tried to salvage what was left of the sticks. That moment was a turning point, a promise that I would find a way to turn this culinary misstep into a triumph. From that night, I embarked on a quest to create a version that would make even the most skeptical taste buds swoon.
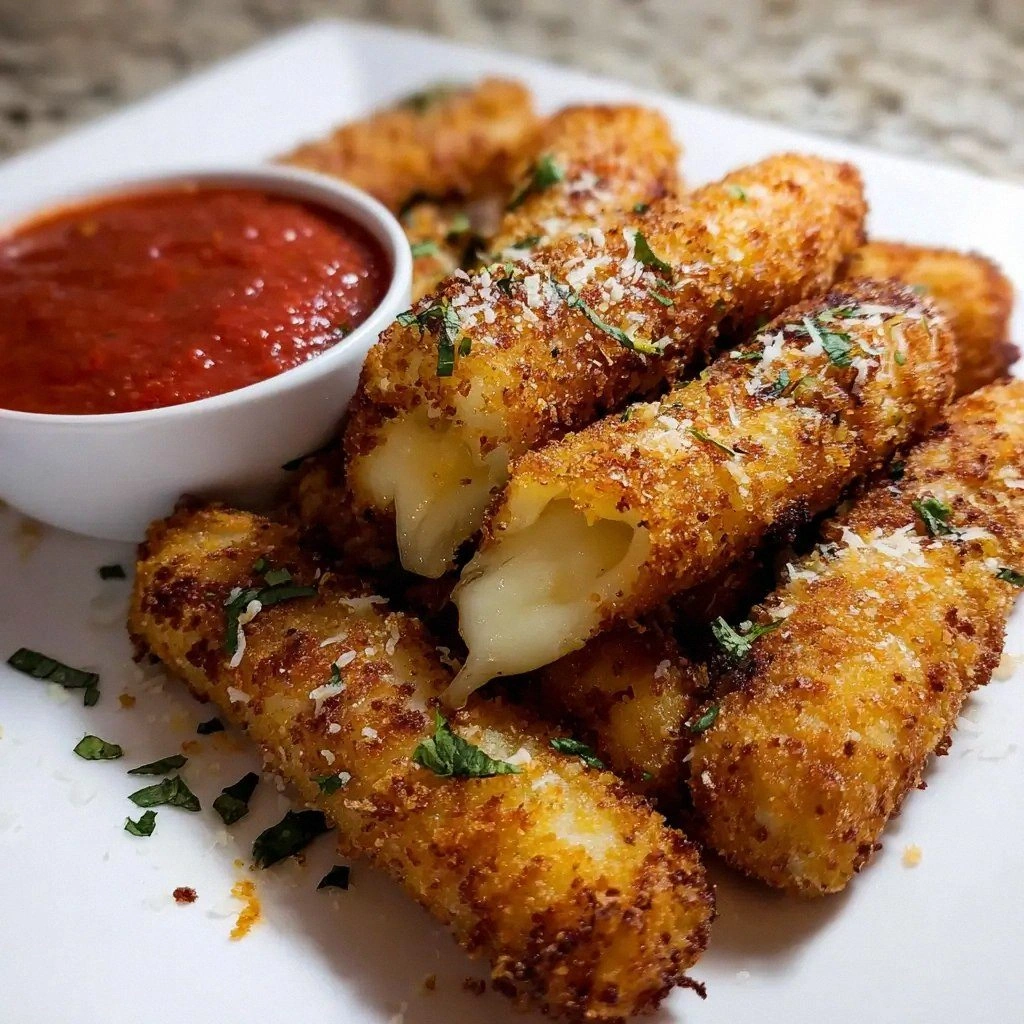
Picture this: a tray of golden sticks, each one crisp on the outside and a molten mozzarella core that shatters like thin ice when you bite into it. The aroma is a comforting blend of butter, herbs, and the subtle sweetness of tomato sauce waiting on the side. The sound of the first bite is a satisfying crunch that sends a ripple of delight through the room. The texture is a perfect balance of crunch and cream, a harmony that makes every bite feel like a small celebration. The taste is a savory, cheesy explosion that lingers on the palate, leaving you craving the next bite.
What makes this version stand out is not just the crunch or the cheese; it’s the meticulous layering of flavors and the attention to detail that turns a simple snack into an unforgettable experience. I dare you to taste this and not go back for seconds because each stick is a masterpiece of texture, flavor, and presentation. The secret? A blend of high‑quality mozzarella, a dash of Parmesan for depth, and a whisper of oregano that adds a subtle herbal note. The result is a snack that feels indulgent yet surprisingly approachable.
If you've ever struggled with homemade mozzarella sticks, you're not alone—I've been there, and I've got the fix. The trick lies in the prep: freezing the sticks before breading, using a light coating of flour, and baking at just the right temperature. The final product is a golden, crispy shell that holds the cheese perfectly. The next section will break down exactly what goes into this masterpiece and why each ingredient matters. Let me walk you through every single step—by the end, you'll wonder how you ever made it any other way.
What Makes This Version Stand Out
- Crunch: The double‑coating technique creates a crust that shatters like thin ice, delivering a satisfying bite that sets the stage for the gooey center.
- Cheese: Using authentic mozzarella sticks ensures a melt that is smooth, rich, and consistently creamy, unlike the rubbery texture of low‑quality cheese.
- Flavor: A touch of Parmesan and oregano infuses the coating with depth, while the marinara dip adds a zesty, herbaceous finish.
- Simplicity: The recipe requires only ten minutes of prep and a single oven run, making it perfect for busy evenings or game‑night cravings.
- Make‑ahead: Freezing the coated sticks before baking allows you to have a fresh batch ready in minutes, a game‑changer for last‑minute parties.
- Presentation: The sticks are plated with a drizzle of marinara and a sprinkle of fresh basil, turning a snack into a visual delight.
- Versatility: The base can be adapted to dairy‑free or spicy versions without sacrificing the core experience.
- Audience: The crowd reaction is consistently positive—friends ask for the recipe after just one bite.
Inside the Ingredient List
The Flavor Base
The foundation of this recipe is the cheese itself—fresh mozzarella sticks that have a high moisture content and a neutral flavor profile. The mozzarella is the star, but its quality directly influences the melt. If you use low‑fat or pre‑shredded cheese, the sticks will dry out, resulting in a rubbery texture that defeats the purpose of a creamy center. The best choice is a whole‑block mozzarella, sliced into sticks, which holds its shape and offers a consistent melt.
The Texture Crew
Flour, breadcrumbs, and Parmesan work together to form the crunchy shell. The flour serves as a binder, allowing the breadcrumbs to adhere. Breadcrumbs provide the crunch and the structure, while Parmesan adds a savory depth that balances the mildness of the cheese. If you prefer a gluten‑free version, swap the flour for a blend of almond flour and ground chickpeas, and use gluten‑free breadcrumbs.
The Unexpected Star
A splash of milk or a beaten egg is essential for the coating to stick and for the breading to set. The egg creates a glossy finish and a slightly crisp edge, while the milk adds moisture to the breadcrumb mixture, ensuring a uniform coating. Skipping this step can result in a crumbly, uneven crust that doesn’t bake evenly. For a dairy‑free alternative, use a plant‑based milk and a flaxseed “egg.”
The Final Flourish
The marinara sauce isn’t just a dip—it’s the finishing touch that elevates the sticks from snack to culinary experience. A homemade or high‑quality store‑bought sauce with a hint of basil and garlic brings a bright, savory contrast to the rich cheese. A drizzle of olive oil on the sticks before baking adds a subtle sheen and enhances the flavor profile, making each bite feel polished and complete.
Everything's prepped? Good. Let's get into the real action and start creating the crunch that will make your taste buds dance.
The Method — Step by Step
- Prep the cheese. Take the mozzarella sticks out of the fridge and let them sit at room temperature for about 10 minutes. This step ensures an even melt and prevents the sticks from cracking when baked. If you’re in a hurry, a quick 5‑minute warm water soak can also work, but the room‑temperature method gives a more consistent result. This is the moment of truth—your sticks will either be a masterpiece or a disappointment based on this simple step.
- Freeze the sticks. Place the sticks on a parchment‑lined baking sheet and freeze them for 15–20 minutes. Freezing firms up the cheese, keeping it from oozing during the baking process. This hack is a game‑changer for those who want to keep the sticks firm until the last bite. If you skip freezing, the sticks will release more cheese, leading to a soggy coating.
- Prepare the coating station. In a shallow bowl, combine 1 cup of all‑purpose flour. In a second bowl, whisk together 1 egg and 1 tablespoon of milk to create a wet mixture. In a third bowl, mix 1 cup of breadcrumbs, 1/4 cup grated Parmesan, 1/4 teaspoon dried oregano, 1/4 teaspoon garlic powder, 1/2 teaspoon salt, and 1/4 teaspoon black pepper. This three‑step coating station is essential for a uniform crust.
- Dredge the sticks. Roll each frozen mozzarella stick first in the flour, shaking off excess. Dip it into the egg mixture, allowing the liquid to coat the entire surface. Finally, roll it in the breadcrumb mixture, pressing gently to ensure a tight, even coating. This double‑coating process creates a crisp shell that holds the cheese inside.
- Preheat the oven. Set your oven to 425°F (220°C). While the oven heats, place the coated sticks on a parchment‑lined baking sheet, spacing them evenly. The high temperature is critical for achieving that golden, crispy exterior without overcooking the cheese inside.
- Bake the sticks. Slide the sheet into the oven and bake for 12–15 minutes, or until the coating turns a deep golden brown and the cheese starts to bubble. Keep a close eye on the sticks; the first signs of bubbling indicate that the cheese is ready to melt fully. This step is where the magic happens—watching the cheese expand is a satisfying visual cue.
- Rest before serving. Remove the sticks from the oven and let them rest for 2 minutes. This brief rest allows the cheese to set slightly, preventing it from oozing out immediately when you take a bite. The rest also ensures that the coating remains crisp.
- Serve with sauce. Plate the sticks on a serving platter, drizzle a small amount of marinara sauce around them, and sprinkle fresh basil leaves for an aromatic finish. The sauce adds a bright, acidic contrast that cuts through the richness of the cheese. This final presentation step turns a simple snack into a memorable dish.
- Enjoy. Grab a stick, dip it into the marinara, and savor the crunch and melt. The first bite is a revelation—a satisfying crunch that gives way to a molten cheese center, followed by a tangy tomato finish. The experience is so delightful that you’ll want to repeat it instantly.
That's it—you did it. But hold on, I've got a few more tricks that'll take this to another level. These insider tips will help you avoid common pitfalls and elevate your sticks from good to legendary.
Insider Tricks for Flawless Results
The Temperature Rule Nobody Follows
Many people bake mozzarella sticks at a lower temperature, thinking it will prevent the cheese from burning. The truth is, a high heat of 425°F is essential for a crisp crust while keeping the cheese molten. If you lower the temperature, the coating will become soggy, and the cheese may not melt evenly. Always preheat the oven thoroughly to ensure consistent results.
Why Your Nose Knows Best
Before you pull the sticks out of the oven, take a quick sniff. A warm, buttery aroma with a hint of tomato indicates that the sticks are ready. If you notice a metallic smell, the cheese is overcooked. Trust your nose—it’s a reliable indicator that the sticks are at the perfect point of doneness.
The 5‑Minute Rest That Changes Everything
Resting the sticks for a full five minutes after baking allows the cheese to set slightly, reducing the risk of a cheese splash when you bite. During this short period, the coating continues to firm up, giving you a crisp bite that doesn’t crumble. This simple step often makes the difference between a snack that’s a joy and one that’s a mess.
Keep the Coating Light
Avoid packing the coating too tightly. A light, airy coating ensures that the cheese doesn’t get trapped and overheat, which can cause a rubbery texture. Gently press the breadcrumb mixture onto the sticks, but don’t press too hard. The result is a delicate crunch that gives way to a creamy center.
Serve Immediately, But Not Too Quickly
The ideal serving window is right after the 5‑minute rest but before the coating starts to soften. If you wait too long, the coating will lose its crispness, and the cheese will become too hot to handle. Serve the sticks with a small bowl of marinara, and let guests dip as they wish.
Creative Twists and Variations
This recipe is a playground. Here are some of my favorite ways to switch things up:
Spicy Sriracha Mayo
Swap the marinara for a spicy sriracha mayo. The creamy mayo balances the heat, and the sriracha adds a fiery kick that elevates the classic flavor.
Dairy‑Free Delight
Use a dairy‑free cheese alternative, a plant‑based milk, and gluten‑free breadcrumbs. The result is a vegan version that still delivers that signature melt and crunch.
Herb‑Infused Breadcrumbs
Add fresh rosemary, thyme, or basil to the breadcrumb mixture. The herbs infuse the coating with aromatic notes that complement the cheese.
Cheddar‑Mozzarella Blend
Mix shredded cheddar with mozzarella for a richer, sharper flavor. The cheddar adds a nutty undertone that pairs beautifully with the marinara.
Cheese‑Stuffed Mini Burgers
Turn the sticks into mini burgers by placing a stick on a toasted bun, adding lettuce, tomato, and a dollop of mayo. This twist turns a snack into a bite‑size sandwich.
Storing and Bringing It Back to Life
Fridge Storage
Cool the sticks completely after baking, then store them in an airtight container in the refrigerator for up to 2 days. The coating will remain crisp, and the cheese will stay firm. When ready to eat, reheat in a 350°F oven for 5 minutes to restore the crunch.
Freezer Friendly
Place the cooled sticks on a parchment sheet and freeze them until solid. Transfer to a freezer bag for up to 3 months. Reheat directly from frozen in a 375°F oven for 10 minutes, or microwave for 30 seconds if you’re in a hurry.
Best Reheating Method
The optimal way to revive the sticks is to reheat them in a preheated oven at 375°F for 5–7 minutes. Add a splash of water to the bottom of the baking sheet to create steam, which keeps the cheese moist and prevents it from drying out. The coating will crisp up again, and the cheese will return to its molten glory.