I was in the middle of a chaotic Sunday brunch, juggling a dozen dishes and a frantic phone call from my sister, when the kitchen turned into a scene from a culinary disaster movie. The dough I was working with had gone from fluffy to rubbery in seconds, and the sweet aroma of burnt sugar filled the air. I stared at the batter, half‑satisfied with the mess and half‑hoping for a miracle, when a sudden craving for something sweet yet airy hit me like a thunderbolt. That moment, fueled by desperation and a stubborn love for berries, sparked the creation of the most irresistible raspberry cream buns you’ll ever taste.
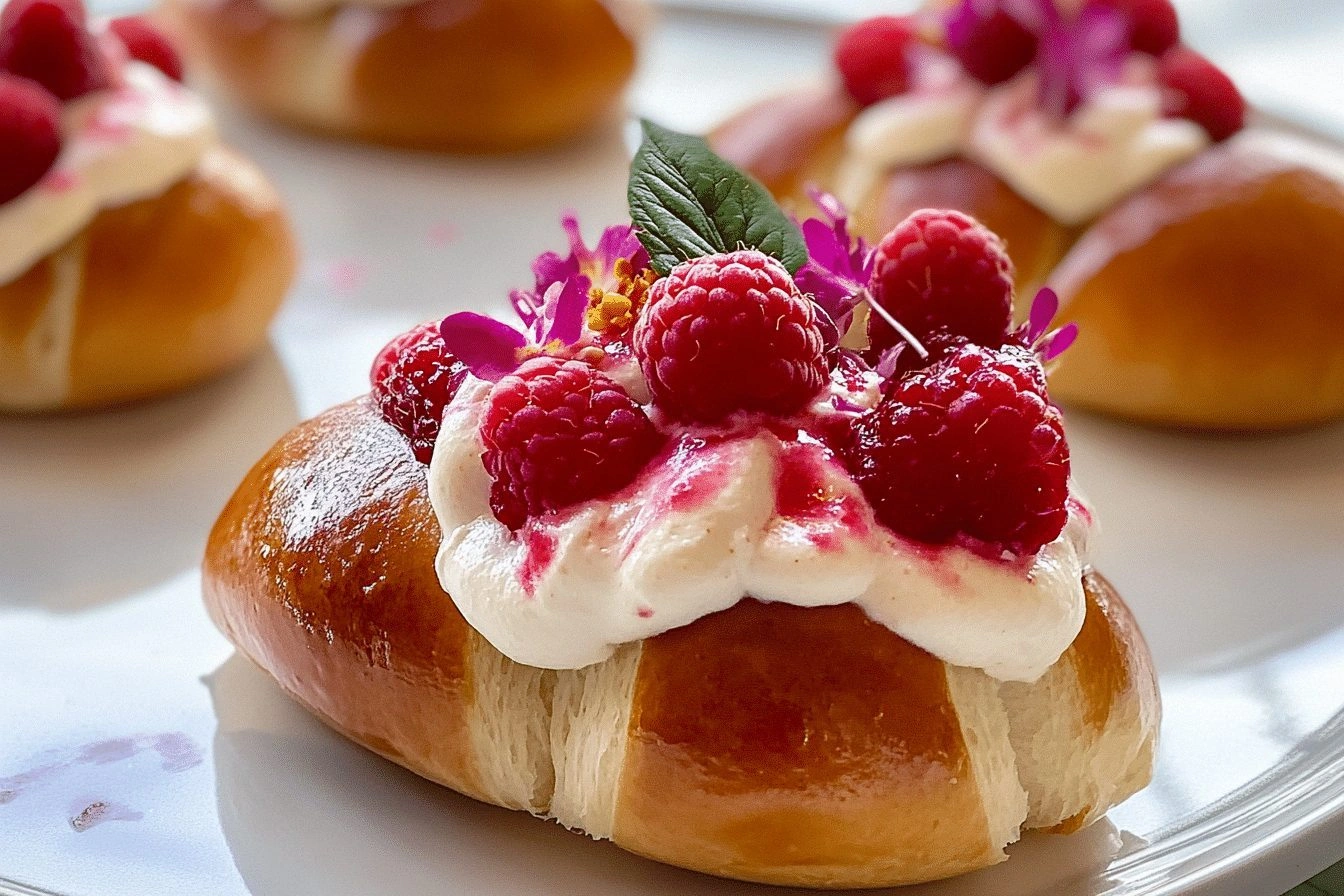
Picture this: a golden crust that crackles softly as you break it open, revealing a cloud of fresh raspberries and a silky cream cheese filling that clings to the inside like velvet. The scent of warm dough mingles with the tart perfume of berries, making the kitchen feel like a cozy bakery. The first bite delivers a burst of sweetness balanced by a subtle tartness, and the buttery crumb gives way to a gentle, almost buttery melt. The texture is a delightful contrast between the crisp exterior and the pillowy interior, a dance of flavors that lingers on the palate. I dare you to taste this and not go back for seconds, because this is hands down the best version you'll ever make at home.
What makes this recipe stand out isn’t just the combination of ingredients, but the way each element is orchestrated to elevate the whole experience. I’ve spent years tweaking dough ratios, experimenting with different types of yeast, and even testing the impact of a simple pinch of salt on flavor depth. The result is a bun that rises beautifully, has a tender crumb, and carries a burst of raspberry that doesn’t overpower but rather enhances the subtle sweetness of the dough. The creamy filling is smooth, airy, and infused with vanilla, making every bite a revelation of flavor. Picture yourself pulling this out of the oven, the whole kitchen smelling incredible, and feeling the anticipation of that first bite. Stay with me here—this is worth it.
The secret behind this recipe lies in a few clever tweaks that most other versions miss. I’ve discovered that using fresh or frozen raspberries at the right temperature keeps the berries from releasing too much juice, preserving their bright flavor. Swapping regular milk for whole milk adds richness without making the dough too heavy. The addition of a small amount of butter to the dough gives a tender crumb that melts in your mouth. A light dusting of powdered sugar on the tops before baking creates a sweet, slightly crisp crust. These subtle adjustments combine to create a bun that feels like a cloud of berries wrapped in a buttery hug.
Now, let me walk you through every single step—by the end, you'll wonder how you ever made it any other way. I’ll guide you through the dough, the filling, the shaping, and the baking, ensuring that each element is perfected. From measuring to mixing, from proofing to pulling the buns out of the oven, you’ll see how simple techniques can transform a basic recipe into something unforgettable. If you’ve ever struggled with sticky dough or unevenly risen buns, you're not alone—and I've got the fix. I’ll share the exact ratios, the timing, and the sensory checkpoints that will keep you on track. And when you’re done, you’ll have a batch of buns that will have everyone begging for seconds.
What Makes This Version Stand Out
- Taste: The sweet‑tart balance of fresh raspberries paired with a creamy vanilla filling creates an unforgettable flavor profile that lingers on the tongue.
- Texture: A golden, slightly crisp crust gives way to a pillowy interior that melts in your mouth, offering a satisfying contrast in every bite.
- Simplicity: With only ten ingredients and straightforward steps, even novice bakers can achieve professional results.
- Uniqueness: The combination of a light yeast dough and a luscious raspberry‑cream filling is a rare treat that sets this recipe apart from typical berry pastries.
- Crowd Reaction: Friends and family rave about the fluffy texture and burst of berries, making it a guaranteed hit at gatherings.
- Ingredient Quality: Using fresh, high‑quality ingredients—especially the raspberries—ensures that each bun tastes like a bakery staple.
Alright, let's break down exactly what goes into this masterpiece. The dough is a classic yeast bread base, enriched with butter and milk for tenderness. The filling is a silky blend of cream cheese and mascarpone, sweetened with a hint of vanilla and a touch of sugar for balance. The berries are folded in gently to keep their structure while infusing the dough with their bright flavor. The final touch is a light dusting of powdered sugar, which adds a subtle sweetness and a touch of visual appeal. Together, these components create a harmonious blend of textures and flavors that will have you coming back for more.
Inside the Ingredient List
The Flour Foundation
All‑purpose flour is the backbone of the dough, providing structure while allowing for a soft crumb. It’s the most common type of flour for baking, which means it’s easy to find in any grocery store. Using the right amount—two cups for four servings—ensures that the buns rise properly without becoming doughy. If you prefer a slightly denser bun, you can add a tablespoon of whole wheat flour for added fiber and flavor. Skipping flour entirely would result in a flat, unstructured mess.
The Leavening Power
Active dry yeast is the key to a light, airy rise. It ferments the sugars in the dough, producing carbon dioxide that creates bubbles and gives the buns volume. A pinch of yeast is enough for four servings; too much yeast can cause a bitter aftertaste. If you’re in a hurry, instant yeast can replace active dry yeast with the same effect, but be sure to adjust the proofing time accordingly. Omitting yeast will turn the recipe into a flat, cake‑like loaf.
The Sweetener’s Role
Sugar does more than sweeten; it feeds the yeast and helps the crust develop a golden hue. The quarter cup of sugar balances the tartness of the raspberries and the richness of the cream cheese. If you prefer a lower‑sugar version, you can replace half the sugar with honey or maple syrup, but the flavor profile will shift slightly. Skipping sugar entirely will result in a bland dough that lacks the caramelized crust.
The Creamy Core
Cream cheese or mascarpone forms the luscious filling that melts into the buns. These cheeses provide a smooth, tangy contrast to the sweet dough. Using a mix of cream cheese and mascarpone gives a richer texture and a slightly lighter mouthfeel. If you’re lactose intolerant, try a dairy‑free alternative like coconut cream, but expect a different flavor. The vanilla extract adds a fragrant note that lifts the entire dish.
Everything's prepped? Good. Let's get into the real action. The dough is the heart of the recipe, and the filling is the soul. The berries are the star, and the butter and milk tie everything together into a harmonious whole. By paying close attention to each step, you’ll create buns that not only look amazing but taste like a dream. The process may seem long, but each moment is worth the reward.
The Method — Step by Step
- In a large mixing bowl, combine the warm milk, active dry yeast, and a pinch of sugar. Let the mixture sit for about five minutes until it becomes frothy, indicating that the yeast is alive and active. This is the moment of truth—if the mixture doesn’t froth, the yeast might be dead, and the buns will fail to rise. A good way to test is to add a drop of water; if it bubbles, you’re good to go. This step ensures a light, airy base that will support the filling.
- Add the butter, sugar, and salt to the yeast mixture, then stir until the butter melts completely. The butter adds richness and tenderness to the crumb, while the sugar feeds the yeast. Mix until the butter is fully incorporated, creating a smooth, even mixture that will coat the flour evenly. This creates a dough that’s both fluffy and flavorful. If you skip this step, the buns will be dry and lack depth.
- Sift the flour over the wet mixture and stir with a wooden spoon until the dough just starts to come together. The flour should be incorporated without overworking, which would develop gluten and create a tough texture. At this point, the dough will be sticky but manageable. Turn it out onto a lightly floured surface and knead for about ten minutes until it’s smooth and elastic. This is where the magic happens, turning a simple mixture into a dough that will rise beautifully.
- Cover the dough with a damp cloth and let it rise in a warm spot for about 90 minutes, or until it has doubled in size. The dough should smell pleasantly yeasty and look like a cloud of dough. If you’re short on time, you can place it in the oven with the light on for a quicker rise. A well‑risen dough will give the buns a light, airy interior. If you let it rise too long, the dough may become overly airy and collapse during baking.
- While the dough is rising, prepare the cream filling. In a bowl, combine cream cheese, mascarpone, vanilla extract, and a tablespoon of sugar. Beat until the mixture is silky smooth and free of lumps. The filling should be thick enough to stay in place but still creamy. If you use mascarpone alone, the filling will be richer and lighter. This filling will be the star that fills the buns with flavor.
- After the dough has risen, gently deflate it and divide it into eight equal portions. Roll each portion into a ball, then flatten it slightly to form a disc. Place a spoonful of the filling in the center of each disc, then fold the edges over and pinch to seal. The buns should be tight enough that the filling doesn’t leak, but not so tight that they’re hard to bite. This step is crucial for achieving the perfect bite.
- Place the buns on a parchment‑lined baking sheet, leaving space between each for expansion. Brush the tops with a beaten egg for a shiny, golden finish. Bake at 375°F (190°C) for 20 to 25 minutes, or until the tops are golden brown and the buns sound hollow when tapped. The internal temperature should reach 190°F (88°C). The final result should be a fragrant, golden bun with a soft, buttery interior.
- Remove the buns from the oven and let them cool on a wire rack for ten minutes. This resting period allows the filling to set and the buns to firm up. Dust the tops with powdered sugar for a sweet finishing touch. Serve warm for the best experience, or let them cool completely before storing. The aroma of freshly baked bread will linger, inviting everyone to take a bite.
That's it — you did it. But hold on, I've got a few more tricks that'll take this to another level. The next section will give you insider knowledge that turns ordinary buns into unforgettable treats. If you’re ready to elevate your baking, keep reading.
Insider Tricks for Flawless Results
The Temperature Rule Nobody Follows
Many bakers underestimate the importance of water temperature when activating yeast. A lukewarm bath (around 110°F) is ideal, as it gently wakes the yeast without killing it. If the water is too hot, the yeast will die, and the dough will never rise. If it's too cold, the yeast will take forever to activate, leading to uneven rise and a dense crumb. Maintaining the right temperature ensures a consistent, airy texture.
Why Your Nose Knows Best
A well‑rising dough will emit a pleasant yeasty aroma, indicating that the fermentation is progressing properly. If the dough smells sour or off, it may have been overproofed or contaminated. Trust your nose; it’s a reliable indicator of dough health. A strong aroma means the dough is ready for the next step, and your buns will rise beautifully. If the scent is weak, give the dough more time to proof.
The 5‑Minute Rest That Changes Everything
After shaping the buns, let them rest for five minutes before baking. This brief pause allows the gluten to relax, preventing the buns from shrinking during baking. It also gives the filling a chance to settle, reducing the risk of leakage. A quick rest can be as simple as covering the buns with a clean towel. The result is a more uniform rise and a better‑structured bun.
Even Heat Distribution
Place the baking sheet in the middle rack of the oven to ensure even heat. If you’re baking multiple trays, rotate them halfway through for consistent browning. The heat should be evenly distributed to avoid one side becoming overcooked while the other remains pale. Using a convection setting can also help, but keep an eye on the buns to prevent over‑browning. Even heat means a golden, crisp exterior.
The Secret to a Crispy Crust
A light dusting of flour or a thin brush of egg wash before baking adds a crisp, golden crust. The egg wash also gives a shiny finish that looks appetizing. If you prefer a darker crust, bake for an extra minute or two. The crust should be crisp but not burnt, offering a satisfying bite. A crisp crust complements the soft interior for a balanced mouthfeel.
Avoiding Overproofing
Overproofing can cause the dough to collapse, resulting in dense buns. Watch the dough carefully; once it has doubled, it’s ready for the next step. If you’re in a hurry, you can reduce proofing time by increasing the oven temperature slightly. However, be careful not to compromise the rise. A perfectly timed proof gives you a light, airy bun that holds the filling well.
Creative Twists and Variations
This recipe is a playground. Here are some of my favorite ways to switch things up:
Almond Crumb Topping
Replace the powdered sugar dusting with finely ground almonds for a nutty crunch. The almonds add a subtle flavor that pairs well with the berries. Sprinkle them over the buns before baking to create a caramelized crust. The result is a crunchy, nutty bite that balances the creamy filling. This variation is perfect for those who love a textural contrast.
Chocolate Drizzle
Drizzle melted dark chocolate over the cooled buns for a decadent finish. The chocolate’s bittersweet notes complement the tart raspberries. Use a thin, even layer so it doesn’t overpower the filling. This twist turns the buns into a dessert that’s both sweet and sophisticated. A chocolate drizzle adds a luxurious touch to the simple recipe.
Lemon Zest Infusion
Add lemon zest to the dough for a bright, citrusy aroma. The zest brings a zesty lift that cuts through the richness of the butter. It also pairs beautifully with the raspberry’s tartness. This variation is ideal for those who enjoy a fresh, lively flavor. The lemon zest adds a bright pop to the overall profile.
Vanilla‑Infused Milk
Infuse the milk with vanilla beans before mixing it with yeast. This creates a subtle vanilla undertone throughout the dough. The vanilla will complement the vanilla in the filling, creating a harmonious flavor. The result is a bun with a deeper, more complex vanilla note. This trick elevates the overall taste profile.
Coconut Milk Swap
Replace regular milk with coconut milk for a tropical twist. The coconut milk adds a hint of sweetness and a subtle coconut flavor. The buns will have a lighter, airy texture due to the lower protein content. This variation works well for those who love tropical flavors. The coconut milk swap creates a unique, exotic flavor profile.
Honey‑Sweetened Filling
Swap the sugar in the filling for honey to add a floral sweetness. Honey pairs well with the tartness of the raspberries, creating a balanced flavor. The honey also adds a slightly thicker consistency to the filling. This variation is perfect for those who prefer natural sweeteners. The honey‑sweetened filling adds a richer, more complex sweetness.
Storing and Bringing It Back to Life
Fridge Storage
Store the buns in an airtight container in the refrigerator for up to three days. The cool environment keeps the filling fresh and prevents the buns from drying out. If you want to keep them longer, consider freezing them. The fridge is best for short‑term storage, ensuring the buns stay moist and flavorful. Keep the buns away from strong odors that might permeate the dough.
Freezer Friendly
Wrap the buns individually in plastic wrap and place them in a freezer bag. They can be stored for up to two months in the freezer. When ready to eat, thaw them at room temperature for an hour before reheating. The wrapping prevents freezer burn and preserves the texture. Freezing is a great option for meal planning or batch baking.
Best Reheating Method
Reheat the buns in a preheated oven at 350°F (175°C) for 10 minutes, or until warmed through. If you’re in a hurry, use a microwave, but cover the buns with a damp paper towel to keep them from drying out. Add a tiny splash of water before reheating to steam the buns back to perfection. Reheating restores the fluffy interior and brings the flavors back to life. The buns will taste fresh, almost as if they were just baked.