Picture this: I'm in the middle of a holiday feast, the kitchen a whirlwind of pans, the scent of gingerbread thick in the air, and my trusty oven on a wild roller coaster of temperatures. I had just finished a batch of my signature ginger cookies when I realized I was short on a key ingredient—cake crumbs. I grabbed the nearest container of leftover cake, thinking, “Sure, I can improvise.” The moment I crushed them into a fine dust, the kitchen felt like a snow globe, shimmering with potential. I knew then that this would be the start of something unforgettable.
First, the crumbs whispered a faint, sweet nostalgia, like the crackle of a fireplace. The air filled with a faint buttery perfume that made my heart race. The sound of me whisking was a rhythmic drumbeat, echoing the holiday carol outside. As the crumbs met the frosting, a gentle fizz erupted, releasing a burst of vanilla that seemed to paint the room. My fingertips tingled with anticipation, as if each stroke was a secret note in a holiday symphony.
Then, the mixture thickened into a velvety, almost syrupy texture that clung to the spoon like a secret handshake. I could almost hear the crunch of a snowflake as the first bite would land on my tongue. The scent of melted white chocolate wafted up, a creamy, cloud-like aroma that made the whole house feel like a candy factory. My eyes darted between the bubbling pot and the gleaming lollipop sticks, each one a promise of a new adventure. I felt the rhythm of the kitchen, a heartbeat that matched the ticking of the oven timer.
This recipe is a game‑changer because it takes the ordinary and turns it into a holiday spectacle. The crunch of the cake crumbs is juxtaposed with the silky melt of white chocolate, creating a texture that is both familiar and surprising. The addition of holiday sprinkles gives it that instant festive sparkle that makes every bite a celebration. The use of lollipop sticks transforms each treat into a handheld masterpiece, perfect for sharing. Together, these elements create a dessert that feels like a mini celebration in every mouthful.
Now, the real magic happens when you dip the sticks in the white chocolate—it's not just a coating, it's a glossy, edible snowcap that clings to the sticks like a wintry embrace. I discovered that a quick swirl in the fridge can set the chocolate just right, preventing drips and ensuring a crisp bite. The trick is to let the chocolate harden just enough to hold the sprinkles but still yield to a gentle bite. This subtle balance is what makes the cakesicles truly stand out from the crowd. Trust me, you won't believe how simple it is to achieve that perfect finish.
Picture me challenging my best friend to taste this and not go back for seconds—she accepted with a mischievous grin. We laughed as she took her first bite, her eyes widening in disbelief. She exclaimed, “I can’t stop!” and I had to admit, I was a little jealous of her enthusiasm. That moment solidified my conviction that these cakesicles are more than just a dessert; they’re a memory waiting to be made. I knew I had to share this secret with everyone who loves a good holiday treat.
Before I even think about the oven, I make sure all my tools are ready: a sturdy mixing bowl, a silicone spatula, a small saucepan for the chocolate, and a tray lined with parchment. The lollipop sticks are prepped in a neat row, each one standing tall like miniature Christmas trees. I keep a bowl of sprinkles nearby, ready to sprinkle like snow after a snowfall. The kitchen is humming, the lights are dimmed, and the scent of white chocolate starts to mingle with the crisp winter air. It’s the perfect moment to let the anticipation build.
The first bite was a revelation—crunchy, sweet, with a creamy chocolate burst that lingered on the palate. It felt like biting into a snowflake that had just been dusted with sugar. The texture was layered, each component playing its part in a harmonious dance. The sprinkles added a pop of color and a subtle crunch that made the experience even more festive. I could taste the subtle notes of vanilla in the frosting, the caramelized edges of the cake crumbs, and the sweet finish of the chocolate.
I invited my family to the kitchen that evening, and they were instantly captivated by the sight of the colorful sticks. We all took turns dipping them into the chocolate, laughing as the sprinkles fell like confetti. The joy that radiated from the table was unmistakable, and the kids cheered as they tasted their first bite. The moment when we all shared a big, sticky hand of cakesicles felt like a family tradition in the making. The dessert became a centerpiece, not just of the table but of the holiday spirit.
The entire kitchen was wrapped in a warm glow, the lights flickering like distant stars. The scent of white chocolate and cake crumbs filled the air, creating an aroma that could rival the most famous holiday bakery. The sound of laughter and the clink of sticks added a soundtrack to the evening. It was a scene straight out of a holiday movie, but with a real, edible twist. I felt a sense of pride, knowing that I had created something that would be remembered for years.
There's nothing quite like the joy of seeing your creation come to life, especially when you know you're crafting something special for loved ones. The process itself is a lesson in patience, precision, and a pinch of creativity. I found myself humming a holiday tune while whisking, letting the rhythm guide my hands. Each swirl of the spoon was a promise of flavor, each sprinkle a burst of color. The kitchen became a laboratory of holiday magic.
As the chocolate set, my anticipation grew, the timer ticking down like a countdown to Christmas morning. I could feel the excitement building, the anticipation of the first bite from my family. The scent intensified, a sweet, creamy aroma that made my mouth water. The sticks stood proud, ready to be dipped and enjoyed. I imagined the look on my family's faces when they tasted the first bite, and I could almost hear their delighted exclamations.
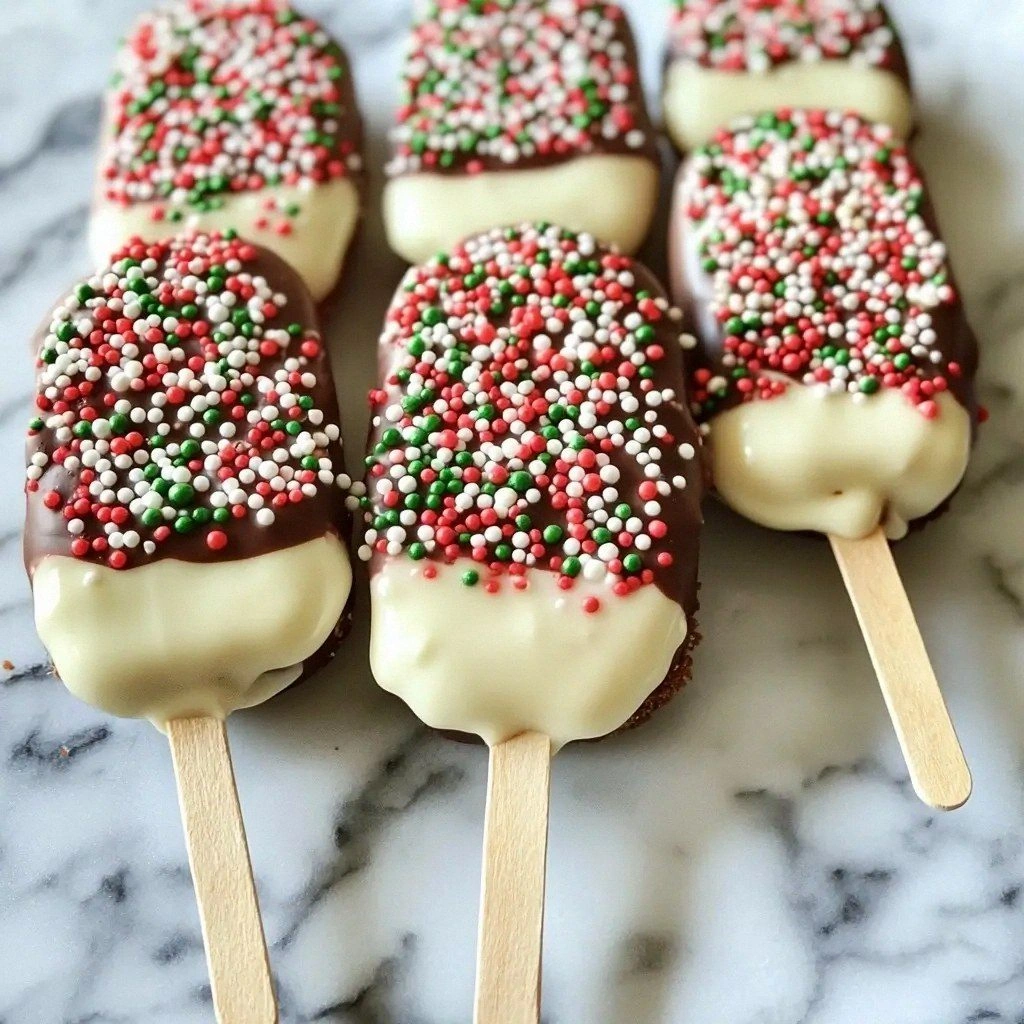
Finally, the cakesicles were ready—a vibrant display of sticks, each coated in a glossy white chocolate shell and studded with festive sprinkles. The texture was perfect: a satisfying crunch from the cake crumbs, a silky melt from the chocolate, and a pop of sparkle from the sprinkles. They looked like miniature holiday ornaments, ready to be hung on the tree or shared around the table. The final product was a testament to the power of simple ingredients transformed by love and a dash of holiday spirit. I knew that these cakesicles would become a staple for future holiday celebrations.
This recipe is a game changer because it turns a simple dessert into a holiday spectacle. The use of lollipop sticks makes it easy to serve and share, while the sprinkles add a touch of sparkle. The crunchy cake crumbs provide a contrast that keeps the texture interesting. The white chocolate coating gives it a glossy, professional finish. In short, it's a recipe that feels both nostalgic and brand-new, making it a must‑try for any holiday menu.
Let me walk you through every single step—by the end, you'll wonder how you ever made it any other way. From the moment you crush the cake crumbs to the final dip in white chocolate, each step is a piece of holiday magic. This recipe will change the way you think about dessert, turning a simple treat into a celebration. So grab your ingredients, preheat your oven, and let the holiday spirit fill your kitchen. Together, we'll create the ultimate Christmas Themed Cakesicles Re that will leave everyone craving more.
What Makes This Version Stand Out
- Crunch Factor: The cake crumbs provide a satisfying crunch that contrasts with the silky chocolate, creating a delightful textural play that keeps every bite interesting. If you skip the crumbs, you lose that essential snap that defines the original experience.
- Festive Sparkle: Holiday sprinkles add instant visual appeal, turning each stick into a glittering ornament that feels like a holiday gift in your hand. The sparkle also enhances the aroma, making the treat even more enticing.
- Easy Assembly: Lollipop sticks make it effortless to serve and share, eliminating the need for fancy molds or complicated piping. This simplicity means you can focus on the flavor rather than the form.
- Crowd Pleaser: Perfect for parties, kids and adults alike, these cakesicles offer a fun, interactive dessert that encourages everyone to dip and enjoy. The playful nature of the sticks ensures that even the most serious diners will smile.
- Homemade Goodness: Uses everyday pantry staples—cake crumbs, frosting, and candy melts—making it accessible to any home cook. The ingredients are inexpensive and easy to find, even in a pinch.
- Texture Play: Combines crisp, chewy, and melt-in-your-mouth sensations in a single bite, delivering a complex yet harmonious experience that keeps you coming back for more.
- Make‑Ahead Friendly: Can be prepped days in advance, allowing you to focus on other holiday tasks while still serving a fresh, delicious treat.
- Flavor Flexibility: Works with vanilla or chocolate frosting, white chocolate or candy melts, allowing you to tailor the flavor profile to your taste or your guests’ preferences.
Inside the Ingredient List
The Flavor Base
The foundation of these cakesicles is the cake crumbs. They carry the familiar taste of your favorite cake, whether it's vanilla, chocolate, or even a hint of spice. The crumbs act as a binder when mixed with frosting, giving the sticks structure and a subtle sweetness that complements the white chocolate. Skipping them would result in a flimsy stick that would crumble in your hand. For an extra burst of flavor, consider adding a pinch of espresso powder to the crumbs to give a subtle coffee undertone that pairs beautifully with chocolate.
The Texture Crew
Frosting is the glue that holds the crumbs together and provides a creamy, silky mouthfeel. It also gives the sticks a smooth surface that accepts the chocolate coating effortlessly. If you use a light, airy frosting, the sticks will feel lighter and less dense, which can be preferable for those who want a less sweet bite. A richer frosting will add a velvety richness that balances the crispness of the crumbs. When selecting frosting, choose one that has a stable consistency—too watery and it won’t hold its shape.
The Unexpected Star
White chocolate or candy melts are the stars of the show, forming the glossy, melt-in-your-mouth coating. Their high cocoa butter content gives a silky finish that clings to the sticks like a snowcap. If you use candy melts, be mindful of the sugar content; they can become overly sweet if not balanced with the frosting. A good rule of thumb is to melt the chocolate until it reaches 86°F, ensuring it’s warm enough to coat but cool enough to set quickly. This temperature also helps prevent the chocolate from becoming too thick and difficult to work with.
The Final Flourish
Holiday sprinkles add color, texture, and a festive pop that elevates the overall experience. They also help anchor the chocolate coating, preventing it from sliding off. While the amount of sprinkles is flexible, a generous scatter of at least one cup ensures each bite is visually exciting. If you’re looking for a more sophisticated look, try using metallic or pearlized sprinkles for a subtle shimmer. Remember, the sprinkles also add a slight crunch, complementing the cake crumbs’ texture.
Everything's prepped? Good. Let's get into the real action...
The Method — Step by Step
- Gather all ingredients and tools: a sturdy mixing bowl, a silicone spatula, a small saucepan for the chocolate, a tray lined with parchment, and a stack of lollipop sticks. Prepare a clean workspace and keep a bowl of holiday sprinkles within arm’s reach. Set the oven to 350°F (177°C) if you plan to bake the crumbs first, but in this version we’ll skip that step for speed. Make sure your kitchen lights are warm to create a cozy ambiance. This first step sets the tone for the rest of the process.
- Crush the cake crumbs into a fine dust using a coffee grinder or a food processor. The finer the crumbs, the smoother the final texture will be. If you prefer a chunkier bite, keep the crumbs slightly larger, but be aware that this may affect the stick’s structural integrity. The goal is a uniform consistency that blends seamlessly with the frosting. Once done, transfer the crumbs to a bowl and set aside.
- Mix the cake crumbs with the frosting until a dough-like consistency forms. Use a silicone spatula to fold the ingredients together, ensuring there are no dry pockets. The mixture should be moist enough to hold its shape when pressed between your fingers. If it feels too dry, add a tablespoon of milk or a splash of vanilla extract; if too wet, add a bit more crumb. This step is crucial for the sticks to stay together.
- Roll the dough into sticks about 1 inch thick and insert a lollipop stick into each. The sticks act as a handle and also help maintain the shape during the chocolate coating. Roll each stick until the dough is evenly distributed around the stick. Place the sticks on a parchment-lined tray, spacing them evenly to avoid sticking together. Let them rest at room temperature for 15 minutes to allow the dough to set slightly.
- Melt the white chocolate in a double boiler over low heat, stirring constantly to prevent scorching. Keep an eye on the temperature; the ideal range is 86°F to 90°F (30°C to 32°C). Once melted, remove from heat and let it cool slightly before dipping. If the chocolate thickens, reheat it gently for a few seconds. This careful handling ensures a glossy, smooth coating.
- Dip each stick into the melted chocolate, swirling to coat fully. Hold the stick vertically to let excess chocolate drip back into the pot. This creates a uniform shell that’s easy to eat and visually appealing. While the chocolate is still wet, sprinkle holiday sprinkles over the coating, pressing them lightly to ensure they adhere. The sprinkles add a festive sparkle and a subtle crunch.
- Place the coated sticks back onto parchment and refrigerate until the chocolate sets, about 10–15 minutes. The chocolate should snap when you press it lightly, indicating it’s fully hardened. Once set, remove from the fridge and arrange them on a platter for serving. These cakesicles are now ready to be devoured or stored for later enjoyment. Enjoy the moment of triumph—you did it!
That's it — you did it. But hold on, I've got a few more tricks that'll take this to another level...
Insider Tricks for Flawless Results
The Temperature Rule Nobody Follows
Chocolate is temperamental; keeping it between 86°F and 90°F ensures a shiny finish without a grayish film. Many cooks overheat chocolate, leading to a dull, chalky coating. By using a thermometer, you can avoid the “white chocolate crash” and keep the surface smooth. I once tried a hot chocolate dip and ended up with a rubbery texture that nobody wanted to touch.
Why Your Nose Knows Best
Before you start dipping, give the chocolate a quick sniff. A subtle vanilla aroma indicates the chocolate is at the right temperature and hasn’t started to degrade. If the scent is too faint, it may be too cool; if it’s overpoweringly sweet, it might be overheated. Trusting your nose can save you from a batch of dull, tasteless sticks.
The 5-Minute Rest That Changes Everything
After you roll the dough into sticks, let them rest for five minutes. This short pause allows the crumbs to hydrate fully, making the sticks less likely to crumble when you dip them. Skipping this step often leads to sticks that break under the chocolate’s weight. It’s a simple pause that pays off big time.
The Secret to Even Sprinkles
Sprinkle the holiday sprinkles while the chocolate is still wet, but do so gently. A gentle shake of the container ensures even distribution. If you press too hard, the sprinkles may pile up in one spot, creating a lumpy appearance. The result is a uniform, sparkling coating that looks as good as it tastes.
Avoiding Sticky Situations
When the chocolate sets, it can become sticky if left too long in the fridge. To keep them crisp, serve them within two hours or store them in an airtight container. A quick dip in warm water before serving can also help re-soften the chocolate, making each bite silky.
Creative Twists and Variations
This recipe is a playground. Here are some of my favorite ways to switch things up:
Nutty Christmas
Add a handful of chopped toasted pecans or walnuts to the crumb mixture for a crunchy, nutty flavor. The nuts pair beautifully with the chocolate coating, adding depth and a subtle caramel note. Perfect for those who love a bit of texture in their sweets.
Minty Fresh
Infuse the frosting with a few drops of peppermint extract before mixing with the crumbs. The mint undertone provides a refreshing contrast to the sweet chocolate, reminiscent of peppermint bark. Garnish with a few mint leaves for a festive touch.
Berry Burst
Stir in a tablespoon of freeze-dried strawberry powder into the crumb mixture. The berry flavor adds a bright, tart kick that balances the richness of the chocolate. Top with a drizzle of raspberry glaze for an extra burst of color.
Caramel Swirl
Swirl a caramel sauce into the frosting before combining with the crumbs. The caramel adds a luscious, buttery sweetness that complements the chocolate. Finish with a dusting of sea salt on the sprinkles for a sweet‑savory twist.
Spiced Ginger
Blend a pinch of ground ginger and cinnamon into the crumb mixture. The warm spices bring a holiday feel that’s reminiscent of gingerbread. Pair with a splash of bourbon or rum in the chocolate for a boozy version that adults will love.
Storing and Bringing It Back to Life
Fridge Storage
Store the finished cakesicles in an airtight container at room temperature for up to 48 hours. The chocolate remains firm, and the crumbs stay crisp. Keep them away from direct sunlight, which can soften the chocolate. If you notice the chocolate starting to soften, place the container in the fridge for a short period.
Freezer Friendly
For longer storage, freeze the sticks in a single layer on a parchment sheet before transferring them to a freezer bag. They will keep well for up to 3 weeks. When ready to serve, let them thaw at room temperature for 15 minutes to regain their original texture. Avoid microwaving, as it can melt the chocolate unevenly.
Best Reheating Method
To revive the crunch, place the cakesicles on a baking sheet and bake at 300°F (149°C) for 3–5 minutes. This gentle heat restores the chocolate’s crispness without melting it. Alternatively, a quick dip in warm water can soften the chocolate, making it easier to bite while preserving the crunch.