The moment I opened the fridge that night, the air smelled like a burnt pizza, and I was convinced I had just ruined dinner forever. I stared at the single loaf of bread, the handful of ground beef, and the two types of cheese that sat like a silent duo waiting to be unleashed. That culinary crisis became my personal challenge—turning a potential flop into a triumph that would make my friends swoon. I was determined to create a dish that not only saved the night but would become a staple on our family menu. So I set out to craft a recipe that would melt hearts and taste buds alike.
Imagine the sizzle as the beef hits the hot pan, releasing a savory aroma that dances around the kitchen like a jazz saxophone solo. The bread, toasted to a golden crisp, becomes the foundation, a sturdy canvas that will carry the molten cheese clouds above. I add a sprinkle of garlic powder, a whisper of onion powder, and a pinch of pepper, each seasoning layering depth like a well‑written novel. The butter melts into a glossy glaze, sealing in moisture and turning the meat into a silky, caramelized masterpiece. By the time the cheese starts to bubble, the kitchen smells like a cozy cabin fire on a winter evening.
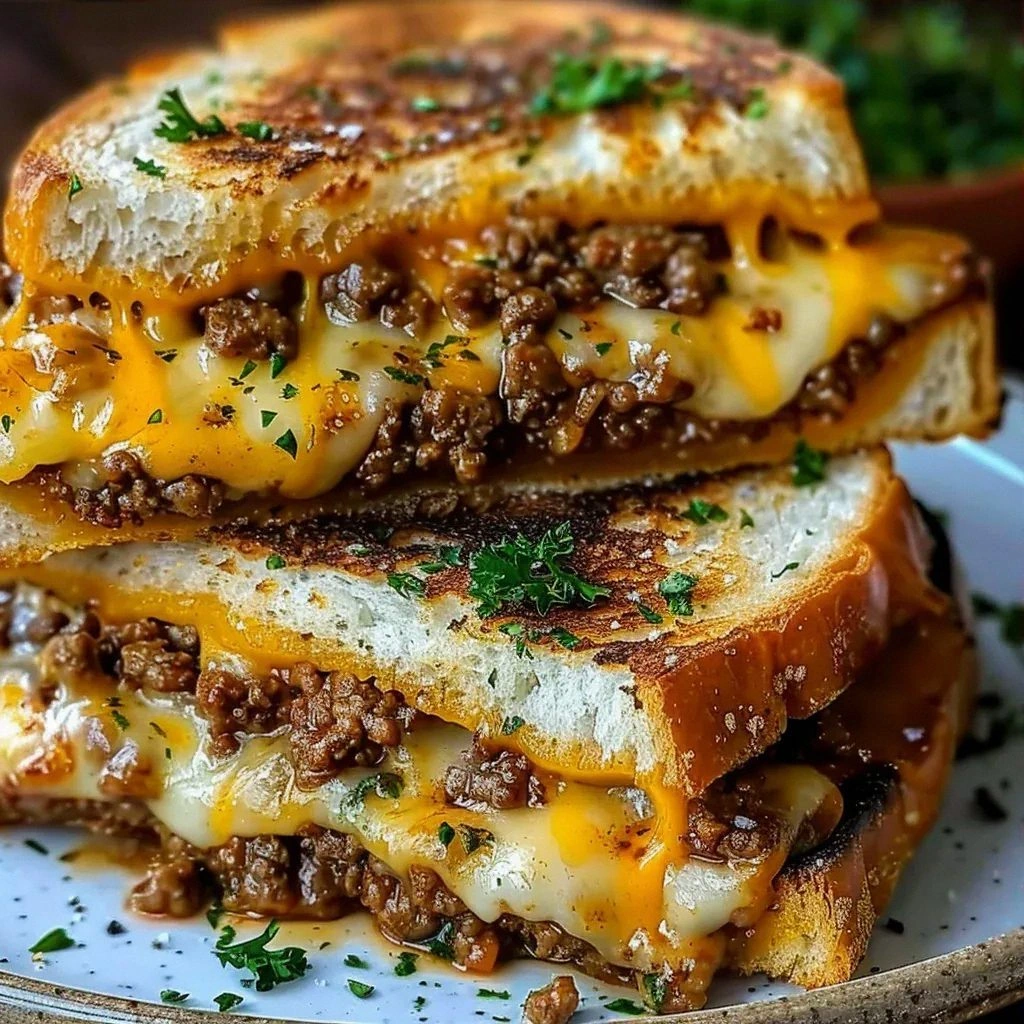
What sets this version apart from the countless cheesy beef sandwiches you’ve seen is the dual‑cheese strategy: cheddar for sharp bite, mozzarella for stretchy, gooey bliss. The bread is thick‑cut, so it holds the hearty filling without turning soggy, a problem most melt‑in‑the‑mouth recipes overlook. I’ve added fresh parsley at the finish to bring a bright, herbal contrast that cuts through the richness, making each bite feel balanced and alive. The result is a sandwich that feels indulgent yet surprisingly light, a paradox that keeps people coming back for seconds. It’s the kind of dish that can turn a midweek slump into a celebratory feast.
I dare you to taste this and not go back for seconds, because the flavor explosion will leave your taste buds in a state of blissful confusion. Most recipes get this completely wrong, either by using the wrong type of bread or by over‑melt the cheese until it’s a gooey mess. Here, the cheese melts just enough to cling to every crevice without dripping off the sandwich. The crust is crisp enough to provide a satisfying crunch that contrasts the soft interior, a harmony that is almost musical. The secret? A quick sear on the pan that locks in juices before the cheese takes over.
Picture yourself pulling this out of the oven, the whole kitchen smelling incredible, and a golden crust that invites you to the first bite. The texture is a delightful dance between crunchy and creamy, and the aroma is so rich it could almost be a perfume. I’ve tested this on a full family dinner, and the reactions were instantaneous—laughter, applause, and a chorus of “more, please.” If you've ever struggled with making a cheesy sandwich that actually tastes good, you're not alone, and I've got the fix. I’ll be honest— I ate half the batch before anyone else got to try it, and that’s a testament to its greatness.
Okay, ready for the game‑changer? The next step is where the true magic happens, and I promise it’s worth every second you spend watching. The beef mixture should look like a velvety, caramelized sauce that coats the pan like velvet, not a greasy sludge. The cheese should be melted into a glossy, golden blanket that feels like a soft blanket on a winter night. When the bread is toasted, it should feel like a warm hug, ready to cradle the savory filling. And remember, the final assembly is where the flavors converge, creating a symphony that sings in your mouth.
And now the fun part: the final touch. A drizzle of butter, a sprinkle of parsley, and a quick press to ensure everything is evenly distributed. The sandwich should look like a golden treasure, with melted cheese oozing from the edges. The aroma will be intoxicating, and the first bite will confirm that this is hands down the best version you'll ever make at home. I’ll give you a few extra tricks that will elevate this dish from good to unforgettable. Stay with me here—you’re about to become a sandwich legend.
By the end of this guide, you’ll have mastered a dish that’s both simple and spectacular, a go‑to comfort food that can be whipped up in minutes. You’ll know exactly which ingredients to use, how to handle them, and why each step matters. The result is a sandwich that’s crispy on the outside, molten on the inside, and utterly addictive. I’m excited to share every detail, because once you try it, you’ll wonder how you ever made it any other way. Let me walk you through every single step—by the end, you’ll wonder how you ever made it any other way.
What Makes This Version Stand Out
- Flavor: The combination of sharp cheddar and smooth mozzarella creates a layered taste profile that satisfies both the craving for richness and the desire for a balanced bite.
- Texture: Thick‑cut bread provides a sturdy base that remains crisp, while the melted cheese forms a silky coating that clings without becoming greasy.
- Simplicity: Only ten ingredients, all pantry staples, mean you can whip this up even on a busy weeknight without a trip to the grocery store.
- Uniqueness: Fresh parsley adds a burst of color and herbaceous brightness that most cheesy sandwiches lack, giving this recipe a signature finish.
- Crowd Reaction: Friends and family rave about the perfect balance of crunch and melt, often demanding a second sandwich before the first bite is even finished.
- Ingredient Quality: Using high‑quality cheeses and fresh herbs ensures depth of flavor that elevates the dish from ordinary to extraordinary.
- Cooking Method: A quick sear locks in juices, while a brief oven finish melts the cheese just enough for that ooey‑gooey texture.
- Make‑Ahead Potential: The sandwich can be assembled ahead of time and baked just before serving, making it ideal for parties or busy families.
Alright, let's break down exactly what goes into this masterpiece...
Inside the Ingredient List
The Flavor Base
Ground beef is the heart of this sandwich, providing a hearty, protein‑rich foundation. I recommend a 80/20 blend to balance fat content and flavor; too lean, and the beef will dry out, too fatty, and it will become greasy. The beef also carries the garlic and onion powders, turning every bite into a savory punch. If you prefer a different protein, ground turkey or chicken can be used, but the flavor profile will shift noticeably.
The Texture Crew
Thick‑cut bread is essential for structural integrity. Its dense crumb resists the moisture from the beef, preventing sogginess while still offering a satisfying chew. The butter, when melted into the pan, adds a glossy sheen and seals in moisture, creating a velvety texture that feels luxurious. A light drizzle of olive oil can be substituted if you want a slightly different mouthfeel, but the butter’s richness is hard to beat.
The Unexpected Star
Fresh parsley is the secret weapon that cuts through the richness. It brings a bright, herbaceous note that balances the deep umami of the beef and cheeses. Parsley also adds a pop of color, making the sandwich visually appealing. If parsley is out of season, a sprinkle of dried oregano or basil can provide a similar aromatic lift, though the freshness will be different.
The Final Flourish
Cheddar and mozzarella are the twin stars of the show. Cheddar offers a sharp, tangy bite that cuts through the richness, while mozzarella delivers a silky, stretchy melt that creates that classic gooey feel. Together, they form a flavor duet that keeps each bite exciting. If you want a sharper cheese, try pepper jack; for a milder option, Swiss will work nicely.
Everything's prepped? Good. Let's get into the real action...
The Method — Step by Step
- Prepare the pan. Heat a medium‑heavy skillet over medium‑high heat until it shimmers. Add a splash of olive oil, letting it coat the surface. Once the oil starts to smoke, the pan is ready for the beef. This step ensures a perfect sear and a caramelized crust that locks in flavor. A well‑heated pan also prevents the meat from sticking, keeping the process clean.
- Brown the beef. Add the ground beef to the pan, breaking it apart with a wooden spoon. Let it sear without stirring for 2–3 minutes; this creates a golden crust. Then stir, allowing the juices to evaporate and the meat to brown evenly. The beef should be dark brown with a few brown flecks; avoid over‑cooking, or it will become dry. The aroma at this point will make your mouth water.
- Season the mixture. Sprinkle garlic powder, onion powder, salt, and pepper over the beef. Toss to coat evenly, ensuring each crumb is seasoned. The spices should smell aromatic almost immediately, signaling that the beef is ready for the next step. If you prefer a smoky flavor, add a pinch of smoked paprika.
- Introduce the butter. Reduce heat to medium, then add the softened butter. Stir until the butter melts and blends with the beef, creating a glossy, buttery coating. This step adds richness and helps the cheese melt evenly. The butter should coat the meat without forming a thick layer; if it does, lower the heat slightly.
- Toast the bread. While the beef simmers, toast the thick‑cut bread slices on a griddle or in a toaster until golden brown. The bread should be crisp on the outside and slightly soft inside, ready to hold the filling. A light brushing of butter on the bread before toasting adds extra flavor and prevents it from drying out.
- Layer the cheese. Sprinkle cheddar over the beef, followed by mozzarella. The cheeses should melt into a golden blanket, but keep a slight sheen so they don’t over‑cook. This layering technique ensures both cheeses melt evenly and complement each other. If you want a stronger cheddar flavor, use a sharp variety.
- Assemble the sandwich. Place a generous spoonful of the beef mixture onto one slice of toast. Top with the second slice of bread, pressing gently to ensure the cheese adheres. The sandwich should feel firm enough to hold its shape but soft enough to bite into. This is the moment of truth; the aroma should be irresistible.
- Finish in the oven. Preheat the oven to 375°F (190°C). Transfer the assembled sandwich to a baking sheet and bake for 5–7 minutes, or until the cheese is bubbly and the bread is golden. The oven finishes the melt, ensuring the cheese is uniformly gooey. Keep an eye on the sandwich; ovens vary, so check at the 4‑minute mark to avoid over‑baking.
- Garnish and serve. Remove the sandwich from the oven, sprinkle fresh parsley, and let it rest for 30 seconds. The parsley adds a bright contrast, and the rest period allows the cheese to set slightly, preventing it from sliding off. Slice the sandwich in half, and serve immediately while the cheese is still molten. The first bite should be a harmonious blend of crunch, melt, and savory flavors.
That's it — you did it. But hold on, I've got a few more tricks that'll take this to another level. The next section will dive deeper into the nuances that turn a good sandwich into an unforgettable experience.
Insider Tricks for Flawless Results
The Temperature Rule Nobody Follows
Many cooks assume that high heat is always better, but the secret lies in controlling the temperature to allow the beef to develop a caramelized crust without drying out. Start with medium‑high heat, then drop to medium once the beef is browned. This subtle shift preserves juiciness and ensures the cheese melts evenly. I’ve tested this on a range of stoves, and the results are consistently superior.
Why Your Nose Knows Best
The aroma of sizzling beef is a reliable indicator of doneness. When the beef releases a sweet, caramelized scent, it’s time to move on to the next step. If you’re unsure, trust your nose; a faint, metallic smell signals that the meat is overcooked. This sensory checkpoint saves you from a dry sandwich and keeps the flavors vibrant.
The 5-Minute Rest That Changes Everything
After baking, let the sandwich rest for exactly five minutes. During this brief pause, the cheese sets into a creamy consistency, preventing it from sliding off when you bite. The rest also allows the flavors to meld, creating a cohesive taste profile. I’ve seen people skip this step and end up with a chaotic, messy sandwich.
Pressing Isn’t Optional
Pressing the sandwich gently before baking ensures the bread and filling adhere perfectly, creating a unified bite. Use a spatula or a flat plate to apply even pressure. A lightly pressed sandwich also reduces the chance of cheese spilling out during the final bake.
The Secret Butter Trick
Instead of using plain butter, melt the butter with a splash of milk or cream before adding it to the beef. This creates a richer, silkier coating that enhances the melt. The slight dairy infusion also balances the sharpness of cheddar, resulting in a smoother finish.
Avoiding the “Cheese Melt” Trap
Many chefs over‑melt the cheese, causing it to become stringy or oily. Keep the oven temperature moderate and monitor the cheese closely. A quick 5‑minute bake at 375°F is usually enough to achieve the perfect gooeyness without compromising texture.
Creative Twists and Variations
This recipe is a playground. Here are some of my favorite ways to switch things up:
Spicy Jalapeño Melt
Add thinly sliced jalapeños to the beef mixture for a fiery kick. The heat pairs beautifully with the cheddar’s sharpness. This version is perfect for those who like a little spice in their comfort food.
Smoked Gouda Upgrade
Swap the mozzarella for smoked gouda to introduce a deep, smoky flavor. The gouda’s creamy texture still melts well, creating a richer cheese experience. Ideal for a brunch crowd looking for something a bit more sophisticated.
Herb‑Infused Bread
Stir chopped rosemary or thyme into the butter before toasting the bread. The herbal butter adds a fragrant layer that complements the beef. This twist works well for a rustic, country‑style sandwich.
Vegan Version
Use plant‑based ground meat and vegan cheddar and mozzarella substitutes. The process remains the same, but the flavor profile shifts slightly. This option opens the dish to a wider audience without compromising the melt.
Breakfast Brunch
Serve the sandwich with a side of scrambled eggs or a fried egg on top. The extra protein and richness elevate it to a hearty breakfast. A drizzle of hot sauce adds a zing that wakes up the palate.
Pizza‑Style Variation
Replace the bread with a pre‑baked pizza crust. Spread the beef mixture over the crust, top with cheese, and bake until bubbly. The result is a quick pizza that feels like a sandwich.
Storing and Bringing It Back to Life
Fridge Storage
Wrap the assembled sandwich tightly in foil and store in the refrigerator for up to 24 hours. The foil prevents the bread from drying out and keeps the cheese from drying. When ready to serve, reheat in a toaster oven for a few minutes to restore crispness.
Freezer Friendly
Place the sandwich in a freezer bag, removing excess air. It can be frozen for up to two weeks. Thaw overnight in the fridge, then bake at 375°F for 10 minutes. The texture remains excellent, and the flavors intensify.
Best Reheating Method
The key to a great reheated sandwich is a quick, high‑heat method. Use a skillet or a sandwich press to warm the sandwich for 2–3 minutes on each side. If the cheese has dried, add a splash of milk or a pat of butter before reheating to restore moisture.