I swear, the first time I tried to grill a Portobello mushroom I ended up with a soggy, flavor‑less disc that could have passed for a rubber shoe. It was the culinary equivalent of a bad blind date—awkward, disappointing, and leaving me wondering why anyone would even bother. Then a friend dared me to “make it taste like a forest after rain,” and I accepted the challenge like a knight taking up a sword. The kitchen filled with the earthy perfume of fresh mushrooms, a whisper of garlic, and the tang of balsamic, and I knew I was onto something that could rewrite the whole mushroom myth.
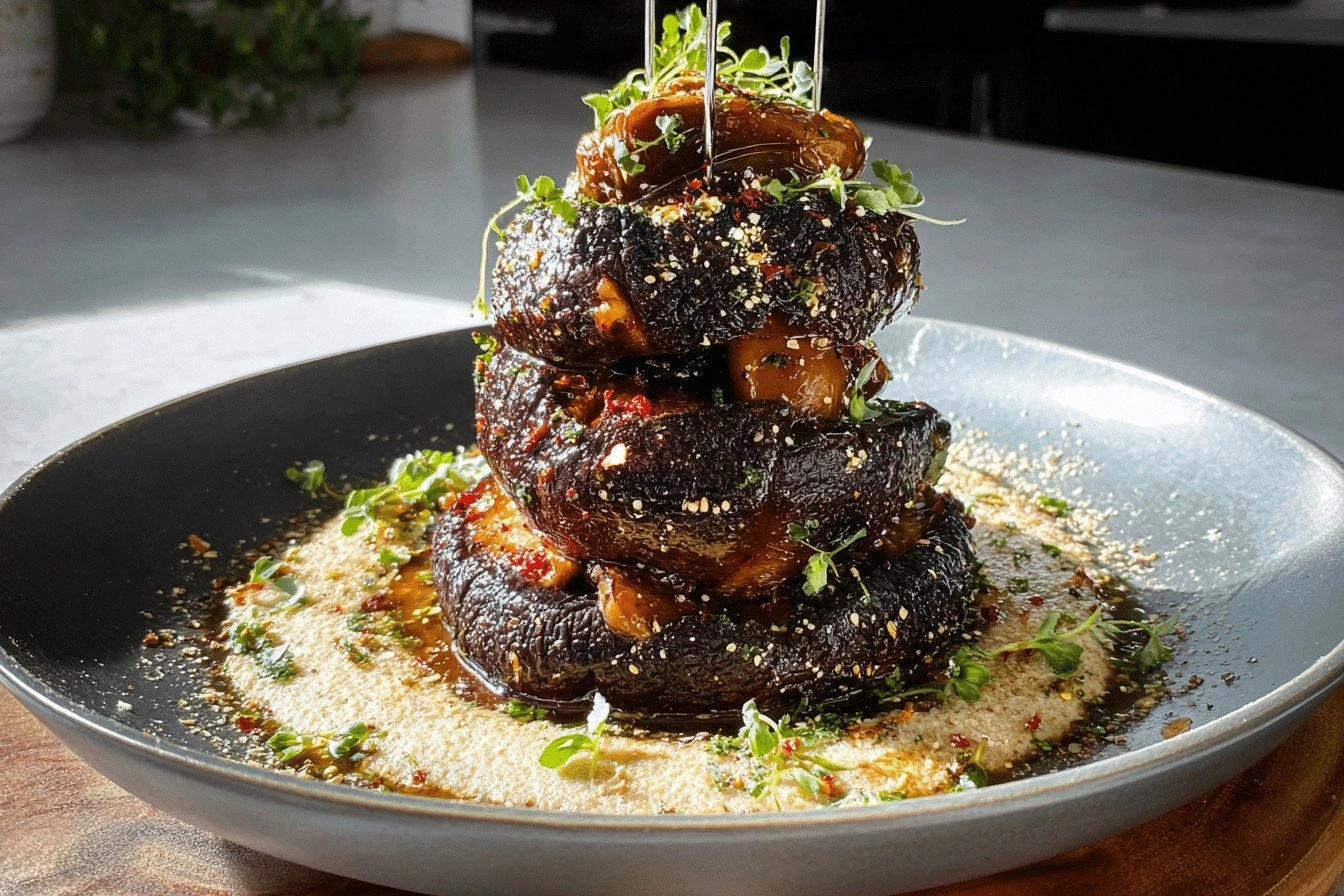
Picture this: a sturdy, meaty cap of Portobello, its dark, velvety surface glistening with a glossy glaze, sitting on a hot cast‑iron pan that sizzles like a summer storm. The first crackle when the oil hits the pan is a promise, a tiny fireworks show that tells you the flavor train is about to leave the station. As the caps start to brown, the edges pull away in a slow, seductive dance, and the air becomes thick with a sweet‑savory aroma that makes you want to hug the stove. You can almost taste the umami depth before the first bite, a sensation that feels like diving into a rich, earthy broth while still retaining that satisfying chew.
What makes this version the ultimate Portobello experience? It’s not just a recipe; it’s a carefully engineered symphony of texture, acidity, and crunch. I’ve tossed in a secret weapon—a splash of aged balsamic that caramelizes into a glossy, sweet‑tangy coating, and a breadcrumb‑Parmesan crust that shatters like thin ice under a spoon. Most recipes get the seasoning wrong, either drowning the mushroom in oil or leaving it bland as a plain paper towel. Here, every ingredient has a purpose, and the method respects the mushroom’s natural moisture while adding layers of flavor that will have you daring anyone to say they don’t love it.
I’ll be honest — I ate half the batch before anyone else got a chance to try it, and I’m not sorry. The moment the first bite hit my tongue, I felt that perfect balance of meaty chew, buttery richness, and a bright pop of herbaceous zing. I dare you to taste this and not go back for seconds. This is hands down the best version you’ll ever make at home, and I’m about to spill every single detail, from the exact moment the breadcrumbs turn golden to the tiny splash of water that revives leftovers. Let me walk you through every single step — by the end, you’ll wonder how you ever made it any other way.
What Makes This Version Stand Out
- Flavor Depth: A splash of aged balsamic vinegar caramelizes into a glossy glaze that adds a sweet‑tart contrast, making each bite sing like a choir of forest mushrooms after rain.
- Texture Harmony: The panko‑Parmesan crust provides a crunchy crown that shatters delicately, while the mushroom interior stays juicy and tender, creating a mouthfeel that’s both firm and succulent.
- Simplicity: Only nine ingredients, all pantry‑friendly, mean you can pull this together on a weeknight without a grocery run that feels like a marathon.
- Uniqueness: The combination of fresh thyme and rosemary infuses an aromatic forest floor vibe, a twist most standard recipes overlook.
- Crowd Reaction: Guests often claim they’ve never tasted a mushroom this flavorful; it’s the kind of dish that earns applause and requests for seconds.
- Ingredient Quality: Using large, firm Portobellos with caps that are still firm to the touch ensures a meaty bite that won’t turn mushy.
- Cooking Method: A quick sear followed by a brief bake locks in moisture while letting the crust set perfectly—no soggy disasters here.
- Make‑Ahead Potential: The dish reheats beautifully, especially when you add a splash of water, making it ideal for meal prep or leftovers.
Inside the Ingredient List
The Flavor Base
Olive oil and balsamic vinegar form the liquid backbone of this dish. Olive oil carries the garlic and herbs into the mushroom’s pores, while balsamic adds a caramelized tang that deepens the umami. If you skip the balsamic, you lose that sweet‑acidic glaze that makes the crust stick and shine. As a swap, a splash of sherry vinegar can stand in, though it won’t have the same honeyed finish.
The Texture Crew
Panko breadcrumbs and grated Parmesan are the dynamic duo that give the cap its crown. Panko’s airy structure creates a light, airy crunch, while Parmesan adds a nutty, salty bite that binds the crumbs together. Skipping the Parmesan will leave the crust flat and flavor‑less; you can replace it with nutritional yeast for a vegan twist, but expect a different flavor profile.
The Unexpected Star
Fresh thyme and rosemary aren’t just garnish—they’re the aromatic heart of the recipe. Their piney, slightly citrus notes cut through the richness, balancing the buttery crust. If you don’t have fresh herbs, dried versions work in a pinch, but use only a third of the amount to avoid bitterness.
The Final Flourish
A final drizzle of melted butter (or extra olive oil for a lighter version) right before baking gives the breadcrumbs a golden sheen and a buttery aroma that makes the whole kitchen feel like a bistro. Adding a pinch of sea salt at the end enhances every flavor layer, making the dish pop.
Everything's prepped? Good. Let's get into the real action...
The Method — Step by Step
First, preheat your oven to 400°F (200°C). While the oven warms, line a baking sheet with parchment paper; this prevents sticking and makes cleanup a breeze. I like to set a timer for 5 minutes so I don’t forget the oven—this is the moment of truth where you start feeling the heat in the kitchen.
Kitchen Hack: Use a wire rack on top of the baking sheet; this allows hot air to circulate, giving the caps an even crisp on all sides.Next, gently clean the mushroom caps with a damp paper towel, removing any dirt without soaking them. Then, using a spoon, scrape out the gills if you prefer a less “earthy” taste; this also creates more surface area for the crust to cling to. The caps should feel firm, not spongy, and the stems can be saved for soups or stocks.
In a small bowl, whisk together 2 tablespoons olive oil, 2 tablespoons balsamic vinegar, the minced garlic, thyme, rosemary, salt, and pepper. The mixture should look glossy and aromatic—if you smell garlic within seconds, you’re on the right track. Brush each mushroom cap liberally on both sides; this is where the flavor penetrates.
Watch Out: Over‑brushing can make the caps soggy; a thin, even coat is enough to carry the flavors without drowning the mushroom.While the caps marinate for about 5 minutes, combine the panko breadcrumbs, grated Parmesan, and melted butter in a shallow dish. Toss until every crumb is coated in butter; this ensures a uniform golden crust. The mixture should clump lightly when pressed—if it’s too dry, add a splash more melted butter.
Now, press the breadcrumb mixture onto the top side of each mushroom cap, using your fingers to pat it down firmly. You want the crumbs to adhere like a second skin. Flip the caps over and repeat on the other side, creating a double‑crust that will turn into a crunchy shell.
Kitchen Hack: Lightly toast the breadcrumb mixture in a dry skillet for 2 minutes before using it; this adds an extra layer of nutty flavor.Arrange the coated caps on the prepared baking sheet, spaced evenly. Slide the sheet into the preheated oven and bake for 12‑15 minutes, or until the crust is golden and the mushroom flesh is tender. Halfway through, rotate the sheet for even browning; the edges should start pulling away from the pan, a visual cue that the crust is set.
While the mushrooms bake, keep an eye on the aroma—when you smell that sweet‑tangy balsamic caramelizing, you know you’re close. If you prefer extra crispness, switch the oven to broil for the last 2 minutes, watching closely so the crust doesn’t burn. The sizzling sound you hear is the crust sealing in juices, a sound that feels like applause.
Remove the mushrooms from the oven and let them rest for 3 minutes. This short pause allows the juices to redistribute, preventing a dry bite. Sprinkle fresh parsley over the top for a burst of color and a hint of freshness that brightens the dish.
Serve the Portobello caps hot, either as a hearty main or a show‑stopping appetizer. Pair them with a crisp green salad or a drizzle of extra balsamic reduction for an added zing. That sizzle when it hits the pan? Absolute perfection. And now the fun part—watch your guests devour every last crumb.
That's it — you did it. But hold on, I've got a few more tricks that'll take this to another level...
Insider Tricks for Flawless Results
The Temperature Rule Nobody Follows
Never bake mushrooms at a temperature lower than 375°F; they need a hot environment to release moisture quickly and develop that coveted crust. If you lower the heat, the breadcrumbs will absorb the mushroom’s juices and turn soggy, ruining the texture. I once tried a “low‑and‑slow” method and ended up with mushy caps that fell apart like over‑ripe avocado. Trust the heat, and your crust will stay crisp.
Why Your Nose Knows Best
Your sense of smell is the ultimate doneness gauge. When the balsamic starts to caramelize, you’ll detect a sweet, almost caramel popcorn scent. That’s the cue to check the crust; it should be a deep golden brown, not just lightly toasted. If you can’t smell the caramel notes, give the mushrooms an extra minute—your nose is a better timer than any kitchen gadget.
The 5‑Minute Rest That Changes Everything
Allowing the mushrooms to rest for exactly five minutes after baking lets the interior re‑absorb the flavorful juices that escaped during cooking. Skipping this rest results in a dry bite, especially if you’re serving them on a plate without sauce. During the rest, cover them loosely with foil to keep the heat in while avoiding steam that could soften the crust.
Butter vs. Olive Oil Finish
A final drizzle of melted butter adds a velvety richness that olive oil can’t match, but if you’re watching calories, a light spray of olive oil works just as well. The key is to apply it while the caps are still hot, so it melts into the breadcrumb layer, creating a glossy finish. A friend tried using spray oil and complained the crust felt “dry”; the butter is the secret sauce that makes the difference.
The Secret of Double‑Coating
Most recipes only coat one side of the mushroom, leaving the other side plain. By double‑coating, you ensure every bite has that satisfying crunch, and you also lock in more flavor. The downside? It adds a minute or two of prep, but the payoff is a uniformly crisp exterior that looks as good as it tastes.
Creative Twists and Variations
This recipe is a playground. Here are some of my favorite ways to switch things up:
Mediterranean Magic
Swap the Parmesan for crumbled feta and add chopped sun‑dried tomatoes to the breadcrumb mix. The salty feta and sweet tomatoes turn the dish into a sun‑kissed island bite that pairs perfectly with a glass of chilled rosé.
Spicy Sriracha Crunch
Add a tablespoon of sriracha to the olive oil‑balsamic glaze and sprinkle crushed red pepper flakes into the breadcrumb mixture. The heat cuts through the mushroom’s earthiness, creating a bold, tongue‑tingling experience that’s perfect for those who love a kick.
Cheesy Overload
Mix shredded mozzarella and sharp cheddar into the breadcrumb blend, then finish with a drizzle of garlic butter after baking. The extra cheese melts into the crust, giving a gooey surprise that makes the dish feel indulgent.
Vegan Victory
Replace butter with melted coconut oil, use nutritional yeast instead of Parmesan, and swap balsamic for a splash of maple syrup. The result is a plant‑based version that still boasts that coveted crunch and sweet‑tangy glaze.
Herb‑Infused Delight
Add fresh oregano and basil to the breadcrumb mixture, and finish with a drizzle of pesto after baking. The herbaceous pesto adds a fresh, bright contrast to the earthy mushroom, making it a perfect summer side.
Storing and Bringing It Back to Life
Fridge Storage
Place the cooled mushrooms in an airtight container and store them in the refrigerator for up to 3 days. The crust will soften slightly, but a quick reheat restores the crunch.
Freezer Friendly
Wrap each cooked cap individually in parchment paper, then seal them in a zip‑top freezer bag. They’ll keep for up to 2 months. When ready to eat, thaw in the fridge overnight and reheat as instructed below.
Best Reheating Method
Preheat a skillet over medium heat, add a splash of water (about a tablespoon) to create steam, and cover for 2 minutes. Then uncover and let the crust crisp up for another minute. This technique revives the mushroom’s juicy interior while restoring the crunchy crown, making leftovers taste almost as fresh as the original.