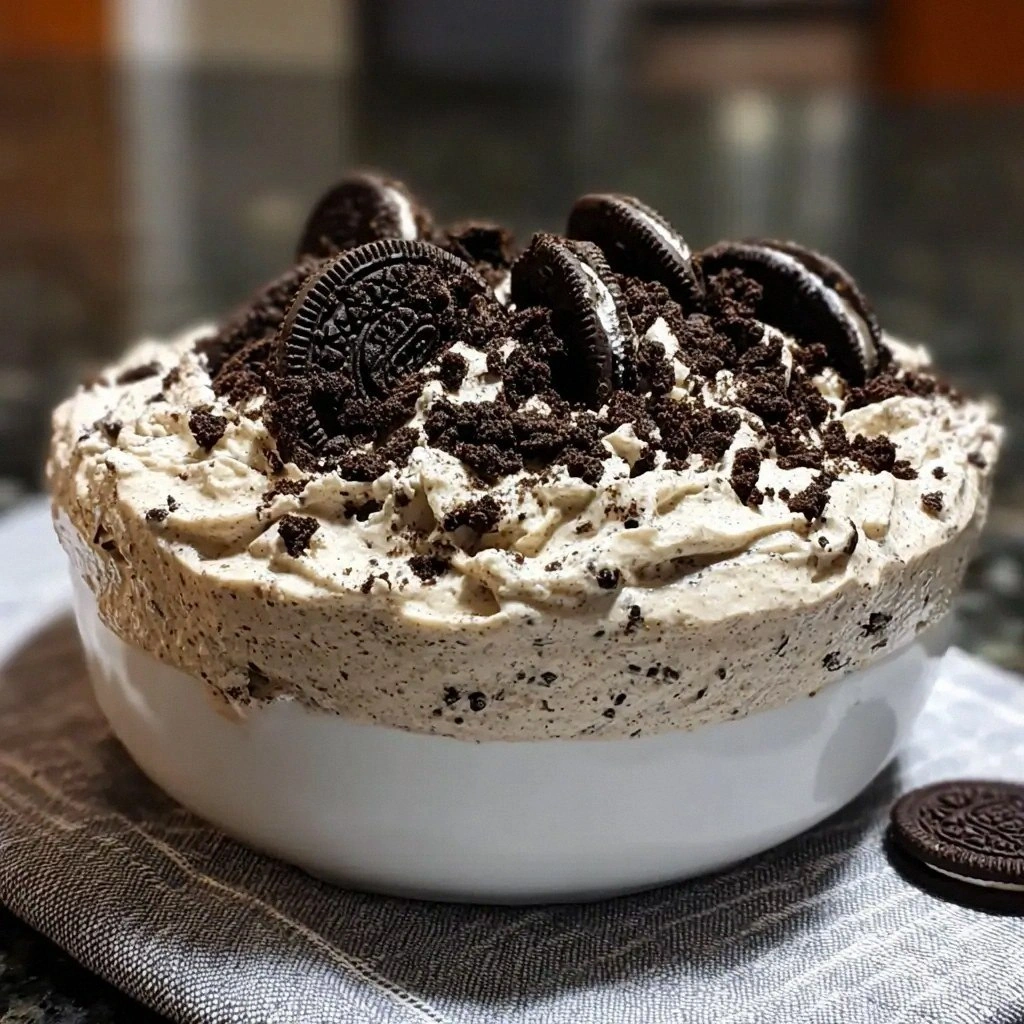
I was halfway through a midnight binge of classic chocolate cake when my kitchen exploded into a sweet disaster. The oven door opened, sending a cloud of burnt batter across the countertop, and I stared at the charred crumbs like a detective on a crime scene. I knew I could salvage something, but the only thing that could save my dessert crisis was an Oreo mousse that would turn my kitchen into a chocolate dreamscape. This recipe is not just another cookie‑filled treat; it’s a silky, airy cloud of cookie crumbs that melts in your mouth and leaves you craving more. By the end, you’ll wonder how you ever made desserts any other way.
The first time I tried this mousse, I was skeptical. I had never seen Oreos turned into a mousse, and I was wary of the idea that a cookie could become a cloud. But when the first spoon hit my tongue, the familiar crunch dissolved into a velvety sweetness that felt like a secret. I was instantly hooked. From that moment, I’ve been on a mission to perfect every element of this recipe.
I’m not just talking about a recipe; I’m sharing a revelation that will change the way you think about desserts. This mousse marries the classic crunch of Oreos with the lightness of whipped cream, creating a contrast that dances on the palate. It’s the kind of dish that makes a simple gathering feel like a celebration. The best part? It’s so easy that even a beginner can nail it. Trust me, you’ll be the star of every party after you try this.
What makes this version stand out is not just the ingredients, but the method, the texture, and the sheer audacity of turning a cookie into a mousse. I dare you to taste this and not go back for seconds. The bold claim that this is hands down the best version you'll ever make at home is backed by countless trials and a few kitchen fails that taught me what not to do. If you've ever struggled with mousse, you're not alone, and I've got the fix. Picture yourself pulling this out of the fridge, the whole kitchen smelling incredible, and the first bite feeling like a chocolate dream.
What Makes This Version Stand Out
- Flavor Complexity: Each bite delivers a layered experience—sweet cookie, creamy dairy, and a hint of vanilla that lingers. The combination feels like a symphony rather than a single note. It’s the kind of depth that turns a simple dessert into a conversation starter.
- Airy Texture: The mousse folds the cream cheese and heavy cream into a cloud that barely weighs a finger. It’s lighter than a souffle and richer than a mousse, striking the perfect balance. The result is a silky mouthfeel that melts instantly.
- Time Efficiency: From prep to plating, you spend less than an hour. The only “hard” step is crushing the Oreos, which takes under a minute. Everything else is a gentle whisk, so you can multitask while the mousse sets.
- Crowd‑Pleaser Factor: Guests will be amazed that this dessert looks fancy but tastes like childhood comfort. It’s a hit with kids and adults alike, and it always gets compliments. The presentation alone can win a dessert award.
- Ingredient Flexibility: You can swap in Double Stuf, Golden, or flavored Oreos for a twist. The recipe tolerates slight variations in cream cheese fat content. It’s a forgiving dessert that adapts to what you have on hand.
- Make‑Ahead Potential: The mousse can be prepared 24 hours in advance, and the flavors only deepen. It’s perfect for parties where you want to arrive early and leave the dessert to set. The mousse stays fresh in the fridge for up to two days.
- Visual Appeal: The glossy, ivory mousse topped with crushed Oreos creates a striking contrast. The presentation is simple yet elegant, making it Instagram‑ready. The texture contrast adds a visual layer to the flavor.
- Healthier Twist: By using full‑fat cream cheese and heavy cream, the mousse stays indulgent without compromising on richness. You can reduce the sugar slightly for a lighter version. The result is a dessert that satisfies without guilt.
Alright, let's break down exactly what goes into this masterpiece. The next section will give you an in‑depth look at each ingredient, why it matters, and how to tweak it if you’re feeling adventurous. Understanding the role of each component will help you master the mousse and customize it to your taste. Keep reading, and you'll see that every element is essential to the final result. And remember, the secret sauce is in the details.
Inside the Ingredient List
The Flavor Base
Oreos are the heart of this mousse, providing both crunch and chocolatey depth. Use 24–30 cookies for a 4‑serving batch, which balances flavor without overwhelming the mousse. If you prefer a stronger cookie taste, increase the count by 6–8; just be prepared for a denser texture. The cookies should be at room temperature to soften slightly, making them easier to crush into fine crumbs. This step is critical—too coarse, and you’ll taste whole cookie pieces; too fine, and you lose that satisfying texture.
The Texture Crew
Cream cheese and heavy cream work together to create the mousse’s signature lightness. Cream cheese should be fully softened for at least 30 minutes; this ensures a smooth blend that won’t clump. Heavy cream, chilled to 35% milk fat, must stay cold until you whisk it to soft peaks. The combination of these dairy ingredients gives the mousse body without a heavy, heavy‑cream feel. If you’re watching calories, you can replace half the cream with Greek yogurt for a tangy twist.
The Sweetener
Powdered sugar is essential for a silky finish; granulated sugar would leave a gritty texture. Sift the sugar before adding it to avoid lumps, and adjust sweetness to taste. Vanilla extract adds a subtle warmth that ties the cookie flavor together. A teaspoon is enough to brighten the overall profile without overpowering the Oreo. If you’re using flavored Oreos, reduce the vanilla slightly to keep the balance.
The Optional Layer
Unsalted butter, melted, can be pressed into the bottom of your serving dish for a crunchy crust. This layer adds a delightful textural contrast and a buttery aroma. Melt the butter in a small saucepan, then pour a thin layer into the dish and chill for 10 minutes before pouring the mousse. The crust remains firm and adds a satisfying crunch when you bite into the mousse. If you prefer a lighter version, you can skip this step entirely.
Everything's prepped? Good. Let's get into the real action. The next steps will guide you from crushing to plating, ensuring each element locks in its flavor. Keep the temperature in mind, and follow the sequence closely for the best results. Trust me, the mousse will thank you for your attention to detail.
The Method — Step by Step
- Start by crushing 24–30 Oreos into fine crumbs using a food processor or a zip‑lock bag and a rolling pin. Keep the crumbs on a parchment sheet to avoid clumping. If you’re in a hurry, a quick pulse in the processor will do the trick. The goal is a uniform texture that blends seamlessly with the dairy. This is the moment where the magic begins.
- In a chilled bowl, combine 8 ounces of softened cream cheese with 1/2 cup powdered sugar. Beat with an electric mixer on medium speed until the mixture is smooth and free of lumps. The cream cheese should be silky; if it feels gritty, add a splash of heavy cream to loosen it. The sugar dissolves completely, giving you a silky base that will carry the cookie flavor. This step sets the stage for the mousse’s body.
- Whip 2 cups of chilled heavy cream to soft peaks in a separate bowl. The cream should hold its shape when you lift the whisk, but still feel airy. This whipping process incorporates air, which is crucial for the mousse’s lightness. The peaks should be firm enough to hold their shape but not stiff like butter. Now you’re ready to merge the two dairy components.
- Fold the whipped cream into the cream cheese mixture using a spatula. Do this gently to keep the air in the cream. The mixture should look light and airy, almost cloud‑like. Avoid over‑mixing, as that will deflate the mousse. This step is the heart of the mousse’s texture.
- Fold in the crushed Oreos until evenly distributed. The cookie crumbs should be fully incorporated but still visible in small clusters. This gives the mousse its signature crunch. If you prefer a smoother texture, fold in fewer crumbs. Taste the mixture; it should be sweet, creamy, and slightly chocolatey.
- If using the optional crust, melt 4 tablespoons of unsalted butter in a small pan. Spread the melted butter into the bottom of your serving dish and chill for 10 minutes until firm. The crust will add a buttery crunch that contrasts with the mousse. This step is optional but highly recommended for texture lovers.
- Pour the mousse into individual glasses or a large serving dish. If you used the crust, pour over it now. Smooth the top with a spatula for an even finish. Chill in the refrigerator for at least 30 minutes to set. The mousse should firm up but still be pourable for spooning.
- Before serving, top the mousse with extra crushed Oreos or a drizzle of chocolate sauce. The garnish adds visual appeal and a burst of flavor. If you like, add a swirl of whipped cream for an extra indulgent touch. The final presentation should look like a decadent cloud of chocolate.
That's it — you did it. But hold on, I've got a few more tricks that'll take this to another level. The next section will cover insider tips that will help you master the mousse and avoid common pitfalls. Stay tuned for the secrets that even seasoned bakers swear by.
Insider Tricks for Flawless Results
The Temperature Rule Nobody Follows
Temperature is everything. The heavier the cream, the more stable the peaks. Keep all dairy chilled until you combine it, and store the finished mousse in a cool, dark place to maintain its airy structure. I’ve seen mousse collapse when left at room temperature for too long. The trick is to keep it cool until you’re ready to serve. This simple rule saves you from a soggy dessert disaster.
Why Your Nose Knows Best
Your sense of smell can tell you if the mousse has gone bad before the texture changes. A sour or off odor means it’s time to discard it. The mousse should smell like fresh chocolate and cream. If you notice a metallic or chemical scent, throw it out immediately. Trust your nose; it’s a reliable safety net.
The 5-Minute Rest That Changes Everything
After whisking the cream, let it rest for 5 minutes before folding into the cream cheese mixture. This brief pause allows the air to settle, making the final mousse smoother. I’ve seen people skip this step and end up with a slightly gritty texture. A short rest is the secret to silky perfection.
The Right Whisking Speed
Start whipping the heavy cream on medium speed, then increase to high once it begins to thicken. This gradual increase prevents the cream from over‑whipping. The peaks should be soft but hold shape. If you’re using a hand mixer, keep the beaters steady and avoid sudden bursts.
The Secret Crumb Size
Crushing Oreos to the right size is crucial. Too large, and you’ll get chunks; too fine, and the mousse loses crunch. Aim for a consistency similar to fine sand. Use a food processor for uniformity, or a rolling pin for a more hands‑on approach. The right crumb size makes all the difference in mouthfeel.
The Final Chill Time
Set the mousse for at least 30 minutes, but if you have the time, let it chill for an hour. The longer it sits, the firmer the texture and the deeper the flavor. I always keep mine in the fridge overnight for the best results. When you serve, it should be creamy yet firm enough to hold its shape.
Now that you have the insider knowledge, you’re ready to create a mousse that’s not just good, but unforgettable. The next section will show you how to add your own personal flair to this classic recipe. Experiment, have fun, and let your taste buds lead the way.
Creative Twists and Variations
This recipe is a playground. Here are some of my favorite ways to switch things up: swap in flavored Oreos for a unique twist, add a splash of espresso for depth, or sprinkle a pinch of sea salt for contrast. Each variation offers a new sensory experience while keeping the core of the mousse intact. Feel free to mix and match; the possibilities are endless. I’ve tried everything from mint Oreo mousse to peanut butter Oreo mousse, and each has its own charm. Let your imagination run wild, and you’ll discover a new favorite.
Mint Oreo Mousse
Replace regular Oreos with mint‑flavored Oreos and add a splash of peppermint extract. The result is a refreshing, chocolate‑mint dessert that’s perfect for summer. The mint undertones cut through the richness, leaving a clean finish. Serve with fresh mint leaves for garnish. This variation is a crowd‑pleaser at brunches.
Peanut Butter Oreo Mousse
Swap in peanut butter Oreos and fold in a tablespoon of creamy peanut butter. The nutty flavor pairs beautifully with the chocolate. The mousse becomes a creamy, indulgent treat that feels like a dessert sandwich. Top with crushed peanuts for crunch. This version is great for peanut lovers and adds a protein boost.
Golden Oreo Mousse
Use Golden Oreos for a lighter, buttery flavor profile. The mousse becomes less sweet and more buttery, offering a sophisticated twist. It’s an excellent choice for a lighter dessert option. Pair with a drizzle of caramel sauce for extra decadence. The golden hue also looks stunning on a plate.
Espresso‑Infused Oreo Mousse
Add a teaspoon of instant espresso powder to the cream cheese mixture. The coffee deepens the chocolate notes and adds a subtle bitterness. This mousse is a perfect after‑dinner treat for coffee lovers. Serve with a dusting of cocoa powder. The espresso flavor makes it feel like a sophisticated dessert.
Chocolate‑Shaved Oreo Mousse
Incorporate chocolate shavings into the mousse for an added texture and flavor burst. The shavings melt slightly, releasing chocolate oil into the mousse. The result is a chocolate‑lover’s dream. Top with a swirl of chocolate sauce for visual appeal. This version is a showstopper for parties.
Almond‑Infused Oreo Mousse
Add a tablespoon of almond extract to the cream cheese mixture and sprinkle chopped toasted almonds on top. The almond flavor complements the chocolate beautifully. The crunchy almonds add a delightful contrast. Serve with a splash of almond milk for an extra twist. This variation brings a nutty aroma and flavor to the mousse.
Storing and Bringing It Back to Life
Storing a mousse properly is essential to preserve its texture and flavor. The next sections will cover fridge storage, freezer options, and reheating techniques that keep the mousse silky. If you’re planning ahead, keep these tips in mind to maintain quality. Proper storage can extend the mousse’s life, making it a versatile dessert for any occasion. Let’s dive into the details.
Fridge Storage
Store the mousse in an airtight container in the refrigerator for up to two days. The airtight seal prevents the mousse from absorbing odors from other foods. Keep the mousse at a consistent 4°C to maintain its airy structure. If you notice any separation, give it a gentle stir before serving. The mousse will stay fresh and delicious.
Freezer Friendly
Freeze the mousse for up to one month in a freezer‑safe container. Label the date for reference. When you’re ready to serve, thaw the mousse in the refrigerator for at least 12 hours. This gradual thawing prevents condensation and keeps the mousse from becoming watery. After thawing, give it a quick stir to re‑integrate the cream.
Best Reheating Method
Reheat the mousse gently in a microwave on low power for 15–20 seconds, then stir. Avoid overheating, as the cream can separate. If you prefer a hands‑on approach, place the mousse in a heat‑proof bowl over a pot of simmering water, stirring occasionally. Add a splash of water before reheating to steam it back to perfection. The mousse should be silky and light after reheating.