Picture this: I’m standing in a kitchen that smells like burnt toast and cinnamon, my friend’s voice echoing through the hallway, “You’re going to make a mess of that pumpkin pie, right?” I laughed, but the heat of the oven was already licking my eyebrows. I’d tried every pumpkin cheesecake recipe I could find, and each one left me with a dessert that tasted like a soggy pumpkin loaf or a cheesecake that collapsed on the first bite. The disappointment was real—until I discovered the secret to making mini pumpkin cheesecakes that feel like a velvety, spiced cloud on a crunchy ginger‑snap foundation. I swear, that first bite was a revelation: the pumpkin’s sweetness, the cream cheese’s silky richness, and the ginger snap crust’s caramelized crunch all dancing together, like a perfectly choreographed dance troupe. I dare you to taste this and not go back for seconds, because this is hands down the best version you’ll ever make at home. I’ll be honest, I ate half the batch before anyone else got a chance to try it, and I’m still laughing about how I nearly blew the kitchen on the first attempt. But that’s the beauty of this recipe: it’s forgiving, it’s fun, and it’s a guaranteed showstopper. If you’ve ever struggled with pumpkin cheesecake, you’re not alone— and I’ve got the fix. Picture yourself pulling these out of the oven, the whole kitchen smelling incredible, the tiny cakes glistening with a hint of caramel, and the anticipation building as you watch the edges set just right. Okay, ready for the game‑changer? Let me walk you through every single step — by the end, you’ll wonder how you ever made it any other way.
What Makes This Version Stand Out
- Texture: The ginger snap crust delivers a satisfying crunch that contrasts with the silky cheesecake filling, preventing the dreaded “cheesecake is a lump” moment.
- Flavor Balance: Ground ginger, cinnamon, cloves, and nutmeg work together to elevate pumpkin’s natural sweetness without overwhelming it.
- Mini Size: These bite‑sized treats are perfect for parties, potlucks, or a quick dessert that feels indulgent but manageable.
- Make‑Ahead Friendly: Assemble the crusts, bake, then chill; they stay fresh for up to five days, making them ideal for busy schedules.
- Ingredient Quality: Using a high‑quality cream cheese and fresh pumpkin puree gives depth that mass‑produced mixes can’t match.
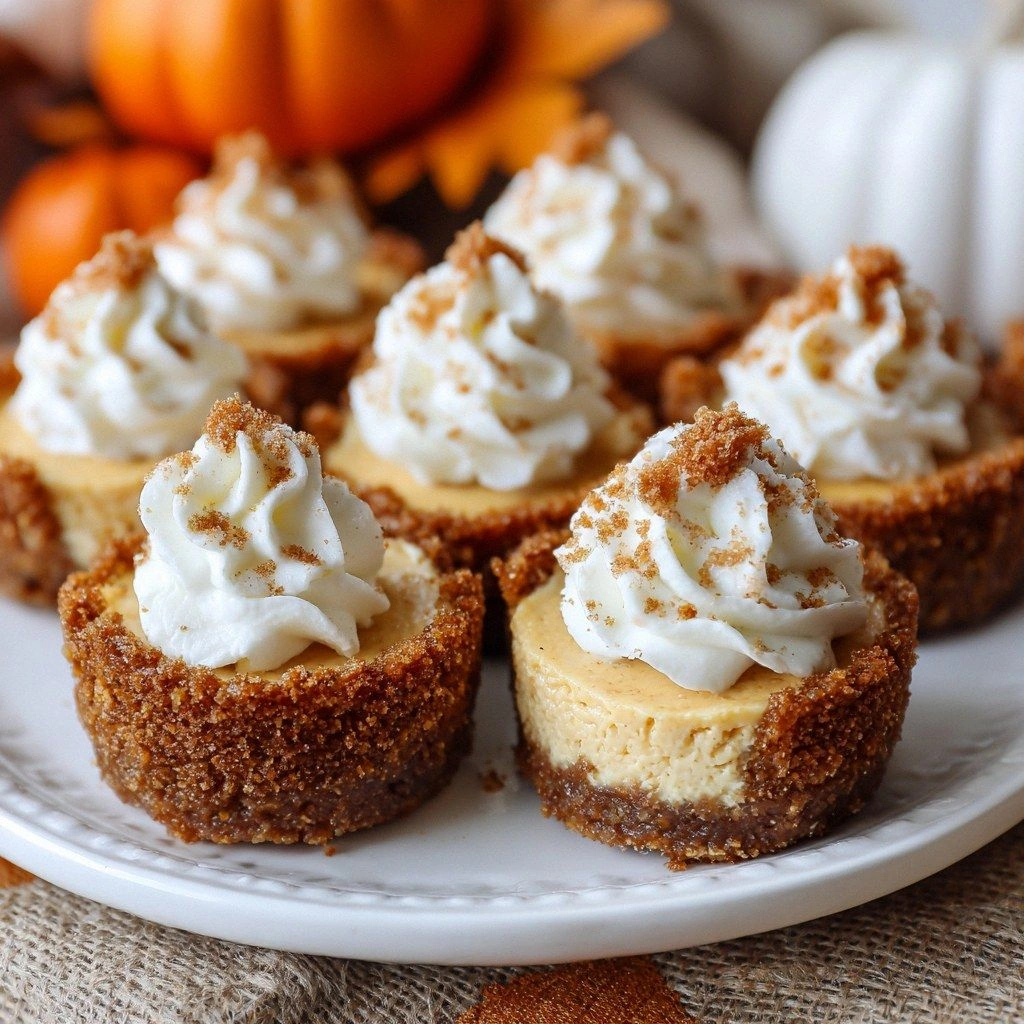
- Visual Appeal: The golden crust and creamy filling create a contrast that looks as good as it tastes.
- Easy Cleanup: The crusts bake in a muffin tin, and the filling doesn’t require a separate pan, reducing dishes.
- Versatility: Swap the crust for graham crackers or crumble for a different texture; add a splash of bourbon for an adult twist.
Alright, let's break down exactly what goes into this masterpiece. Each component is carefully chosen to create a harmonious bite that sings.
Inside the Ingredient List
The Flavor Base
Canned pumpkin puree is the heart of this recipe. It delivers that unmistakable fall flavor and provides a smooth, creamy texture. If you’re in a pinch, use fresh pumpkin puree, but you’ll need to cook it down to remove excess water. A small amount of lemon zest brightens the sweetness, adding a subtle citrus note that lifts the overall profile.
The Texture Crew
Cream cheese is the backbone of any cheesecake. For a lighter bite, choose a lower‑fat version, but keep the ratio the same to avoid a watery filling. The eggs act as a binder and help set the structure; using large eggs ensures a richer flavor. Brown sugar adds depth and a hint of molasses, complementing the pumpkin’s natural sugars.
The Unexpected Star
Ground ginger is the secret weapon. It provides warmth and a spicy kick that cuts through the sweetness. A pinch of cloves and nutmeg adds complexity, while a splash of vanilla ties everything together. If you’re a fan of a little heat, add a pinch of cayenne for a subtle surprise.
The Final Flourish
The crust is where the magic happens. Combining all-purpose flour with brown sugar, melted butter, and spices creates a caramelized base that crunches delightfully. A pinch of salt balances the sweetness, and the melted butter keeps the crumb tender. If you prefer a gluten‑free version, swap the flour for almond flour and add a tablespoon of xanthan gum to maintain structure.
Everything's prepped? Good. Let's get into the real action.
The Method — Step by Step
- Preheat your oven to 350°F (175°C). Line a 12‑cup muffin tin with paper liners. The temperature ensures a gentle bake that keeps the cheesecake from cracking.
- Make the crust: In a medium bowl, whisk together 1 cup flour, 1/2 cup brown sugar, 1 tsp ground ginger, 1 tsp cinnamon, 1/4 tsp cloves, 1/4 tsp nutmeg, and 1/4 tsp salt. Add 1/2 cup melted butter and stir until the mixture resembles coarse crumbs. If the mixture feels dry, add a tablespoon of cold water.
- Press into tins: Divide the crust evenly among the muffin cups, pressing firmly into the bottom and up the sides. The crust should be about 1/4 inch thick. Chill for 10 minutes to set.
- Whip the filling: In a large bowl, beat 8 oz softened cream cheese until smooth. Gradually add 1/2 cup sugar, mixing until creamy. Stir in 1 cup pumpkin puree, 2 eggs, 1 tsp vanilla, 1 tsp lemon zest, and 1/4 tsp salt. Beat until no lumps remain.
- Fill the crusts: Spoon the filling into the chilled crusts, filling each about 3/4 full. The filling should be level with the crust to avoid overflow during baking.
- Bake: Place the tin in the oven and bake for 18–20 minutes. The tops should set but still have a slight wobble in the center. The edges will begin to pull away from the paper liners.
- Cool: Remove the tin and let the cheesecakes cool on a rack for 10 minutes. Then, slide the paper liners off and transfer to a wire rack to cool completely.
- Chill: Cover the cooled cheesecakes with plastic wrap and refrigerate for at least 3 hours, preferably overnight. The chill allows the flavors to meld and the texture to firm up.
That's it — you did it. But hold on, I've got a few more tricks that'll take this to another level.
Insider Tricks for Flawless Results
The Temperature Rule Nobody Follows
Many people bake cheesecakes at a higher temperature, but that can cause cracks. Keep the oven at 350°F, and use an oven thermometer to ensure accuracy. If your oven runs hot, lower the temperature by 25°F to prevent the tops from over‑browning.
Why Your Nose Knows Best
Close your eyes and sniff the batter. If it smells like raw sugar, it needs more mixing. If it has a faint citrus scent, you’re on the right track. The aroma is a reliable indicator of doneness before you even touch the timer.
The 5-Minute Rest That Changes Everything
After baking, let the cheesecakes rest for exactly five minutes before removing the paper liners. This brief pause allows the filling to set and prevents them from sliding off the liners or cracking.
The Cream Cheese Trick
Soften cream cheese at room temperature for at least 30 minutes. If you rush, the batter will be lumpy and the final product will be uneven. I’ve seen people use the microwave, but that can cause hot spots; instead, let it sit on the counter.
The Chill‑and‑Serve Combo
Refrigerate the cheesecakes for at least three hours, but overnight is best. This gives the spices time to mellow and the filling to set. When you’re ready to serve, let them sit at room temperature for 10 minutes to soften slightly, making each bite a silky experience.
Creative Twists and Variations
This recipe is a playground. Here are some of my favorite ways to switch things up:
Nutty Crunch
Add chopped pecans or walnuts to the crust mixture. The nuts give a satisfying bite and complement the pumpkin’s sweetness.
Chocolate Drizzle
After chilling, drizzle melted dark chocolate over the tops. The bittersweet flavor contrasts with the sweet pumpkin filling.
Citrus Twist
Replace the lemon zest with orange zest and add a teaspoon of orange marmalade to the batter for a bright, zesty kick.
Boozy Bites
Stir in one tablespoon of bourbon or spiced rum into the batter. The alcohol evaporates during baking, leaving a subtle warmth.
Gluten‑Free Option
Swap the all‑purpose flour for almond flour and add a teaspoon of xanthan gum to maintain structure. The crust will be slightly denser but still delicious.
Storing and Bringing It Back to Life
Fridge Storage
Store the chilled cheesecakes in an airtight container for up to five days. Keep them in the refrigerator to preserve moisture and prevent mold.
Freezer Friendly
Wrap each cheesecake individually in plastic wrap, then place them in a freezer bag. Freeze for up to two months. When ready to eat, thaw in the refrigerator overnight.
Best Reheating Method
Reheat in the microwave for 10–15 seconds, then let sit for a minute. Add a splash of water before reheating to keep the cheesecake moist and prevent it from drying out.